Michigan Gardener

SIGN UP to stay in touch!
We will send you occasional e-mails with gardening tips and information!


Digital Editions

Click on the cover to read now!

  • Home
  • Departments
    • Ask MG
    • Books
    • Clippings
    • Garden Snapshots
    • MG in the News
    • Janet’s Journal
    • Plant Focus
    • Profile
    • Raising Roses
    • Thyme for Herbs
    • Tools and Techniques
    • Tree Tips
  • Garden Event Calendar
  • Resources
    • Alternatives to Impatiens
    • Garden Help
    • Soil and Mulch Calculator
    • Public Gardens
  • Web Extras
  • About
    • About Us
    • Editorial Content
    • Privacy Policy
    • Contact Us

PLEASE NOTE: In the autumn of 1995, we hatched the idea for a free, local gardening publication. The following spring, we published the first issue of Michigan Gardener magazine. Advertisers, readers, and distribution sites embraced our vision. Thus began an exciting journey of helping our local gardening community grow and prosper.
After 27 years, nearly 200 issues published, and millions of copies printed, we have decided it is time to end the publication of our Print Magazine and E-Newsletter.

Avoiding downy mildew in the vegetable garden

February 10, 2017   •   Leave a Comment

I believe my most recent cucumber crop fell victim to downy mildew. My zucchini ended up with what looked to be the same stuff and the vines turned to mush. I have sandy loam soil in 8 x 8 raised beds. In fall, the beds are amended with shredded leaves and in the winter they get all our coffee grounds. I also have oyster shells sprinkled here and there for the tomato plants. Is there anything else I can do this spring to improve or pre-treat my garden soil in hopes of preventing this problem?

Downy mildew spores do not winter over in Michigan. Each year the spores blow north from southern areas, accounting for the late season appearance of downy mildew. When any plant falls victim to downy mildew, it is generally a combination of excess moisture, humidity, and not enough air circulation. Although your sandy loam soil drains nicely, it may drain too well, which increases your need to water. Besides rotating the placement of your crops every year in your raised bed, your cucumbers would benefit from a pyramid or A-frame trellis. This would raise them above the soil surface, allowing air to circulate and giving you cleaner, straighter cukes. Secondly, avoid watering overhead. Invest in a drip line that targets each plant’s root zone instead of spraying the entire bed. The best solution to a downy mildew problem is to choose and grow only genetically resistant plant varieties.

If your mildew problem is powdery mildew, which does winter over in the soil, combine the cultural practices above with the use of an organic fungicide made from bicarbonate of soda and summer horticultural oil. Too much of either one can be very damaging, so use an organic commercial product that has a proper formulation and is labeled for the particular plant you are going to treat.

Zucchini and cucumbers are nutrient hogs. Your application of organic compost and amendments is on the right track so long as it is cultivated well into the soil. The use of finely pulverized oyster shells adds lime and will increase the alkalinity of the soil, which in Michigan is normally not recommended (shells not finely ground have no effect). Keeping the moisture even is also very important, which is why a drip line is so effective. However, the best way to check your soil for the vegetables you want to grow is to get a soil test. The MSU Extension Service has soil testing kits available.

Filed Under: Ask MG Tagged With: downy mildew, mildew, powdery mildew, soil test, vegetable garden

Plant amaryllis bulbs now for winter color after the holidays

December 20, 2016   •   Leave a Comment

Plan and plant ahead to give your home some winter cheer after the holidays—plant an amaryllis bulb. The bulb contains everything it needs to produce large, showy flowers that will brighten your winter days. All you need to do is plant the bulb using seven easy steps, water sparingly, then sit back and watch the growth. Click here to see the seven steps in a simple, one-minute video.

Filed Under: Clippings Tagged With: amaryllis, grow, simple

Japanese knotweed spreads throughout Michigan

October 6, 2016   •   Leave a Comment

Detroit Free Press:

A pretty, invasive plant that flowers in late summer and early fall is spreading throughout Michigan. And it’s so prolific and tough, it can grow through sidewalks, driveways and building foundations.

Japanese knotweed, native to East Asia, has become such a pervasive invader in Great Britain that those with it on their property can have trouble getting a mortgage or home insurance. It’s not to that point in Michigan — and concerned ecologists want to keep it that way.
The law prohibits bringing the plant into the state or moving it around within Michigan.

The shrub-like plant features a hollow, bamboo-like stem and broad leaves in a zigzag pattern up the shoot. It grows up to 10 feet in height. In Michigan, the plant blooms small, creamy white flowers in August and September. Its root network and rhizomes — a stem that grows horizontally under the ground — can grow up to 65 feet away from the weed, shooting up additional plants along its path.

Read the rest of the story…

Filed Under: Clippings Tagged With: invasive, Japanese knotweed, Michigan, spreading

Janet’s Journal – A Drought Diary

August 30, 2016   •   1 Comment

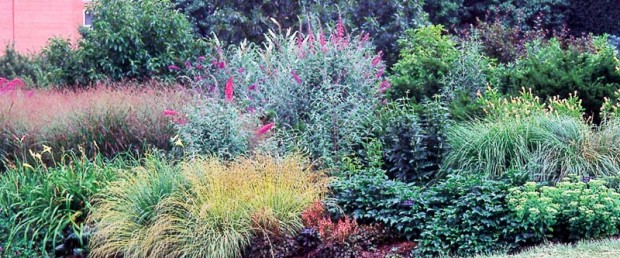
Some gardening seasons are better than others. Don’t look and learn only during the best years, but also when disasters such as drought strike. There’s a lot to be learned, such as the fact that butterfly bushes, sedum and grasses not only survive drought and heat that wipe out astilbe and daylilies, but also look good under those conditions.

Plants that armor themselves against future droughts

After one of the hottest, driest summers in recent memory, we realized that quite a few species were not crispy critters, but actually seemed to be reveling in the heat and drought.

So I began noting plants in my own garden and others that rely almost entirely on rain, and made the following list. It’s hardly exhaustive—it’s heavy on perennials since that’s my gardening specialty, but even that list could be longer—but it’ll be useful for designing dry, gravelly beds or hot places where the hose won’t reach.

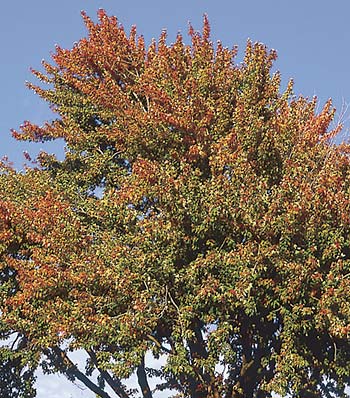
Hawthorns provide pleasant bloom in June, fruit for the birds, and respectable fall color. What a delight to know they also perform well in hot, dry places.

Don’t call it a list of drought-tolerant plants. Tolerance isn’t what you should settle for, because it’s not always pretty.

Joe Pye weed is a good example. They showed me their burned-back foliage, their drought defense mechanism. They simply hang on until late June, ugly though they may be with leaves so wilted you can pass your arm between stems without touching foliage, because then they can set buds for next spring. Even if they die back without flowering, those buds survive, insulated below the soil. It’s an effective survival technique, but hardly handsome.

So, some plants perfectly capable of outlasting a drought aren’t listed here. I sought and found plants that fare well in a drought and remain attractive too.

What makes these winners, when other plants shrivel or duck out in a hot, dry season? I’ve noticed a number of common characteristics that probably helped them survive. I’ll describe them so you can be on the lookout for other plants like them. Even without witnessing a plant’s performance under fire, you can probably bet on it if it has one or more of these attributes.

Plants with skinny foliage

The fewer and smaller its leaves, the less water a plant loses through transpiration on hot days. This was important this year, since some plants that might have weathered simple drought couldn’t handle the heat—they couldn’t take up water fast enough on the hottest days to replace what the leaves transpired.

Missing from the list are some plants with tiny leaves but a preference for dry air. Cosmos and annual bachelor button, for instance, are drought tolerant. Both are also susceptible to mildew when they’re under stress, as in a drought. Our high relative humidity insures that spores and chances of infection abound, so we see their lower leaves begin to brown and curl, victims of mildew.

Leaves held vertically

A leaf that stands upright escapes the full impact of midday sun. Bearded iris is a perfect example. It’s a plant that may never be as happy as when it’s planted in that hot, dry strip between driveway or sidewalk and brick house foundation. Yuccas and many ornamental grasses employ the same tactic.

Even large leaves can get by in a drought if vertically arranged. Prairie dock and its relative, compass plant, have huge leaves that stand straight up like canoe paddles stuck butt first into a sandy beach. Both plants impress me most in dry years, standing taller and producing sturdier flowering stems in a dry summer than wet (although prairie dock, a native of seasonally wet meadows, loves being wet at least through spring).

By comparison, and in explanation of some sad losses this year, pity the poor understory species often planted in the sun—flowering dogwoods, Japanese maples, redbuds, hydrangeas, etc. These plants’ leaves are held parallel to the ground, better to catch every photon of light that filters through the forest canopy. The only way for those leaves to protect themselves from full sun is to hang down—to wilt. In a wilted state they can’t photosynthesize, so the plant can starve in the process.

Leaves with a furry coat

The hair that makes a leaf look gray or silver also acts as insulation. Water released from “breathing holes”—the stomata—isn’t whisked away directly by the wind but remains trapped in the hairs as a high-humidity buffer zone.

Even a little bit of hair makes a difference—the downy foliage of a Tellima or the bristles on prairie dock and annual sunflower are examples. Excessive hair doesn’t seem to be the problem for plants that overdressing can be to people, however. Blue mist spirea and Russian sage, two of the best species for hot dry beds, have a coating not only on their leaves but the twigs too.

Leaves can fail to develop their rightful downiness if grown in cool, moist shade. Blue globe thistle and dusty miller are cases in point. They become almost green in the shade and apt to sag at the first taste of drought.

Waxy coatings on leaves

Here’s another means to slow water loss. Myrtle euphorbia’s (Euphorbia myrsinites) wax coating protects it even through winter’s freeze-drying, so I’m not surprised this plant looked blue, cool and comfortable all summer. And although giant crambes burned or were set back, their waxy blue cousin, sea crambe, never looked better than it did in this drought.

Tap roots

Plants that pull water from deep down can grow for weeks and even months after other plants have curled up and blown away. Tap roots are probes that can extend many feet into the subsoil.

Many plants have more than one defense mechanism. Waxy myrtle euphorbia has a tap root. Yucca and yucca-leaf sea holly (Eryngium yuccifolium) have vertically-arranged leaves as well as tap roots.

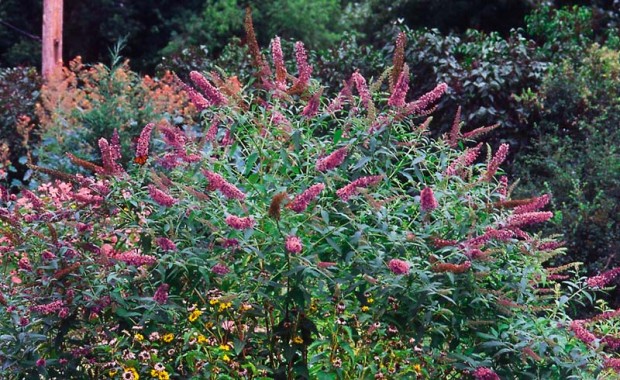
Butterfly bush may hang its leaves on the hottest dry days, but it comes through with flower even so. Now, if we could only help it stay ahead of the spider mites that also like hot, dry conditions!

Wide-reaching roots

Far-flung, stringy roots carry junipers, butterfly bushes and hawthorns through a drought. These plants aren’t limited to drawing water from only that relatively small area right outside their own driplines.

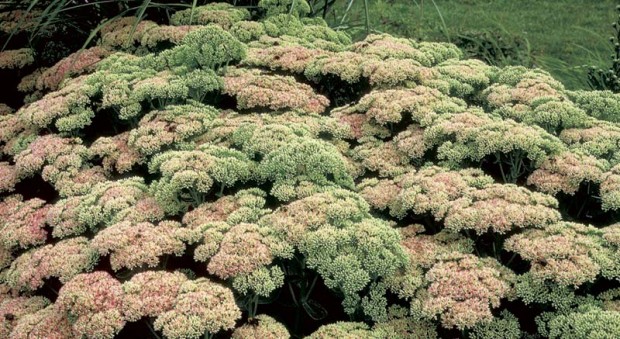
Sedum ‘Autumn Joy’ has become the plant I love to hate, because it’s too perfect. Is it fair that a plant with good foliage all summer, great color all fall, plus winter interest should also handle drought and heat without faltering?!

Succulent foliage

You probably know that cacti take up water during the brief desert rainy season and can retain and use it slowly, even over years. Michigan native prickly pear cactus and many sedums can also make use of water that was imbibed weeks before.

Bulbous plants and others with avoidance syndrome

Listen hard, and you can probably hear tulips, daffodils and foxtail lilies humming with delight right about now. These plants developed “grow fast, then hide” traits to deal with bone-dry summers. In fact, Michigan’s normally-moist summers may account for problems we have with these plants as perennials—namely, that they won’t come back. If the bulbs (tulip and daffodil) or roots (foxtail lily) remain cool and moist all summer, they don’t ripen. As a result, they may not set flowers or might not develop a proper protective tunic, which may mean they’ll rot during winter.

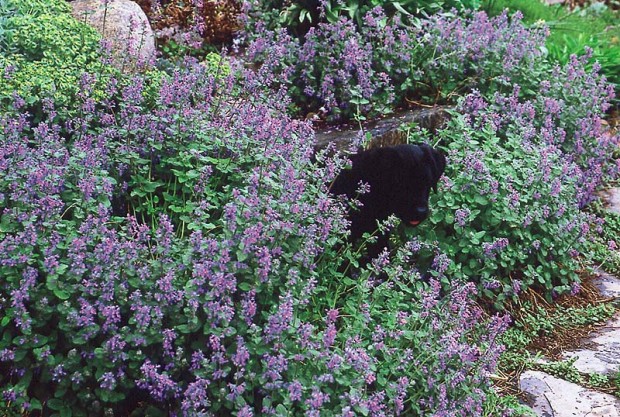
Catmint is happy here next to a stone patio in 95 degree heat, even without irrigation.

Beats me what gives them an edge

Then there are the plants who survive by some facility I can’t figure. Yet even though I can’t guess why ‘Gold Standard’ and ‘Sugar and Cream’ hostas keep going when other hostas are toasted or prostrated by the heat, I can’t deny my notes—they did stand tall. Tovara, Solomon’s seal and goatsbeard stump me as well, as does siebold viburnum—this last has hairy leaves and twigs, but so do other viburnums that scorched and drooped this summer!

Most of these enigmas are shade-loving plants, and as such are not likely to withstand drought and heat if moved out of their element. However, I’m convinced that shade alone did not save them. Many were survivors in shade gardens among dozens of other shade-loving species that wimped out.

One last thing. If you choose to grow a perennial or hardy woody plant from this list, don’t simply set it out in a dry bed and expect it to thrive. If it was produced in a nursery or an irrigated bed, even if it belongs to the most drought-tolerant species in the world, it will need time to reconfigure its root system from a dense, watered-every-day ball to something wide, deep or both. If it’s a species shielded by furry foliage or a thick, waxy coating, it may come to you less hairy or thinner-skinned than it should be. Once established, things are different, since the plant’s leaves will form in hotter, drier conditions. So provide water during dry spells for at least the first year if you want to see your drought-tolerant plants shine the next time rains fail.

Half the world may feel that yuccas are appropriately named, but even those detractors must admit they shine during a drought.

Drought-thriving plants

Annuals

  • Dusty miller (Senecio cineraria)
  • Gazania
  • Licorice plant (Helichrysum species
    and varieties)
  • Red fountain grass (Pennisetum setaceum ‘Rubrum’)
  • Sunflowers (Helianthus varieties)
  • Verbena bonariensis

Perennials

  • Allium (Allium species)
  • Amsonia (Amsonia tabernaemontana and A. hubrichtii)*
  • Baby’s breath (Gypsophila paniculata)
  • Barrenwort (Epimedium species)*
  • Bearded iris (Iris germanica hybrids)
  • Blue globe thistle (Echinops ritro)
  • Blue lyme grass (Elymus arenarius, Lymus arenarius). Beware: it’s not a clump-former but a runner extraordinaire.
  • Butterfly bush (Buddleia davidii and its hybrids)
  • Catmint (Nepeta mussinii and hybrids)
  • Compass plant (Silphium laciniatum)
  • Daffodil (Narcissus species and hybrids)
  • Dianthus ‘Bath’s Pink’ and other perennial carnations having D. gratianopolitanus in their genes.
  • Fountain grass (Pennisetum alopecuroides)
  • Foxtail lily (Eremurus himalaicus)
  • Goatsbeard (Aruncus dioicus)*
  • Goldenrod (Solidago species and hybrids). Note: it’s not an allergen and there are excellent clump-forming hybrids such as ‘Goldenmosa’ available.
  • Hosta ‘Gold Standard’*
  • Hosta ‘Sugar and Cream’*
  • Lavender mist meadow rue (Thalictrum rochebruneanum)*
  • Leatherwood fern (Dryopteris marginalis)*
  • Michigan lily (Lilium michiganense)*
  • Myrtle euphorbia (Euphorbia myrsinites)
  • Perennial ageratum (Eupatorium coelestinum)*
  • Prairie dock (Silphium terebinthinaceum)
  • Prickly pear cactus (Opuntia humifusa)
  • Rose mallow (Lavatera cachemiriana and Malva alcea)
  • Sea crambe, sea kale (Crambe maritima)
  • Showy stonecrop (Sedum spectabile and hybrids such as ‘Autumn Joy’)
  • Solomon’s seal (Polygonatum species)*
  • Starry false Solomon’s seal (Smilacina stellata)*
  • Tellima (Tellima grandiflora)*
  • Tovara (Tovara virginiana, Persicaria virginiana)*
  • Tulip (Tulipa species and hybrids)
  • Yucca (Yucca filamentosa)
  • Yucca-leaf sea holly (Eryngium yuccifolium)

Shrubs

  • Barberry (Berberis thunbergii)
  • Blue mist spirea (Caryopteris x clandonensis, gray-leaf forms)
  • Juniper (Juniperus species)
  • Siebold viburnum (V. sieboldii). Caution: fragrant in bloom, but not in a nice way.*

Trees

  • Hawthorn (Crataegus species)
  • Honeylocust (Gleditsia triacanthos)

* Should be grown in shade or half shade.


Article by Janet Macunovich and photos by Steven Nikkila, www.gardenatoz.com.

Filed Under: Janet’s Journal Tagged With: Butterfly bush, catmint, drought, hawthorne, Janet Macunovich, sedum, yucca

Vacant Detroit buildings breed indoor farms

August 16, 2016   •   Leave a Comment

The Detroit News:

Entrepreneurs are taking advantage of inexpensive former warehouses and factories in Detroit and transforming them for agricultural use to produce local foods.

There’s a growing movement of using vacant buildings and spaces to produce lettuce, basil and kale, and even experiment with fish farming — year-round.

And the city is considering regulations that could expand indoor agriculture even more.

“Fifteen, 20 years from now, we want people to say, ‘Of course they grow kale in that building,’ ” said Ron Reynolds, co-founder of Green Collar Foods Ltd. It built its first indoor-farming research hub in Eastern Market’s Shed 5 in 2015.

Read the rest of the article…

Filed Under: Clippings Tagged With: agriculture, buildings, detroit, indoor farms, vacant

The story behind the buzz of bumblebees

August 5, 2016   •   Leave a Comment


[Read more…]

Filed Under: Clippings Tagged With: bees, bumblebees, buzz, pollen

Michigan biological control facility produces wasps for battle against Emerald Ash Borer

July 21, 2016   •   Leave a Comment

Great Lake Echo:

Experts used to say the number of ash trees lost in Michigan was tens of millions.

Now they say hundreds of millions, according to Deb McCullough, a professor in Michigan State University’s entomology and forestry departments. Still, there’s hope for the ash’s survival.

“In a nutshell, what I found is that [ash] seems to be holding on quite well,” said Dan Kashian, who studies ash tree regeneration.

The mortality varies among species, but now the devastation has become an international epidemic, McCullough said. While some patches are worse than others, it’s hard to find a lot of live ash trees in Lower Michigan and much of the eastern and central Upper Peninsula.

The culprit is the emerald ash borer, Agrilus planipennis Fairmaire, an exotic Asian beetle discovered in southeastern Michigan near Detroit in the summer of 2002. Adult beetles are metallic green and about 1/2-inch long. They hitched rides on ship and plane cargo originating from Asia and movint to Detroit.

Read the rest of the article here…

Filed Under: Clippings Tagged With: Agrilus planipennis Fairmaire, ash, Ash Trees, Asian Beetle, EAB, Emerald Ash Borer, Michigan

Hostas have new growth with different leaves

July 18, 2016   •   Leave a Comment

I planted a variety of hostas 4 to 5 years ago. A couple have new side growth that is different from the parent plant. Would these plants be a cross from two different hostas or are they reverting back to the original plants that they were hybridized from?

Hostas are hardy, easy-to-grow, shade-tolerant perennials known primarily for their beautiful foliage. Their leaf color can be affected by the amount of sun the leaves receive: a variegated variety planted in full shade tends to turn to solid green during the summer and come back up variegated the next spring.

They can sometimes backmutate: new shoots revert back to one of the parents. Well over half the varieties were found as “sports” or mutations on existing cultivars. A sport occurs when a plant mutates into a different color leaf pattern. For example, a gold hosta may sport to a gold with a green edge, or any other number of color pattern changes. The reason that so many sports are found is that they are genetically fairly unstable. A new term has been coined for folks who intentionally indulge in this new and popular pastime of looking through nurseries for these mutations: “sport fishermen.”

Hostas can also be grown from seed. Just like people, their offspring will not look exactly like their parents, but they will share a few of the same characteristics. The leaf color of the seedling will be derived from the color in the center of the leaf of the parent plant (grandparents are included here also). Green varieties will usually produce green offspring, blue varieties will produce some blue, some green, and some gold offspring. Gold hostas will produce some of each also. Edged variegated hostas will not produce variegated offspring. Only cultivars that have white streaks (streaky) in the center of the leaf will produce variegated offspring. White-centered cultivars will produce all white hostas which usually die due to a lack of chlorophyll.

Related: Hostas: sun vs. shade

Roadtrip: Check out the Hosta Hillside at Hidden Lake Gardens

Filed Under: Ask MG Tagged With: backmutate, hosta, hostas, leaf, leaves

How to make your own soilless potting mix

July 11, 2016   •   1 Comment

What is a good formula for making soilless potting mix?

Years ago Cornell University published a simple and effective recipe for a soilless potting mix that works well for most plants. It is 1 bushel of peat moss, 1 bushel of perlite or vermiculite, 1/2 pound of dolomitic limestone, 1 pound of 5-10-5 fertilizer, and 1-1/2 ounces of 20 percent superphosphate fertilizer. Most commercial mixes now on the market began with this recipe and have since been amended to create a plethora of combinations suited to specific plants. There are special commercial combinations available for seed starting, houseplants, cactus, violets, orchids, and many many more for general container plantings.

You can create your own soilless potting mix using the basic recipe as a start, depending on your particular needs. For instance, using perlite allows for needed air pockets, along with quicker drainage and drying, but probably will require more frequent watering. Using vermiculite, on the other hand, creates air pockets, but holds moisture longer for those plants that do not like to dry so much between waterings.

Another option is to use composted woody fines or ground bark in place of some of the peat moss. The woody fines and bark absorb water more readily than peat moss. Coir (coconut husk) is also an excellent ingredient in place of or in addition to peat moss. Dry peat moss resists wetting and you will find that commercial mixes include a wetting agent to facilitate the wetting of the peat moss. You should always wet peat moss well before use, and if it ever dries completely be sure to water the container several times until you know the water is being absorbed and not just running off the top and down the insides of the container, as dry peat moss will shrink inward and pull away from the edges of the container, allowing too much runoff.

The addition of builder’s sand will create a mix that drains very quickly for cactus or succulents, and also add weight to the container if you have a tall plant that is prone to tipping over in a lightweight mix. In terms of fertilization, if you are less inclined to do it regularly, try substituting a slow-release fertilizer that will last for several months. If you are an erratic waterer, try adding some of the new crystals made of polymers that hold water and release it gradually. A way to help yourself decide what ingredients a particular mix should have might begin with reading the ingredient labels of the commercial products. You will get some good ideas for amendments that suit your special needs.

As you concoct your own version of soilless mix, keep a few things in mind. Your goal will be to have water move through the media quickly, leaving water absorbed by the media and at the same time leaving air pockets in the media to supply oxygen for the roots. The one big “don’t” is don’t use real soil from your yard or garden in the mix. It is heavy, doesn’t drain well in containers, and brings in pathogens and possible chemical residuals. You may also want to compare the cost of your chosen ingredients to the cost of commercial mixes. Making your own may or may not save money.

Filed Under: Ask MG Tagged With: soil, soilless potting mix

After the Fall: Late-Season Plant Staking

June 28, 2016   •   2 Comments

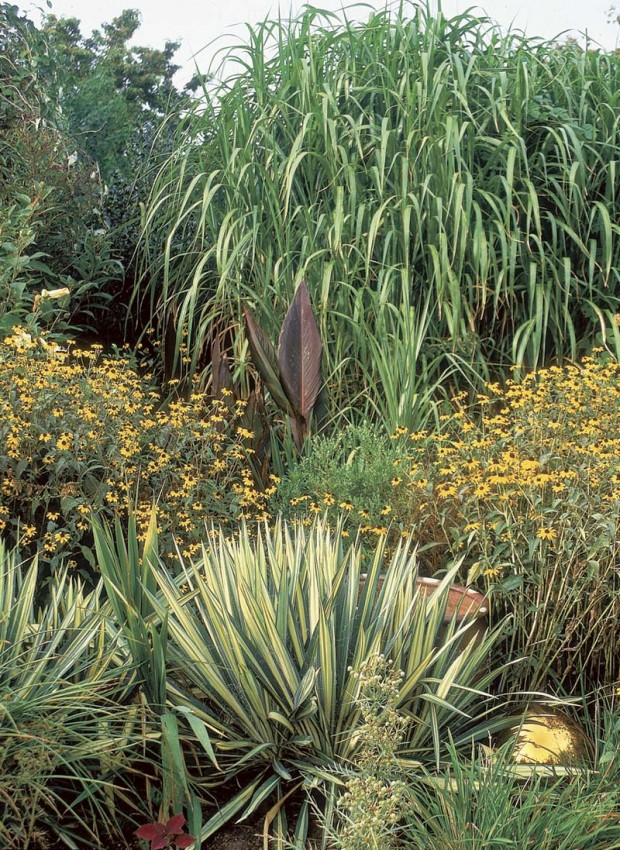
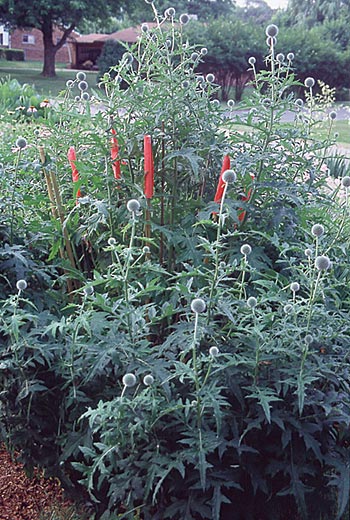
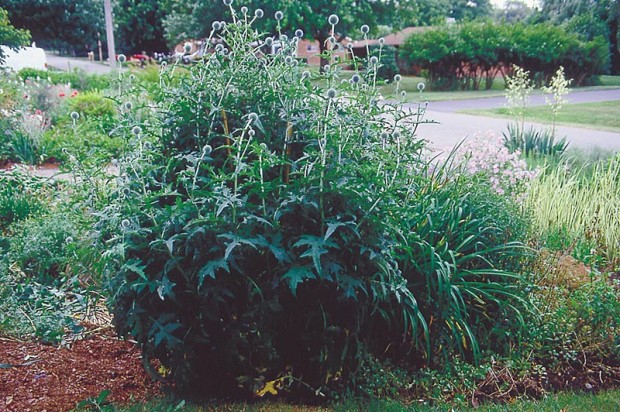
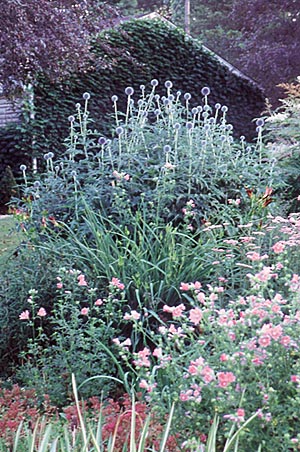
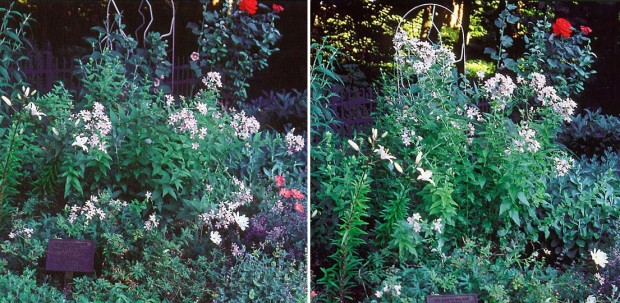
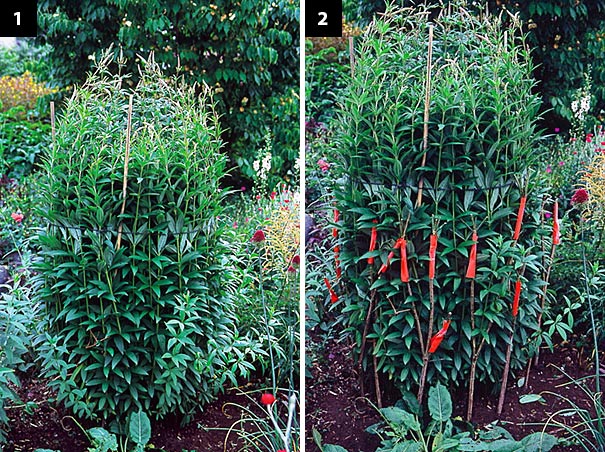
Many of the players in this scene owe their upright stance to the gardener who took a few minutes in May to position a grow-through support above the plant.

Save grace and flower with these restorative plant staking techniques

by Janet Macunovich / Photos by Steven Nikkila

This article is not about proper plant staking, that pre-meditated placing of supports. It’s about staking after a plant falls or when a plant flop is imminent.

Surely you’re familiar with the situation: it takes place in high summer. It involves a perennial whose progress you’ve been following with pleasure—by its fullness and vigor it has made it clear that this year’s bloom is going to be the best ever. The action begins as you step outside to look over your garden and find it, the promising star, leaning drunkenly against a neighboring plant or sprawled flat like a worn out puppy on a hot day.

The next time you find yourself playing this scene, resist the urge to grab all the stems, stuff them together in a string girdle and tether them to a stake. Few things look more ridiculous than bunched, crooked-tip stems with foliage turned inside-out, torn or flattened by the encasing cord. Not only are your efforts sure to produce a visual disaster, chances are you’ll crack stems or flower stalks in the process.

Before you take that route, try one of the following methods of restorative staking.

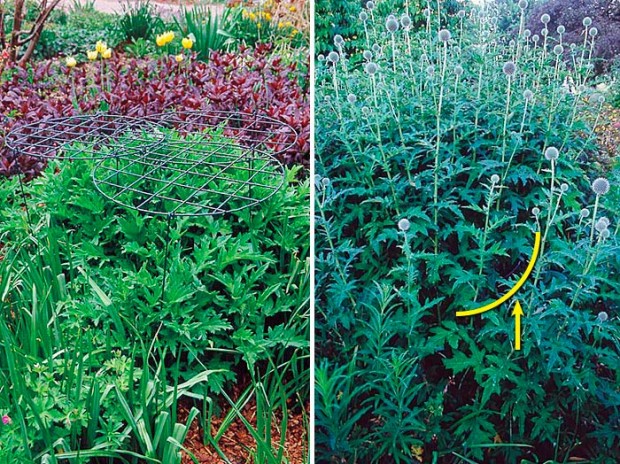
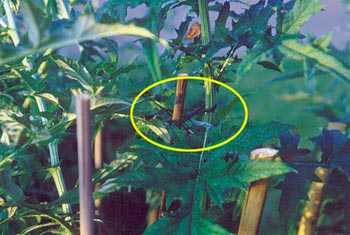
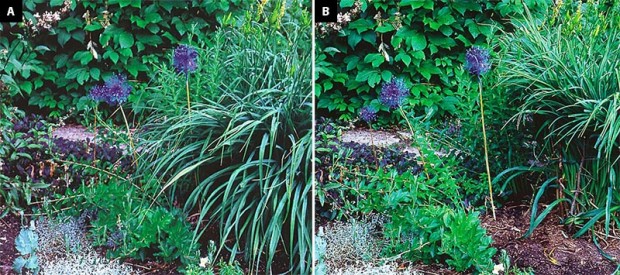
Left, a grow-through support is a simple, effective device—if it’s used in May. Right, the globe thistle (Echinops ritro) stands tall and straight in July. If you look closely you can see the edge of the support that was placed in May and keeps the plant in line.
Left: a grow-through support is a simple, effective device—if it’s used in May. Right: the globe thistle (Echinops ritro) stands tall and straight in July. If you look closely you can see the edge of the support that was placed in May and keeps the plant in line.

Stakes and crutches

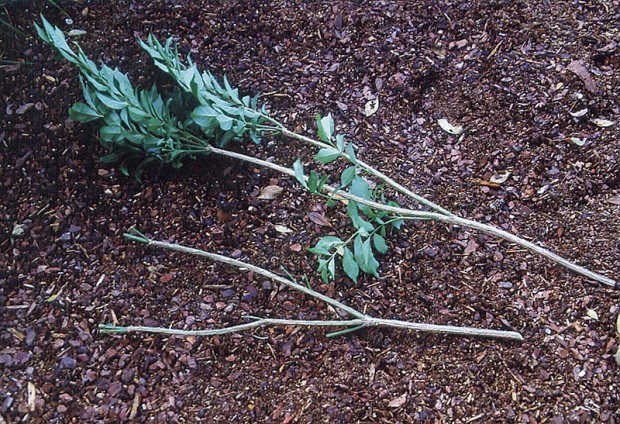
First, gather a dozen or more stakes that are just as tall as or a bit taller than the plant was before it fell. Round up a small hammer. Put your pruners in your pocket, along with a roll of string or wide, soft ties—I prefer to use green- or straw-colored hemp. Often you will need some crutches as well, so take out your loppers and prune a shrub or two to get a half dozen sticks that are at least half the height of the fallen plant and have forked tops.

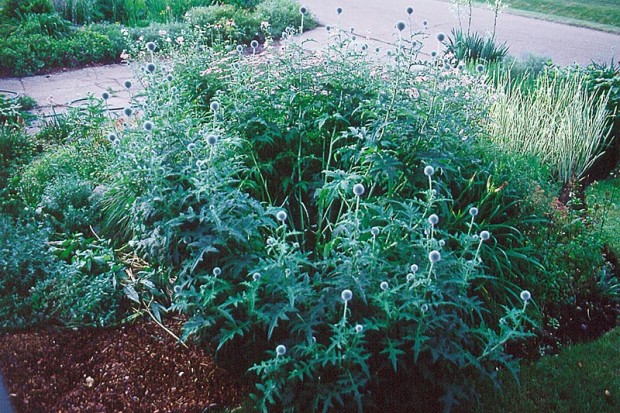
This globe thistle was not staked in May. By July 1, it’s leaning drastically, inches from a full fall.

Now, lift a stem of the fallen plant you’ll be staking. Raise it gently toward vertical to see how far back you can push it without cracking it. Lay the stem back down again.

Insert 4 or 5 bamboo canes, straight sticks or hooked-end metal rods in the center of the plant’s air space. Imagine a spot about six inches underground, directly below the center of the plant’s crown. Insert the stakes as if they would meet at that point below the plant. Angle them so they are not straight up and down, but lean outward slightly to match what your test lift said the stems can bear.

Insert 6 or 8 more stakes to make a ring around the first. Lean these stakes outward to match the angle of the inner ring. An important note: You must be happy with the stakes’ positions before you start to work with the stems. The stakes should cover space evenly and gracefully—I aim to make them look like the spray of a fountain. I have learned that if I am not pleased with the stakes alone, I will not be happy with the finished staking either.

Tap the stakes into the ground with a hammer. I’ve found that if I use my weight to force them in, it’s too likely that I’ll lose my balance at least once and end up stepping or falling into the plant’s prostrate stems.

Set the stakes just deep enough to be steady. They don’t have to be driven to China, because each one is only going to support one or perhaps two stems.

To position the stakes well, you may drive them right through the crown of the plant. Don’t worry too much about this. Most of the time, the stakes will go through without serious damage. Once in a while a stake will pierce an important root or stem base, in which case the stem will tell you by wilting the next day and you’ll just cut it out then.

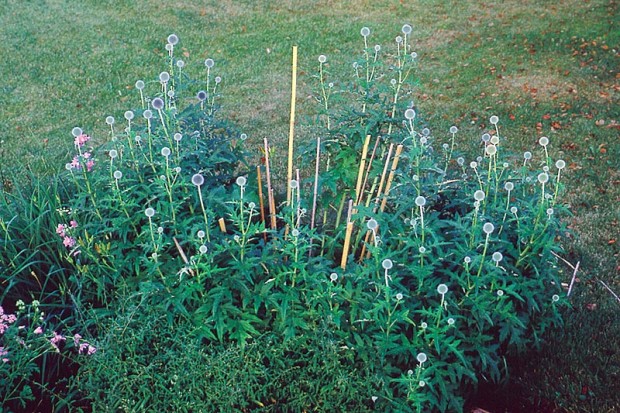
All of the fallen stems will be tied to or contained within the stakes you see here. You should be happy with the arrangement of the stakes before tying stems to them.

Next, take a look at the fallen stems. Picture the crown of the plant as a bull’s eye target and pick 4 or 5 stems that emanate from the bull’s eye at the center. Raise them gently, one by one, to meet in the middle of the inner ring of stakes. This often requires patience to separate the stems from the heap and guide them past the stakes without breaking them or tearing foliage.

Tie these central stems together, loosely. Let them lean against an inner-ring stake. This is only a temporary arrangement, so it doesn’t have to be pretty.

From stems still on the ground, select some that arise from the first ring around the bull’s eye. Tie one to each inner-ring stake.

Each of the inner-ring stakes has a stem tied to it now, and several stems stand free in the center. Here, for demonstration purposes, the inner ring of stakes has been temporarily marked with orange sleeves.

After the inner ring of stakes is full, release the string that holds the central stems together. Usually these will not fall but will rest against each other or the stakes. However, if it seems like they may slip through and fall to the ground again, take one turn of string around the inner stakes to corral the loose stems within.

Use a figure-eight tie to prevent crushing the stem and to allow it necessary swaying leeway in winds and storms. That is, cross the two ends of your tying string in between the stem and the stake.

Now raise a stem and tie it to each outer-ring stake. Clip out weak and flowerless stems.

Cut off the tip of any stake that shows above the plant.

You can obtain crutches by cutting branches from many common landscape plants, including burning bush, crabapple and spruce. All foliage is removed and soft twigs clipped off to turn this 36-inch piece of burning bush into a crutch.

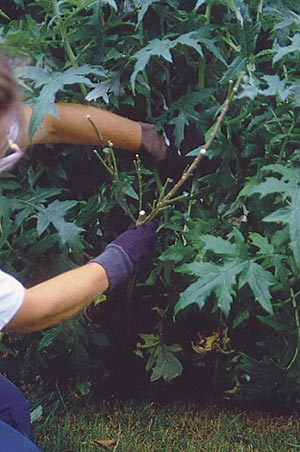
Use crutches to support the outermost stems of the fallen perennial. These outside stems are often least flexible and most crooked since they were the first to fall. Raise the outer stems one at a time, push a crutch into the ground to support it, then let the stem rest there. Sometimes one crutch has enough forks to support several stems. If so, drop stems one at a time into the crutch—don’t bunch them.

Raise the fallen stem. Push a crutch firmly into the ground so its fork is beneath the stem, then let the stem rest on the crutch.

Here’s the globe thistle, arrested from its fall and restored to nearly full glory.

If raised before its flowers are open, a stem’s tip will turn up to vertical again. Here’s the plant, proud and tall two days after being staked, its crooked tips already straightening.

Crutches alone

Sometimes when a plant is only beginning to fall or when it has very few stems, it can be returned to grace with just a few well-placed crutches.

Left, This milky bellflower Campanula lactiflora ‘Loddon Anna’ wouldn’t normally need staking but is growing away from the shade of big trees 25 feet to the west. Its stems are likely to descend further unless staked. Crutches are all that will be needed to bring the plant back up from its fall. Right, Each stem was lifted and a crutch pushed into the ground to hold it nearer to vertical. For crutches with multiple forks, additional stems were then lifted and guided into the crutch.
Left: This milky bellflower (Campanula lactiflora ‘Loddon Anna’) wouldn’t normally need staking, but it is growing away from the shade of big trees 25 feet to the west. Its stems are likely to descend further unless staked. Crutches are all that will be needed to bring the plant back up from its fall. Right: Each stem was lifted and a crutch pushed into the ground to hold it nearer to vertical. For crutches with multiple forks, additional stems were then lifted and guided into the crutch.

Lasso it, then crutch it

Throwing a lasso and cinching it around a plant is not attractive or even effective—the whole bale can still slump to one side or the other. However, I do sometimes cinch stems temporarily to pull a plant together while I set crutches.

Crutches are often simpler to place than late-season stakes and are much less visible than any kind of corral or police line you could construct around the outside of the plant with stakes and string.

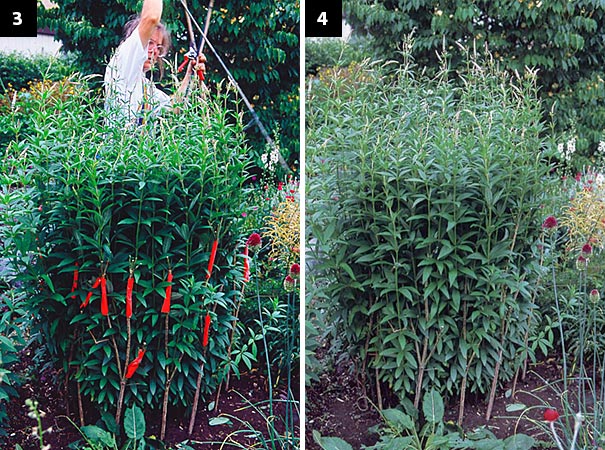
Left: This culver’s root (Veronicastrum virginicum) was beginning to topple. Although it looks ridiculous in its string girdle, it’s only a temporary measure – a way to make the plant “suck it in” while crutches are placed. Right: While it’s tied up I can set crutches around the base of the plant. They’re sleeved with orange so you can see them better.
Left: This culver’s root (Veronicastrum virginicum) was beginning to topple. Although it looks ridiculous in its string girdle, it’s only a temporary measure—a way to make the plant “suck it in” while crutches are placed. Right: While it’s tied up, I can set crutches around the base of the plant. They’re sleeved with orange so you can see them better.

Left: I’m releasing the plant from its string girdle now, and the stems are relaxing against the crutches. Right: Don’t you think using crutches allows the plant to retain its grace? Just compare it to the strung-up culver’s root in photo number 1.

Another reason to temporarily tie up a plant is to work on a fallen neighbor:

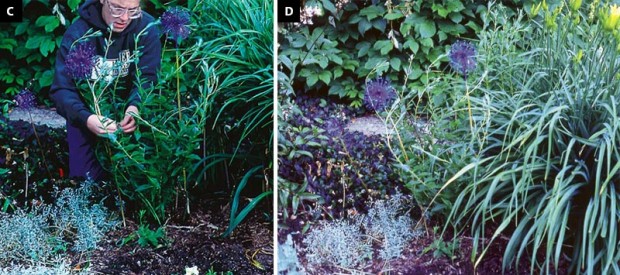
Left: This yellow daylily and blue balloon flower (Platycodon grandiflorus) make a great combination when they bloom together, but the daylily has overgrown its neighbor. The daylily can be divided in fall or spring to reduce its size. For now, I’ll stake the balloon flower. Right: It helps to tie the daylily out of the way while I work on the balloon flower.

Left: I’ve placed the stakes and am raising and tying the fallen balloon flower stems. An alternative would be to leave the fallen stems on the ground and use short stakes to keep the tips vertical. I decided against that option since I prefer to have the blue balloon flowers open at the same height as the daylilies. Right: Once the balloon flower was staked, I released the daylily from its bonds. I also clipped back some of the daylily’s leaves to make it less overwhelming.

Wrap-up: a time consuming thing

Staking after the fall takes considerably more time and skill than preventive staking. As an example, staking the blue globe thistle after its fall, including the time required to cut branches and make crutches, took about an hour. Placing the grow-through grid over the globe thistle pictured at the beginning of this article took less than five minutes in May. As my Dad always said, “If you do a thing right at the start, even if it seems like a lot of work, it will still save time in the long run.”

On the other hand, Mom must have told me a million times, “Don’t cry over it! Use your head and come up with a way to fix it.”

Out in the garden in July and August, I smile every time I stake after a fall. I’m not only salvaging a pretty plant, I’m proving my parents’ wisdom.

Article by Janet Macunovich and photos by Steven Nikkila, www.gardenatoz.com.

Filed Under: Janet’s Journal Tagged With: Janet Macunovich, Janet’s Journal, plant staking

  • « Previous Page
  • 1
  • …
  • 19
  • 20
  • 21
  • 22
  • 23
  • …
  • 43
  • Next Page »

Copyright 1996-2025 Michigan Gardener. All rights reserved.