Michigan Gardener

SIGN UP to stay in touch!
We will send you occasional e-mails with gardening tips and information!


Digital Editions

Click on the cover to read now!

  • Home
  • Departments
    • Ask MG
    • Books
    • Clippings
    • Garden Snapshots
    • MG in the News
    • Janet’s Journal
    • Plant Focus
    • Profile
    • Raising Roses
    • Thyme for Herbs
    • Tools and Techniques
    • Tree Tips
  • Garden Event Calendar
  • Resources
    • Alternatives to Impatiens
    • Garden Help
    • Soil and Mulch Calculator
    • Public Gardens
  • Web Extras
  • About
    • About Us
    • Editorial Content
    • Privacy Policy
    • Contact Us

PLEASE NOTE: In the autumn of 1995, we hatched the idea for a free, local gardening publication. The following spring, we published the first issue of Michigan Gardener magazine. Advertisers, readers, and distribution sites embraced our vision. Thus began an exciting journey of helping our local gardening community grow and prosper.
After 27 years, nearly 200 issues published, and millions of copies printed, we have decided it is time to end the publication of our Print Magazine and E-Newsletter.

Archive for the Tree Tips department

Phenology: Use nature’s calendar to improve your garden

March 8, 2024   •   Leave a Comment

Spring is coming! How can you tell? Don’t glance at the calendar—look at the plants around you. Since they useheat from the sun to become active, plants and bugs are better than the weather forecasters. They are like little solar panels that absorb heat. When they get enough, they begin to develop and change according to how much they have absorbed.

Scientists use a system that is based on days that the temperature reaches 50 and above to calculate this activity—they call it DD50 (Degree Day of 50 degrees). Most insects and plants need a temperature of at least 50 degrees to start to become active. The hotter it gets, the quicker they change. 50 is used as a base degree day, so for each degree above 50 the temperature rises, so does the DD50. For example, a 70-degree day would have a DD50 of 20.

Entomologists have charted insects according to how many cumulative DD50s it takes for them to become active and develop into different life stages (egg, nymph, larva, and adult). For instance, it takes the birch leaf miner adult an average DD50 of 180 to emerge and start laying eggs in the tissue of birch leaves, while the larva needs 262 DD50s to become active.

By using this information, we can better track and control undesirable insects by applying treatments when they are the most vulnerable—usually when they are in the nymph stage, just after egg hatch. Many insects become active between 100 and 200 DD50—that is usually the end of April to the beginning of May. But how do we tell when? Most of us are too busy to sit down and do the math, and every landscape is different. You might have several different DD50s in one yard, depending on microclimates and exposure to the sun.

Phenological indicators

The solution is simple. We use phenological indicators to tell us when a certain DD50 has been reached in an area. These are signals that nature gives us in the landscape. Since both plants and insects need a certain DD50 to become active, we can match them together to tell when an insect is active, based on which flowers are in bloom or when a plant leafs out. There are thousands of these indicators out there and they are pretty easy to learn once you know what to look for.

A common one is the lilac. When it blooms, the birch leaf miner is beginning to lay its eggs in the leaf tissue of birch. So when you see the lilac flowers, you need to check your birch for signs of infestation and treat if necessary.

There are many phenological indicator lists available from your county extension service and various gardening sources, or you can make your own. The next time you see a problem insect in your garden, look around and see what plant is coming into bloom or going through any other noticeable change—then make note of it. Next year, when you see the plant going through the same change, you will know that it is time to check for those same insects in your garden. These indicators are very accurate and do not change from year to year, only the date will vary,depending on the weather.

The tracking of phenological indicators is considered an accurate gauge to our changing climate. Scientists and volunteers all over the globe are recording them to help understand how our world is transforming due to climate change. In Europe, there is a huge network that tracks the first leaf, full leaf, and first bloom of many plants. In some areas they have data going back hundreds of years.

In the U.S., there is a group called The USA National Phenology Network that tracks a multitude of species (www.usanpn.org) and publishes the data every year.Volunteers can report to the site; the information you need is online. Scientists use this data to help predict changes in weather patterns and the effect they have on different plants and insects. This also impacts other animal environments, such as bird migrations and fish spawning.

These indicators are all linked together and can help explain why certain plants no longer grow in areas where they once flourished. It also explains why some springflowers reemerge in the fall—a late season cold snap sends the plant into dormancy and effectively “resets” its DD50. Then a warm fall accumulates enough DD50s to force the plant into growth.

By increasing our knowledge in this area, we begin to see the whole picture of our environment a little clearer. As a result, we can respond more effectively to the signs that nature gives us.

April and May are great months to try out your observation skills and find some good indicators in your own yard. Have fun!

Steve Turner, Certified Arborist, is from Arboricultural Services in Fenton, MI.

Filed Under: Tree Tips

Mulch volcanoes are harmful to trees—here’s why.

April 18, 2023   •   Leave a Comment

by Steve Turner

Mulching is one of the best things you can do for your plants if it is done right, but too much or improperly installed mulch can be a real problem.

The problem

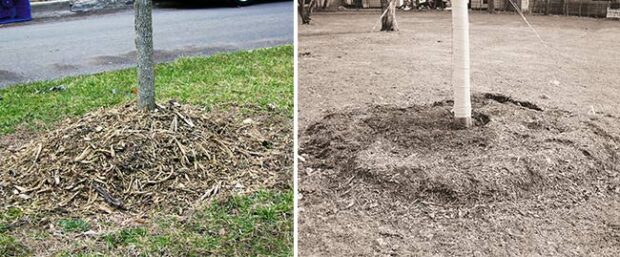
The common practice of mounding mulch against the trunk has proven to be a fatal one for many trees. These often seen “mulch volcanoes” are perfect circles 8 to 12 inches thick (or more) piled against the trunk. They are actually creating more problems than they are solving.

What compounds the problem is that many of these trees are on commercial properties under professional care, and this has helped create the false impression that this is the proper way to mulch trees. Homeowners see this and imitate the practice on their own trees. The neat, clean appearance it gives a landscape is appealing to many. Actually, I have had several customers over the years ask me if there is a mold they can buy to make these volcanoes on their own trees! So in our quest for a beautiful landscape, we are unknowingly sacrificing the long-term health of the trees.

LEFT: Mounding mulch against the trunk of a tree can create problems, including wounds, decay, and girdling roots. RIGHT: Mulch should be placed in a ring around the tree, with the center around the trunk empty, like a wide doughnut.

How does it harm trees?

The bark on the roots of a tree is much different than the bark on its trunk or branches. It is able to tolerate moisture as well as the lower oxygen levels in the soil. The aboveground portion of the tree, which starts at the root flares, has bark that contains tiny openings which are used to release gases and toxins from its system. On plants such as cherry trees or forsythias, these sites (called lenticels) are easily seen as tiny white dots or dashes on the bark. Because of this important function, trees can’t tolerate soil or mulch placed above its root flares. The lack of air and the presence of excess moisture prevents natural respiration from the bark and causes a build up of gases and toxins in the bark tissue.

The damage

If soil or mulch disrupts the respiration of the bark, the tree will usually respond in one of two ways. On thin-barked, young trees or species with naturally thin bark, like beech or linden, this disruption causes cankers (wounds) on the trunk. These appear as areas of dead tissue and provide an opportunity for decay to enter the tree. Other species will react by sending out additional roots from the trunk. These roots often end up circling around the trunk and become girdling roots in the future. Researchers are finding out that trees with girdling roots and excess soil and mulch build-up are much more prone to snapping off at the base in wind and ice storms. The longer the problem exists, the more damage occurs, and the chances of correcting it decrease.

Note that not all trees will respond in the same way—species, age, and health all need to be considered when trying to evaluate the effects of past damage. Most willow trees, for example, are very adaptable to a change of grade and often will show no problems at all.

Can the problem be fixed?

If caught soon enough, it can be corrected and tree will recover. However, upon root crown inspection, if it is found that large cankers have formed and decay is present, or if the tree has developed extensive girdling roots, it might be wiser to remove and replace the tree than attempt to save it. During the root crown inspection, arborists use a high pressure air device called an “air spade” to safely remove the excess soil and mulch without damaging the root system. Once the soil is removed, there is a clear view of the buried trunk and roots. Then the damage can be evaluated, and a decision made as to which roots to leave and which can be safely removed. It is very important not to remove too much too soon or the tree will be shocked. Sometimes the work will have to be done in stages over a couple years.

Proper mulching

While it is common to see 4 to 6 inches of mulch around a tree, this is usually too much. I would suggest 2 to 3 inches placed in a ring around the tree with the center around the trunk empty, like a doughnut. How wide to make the ring is up to you, but the bigger the better. Trees don’t like to compete with lawns for nutrients and water, and the more mulched area you can give them, the better off they will be. Mulched trees have fewer problems than trees growing in lawns. Even a small, 2- to 3-foot ring can make a big difference. The mulch creates a more natural growing environment with its organic material breaking down and supporting vital soil microbes. Other benefits include increased moisture retention and cooler soil temperatures, both of which favor optimal root growth.

If done properly, mulch is a great asset to your landscape and aids your trees during summer drought periods by maintaining soil moisture. It also helps insulate the roots during the winter months, which allows them to remain active longer through the seasons.

Steve Turner, Certified Arborist, is from Arboricultural Services (248-259-8420).

RELATED: Janet’s Journal – How to improve your clay soil

ELSEWHERE: Mulch overload!

Filed Under: Tree Tips Tagged With: mulch, mulch volcanoes, mulching, trees

How do you select the right tree care company?

June 20, 2022   •   1 Comment

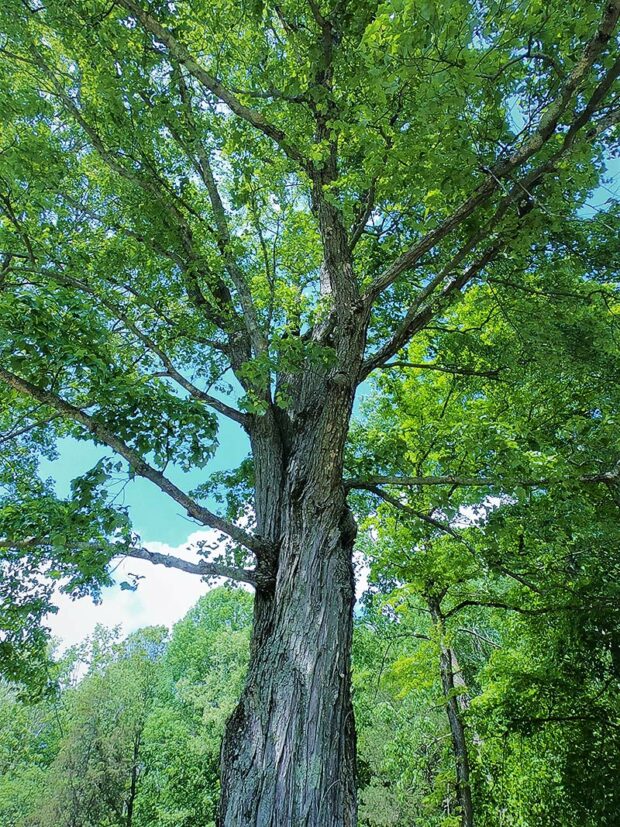
This mature oak tree provides plenty of shade.
This mature oak tree provides plenty of shade. (Photo: tsg pixels)

by Steve Turner

How do I select the right tree care company? Many times when I’m out on consultations, the homeowner will tell me they have had their trees sprayed, but the problem is still occurring. Or the trees were trimmed, but the crew apparently did not notice a particular pest or disease. How come? This is not always an easy question to answer, but most times it will be that the company just didn’t know or that the situation called for expertise beyond what they offer.

There are basically three types of tree care companies and knowing what their capabilities are should help you decide which type is right for you.

Type #1. The first is the lawn and tree care company that fertilizes your lawn and offers a basic program to spray your trees 3 or 4 times and fertilize them each year. This is a popular option with homeowners because it is fairly inexpensive and the homeowner is already familiar with the company. The drawbacks are that the sprays are done when the company is scheduled to be in your area and, as a result, may not always be timed to treat the specific problems that you might have. Insects have complex life cycles and the timings can vary year to year as to when the best time to treat them is. If you miss this “window,” many treatments will be ineffective and the problem will persist.

These types of companies are fine for covering the basic care in a cost-effective manner. For more serious problems or more advanced treatment, it is advisable to turn to the other two company types.

Type #2. The second type is the company that specializes in pruning and tree removal only. There are more of these than both of the other types combined. There is a wide range, from the weekend warrior with a chainsaw and a pickup truck, to the large company with a fleet of bucket trucks. Choosing between them can often be difficult, because it is not always easy to assess their skill levels until after the work is done. Getting references is important, especially if it is a more complex removal over a house or trimming a large, 100-year-old oak tree. You want the most skilled and knowledgeable tree care professionals to do these types of jobs because you only get one shot at getting it right and there is little room for error.

Asking a few simple questions and paying attention to how they write an estimate can help you determine their professionalism. First and most important is, are they insured? Second is, do they use spikes to climb trees that are to be only pruned and not removed? Unfortunately, protecting your trees from unnecessary damage is not always the top priority of some companies. These two questions can help forewarn you of potential problems.

Next is the written estimate they give you. How much detail do they put into the contract? Are they vague in describing what they intend to do or do they provide a clear description? Can they identify all the species of trees they will be working on or do they just write “large tree in front yard?” The more detailed the estimate is, the less likely you are to be disappointed with the results of the job. The quality of work performed by these types of companies can range from excellent to poor—make sure someone in the company has a good knowledge of proper tree care. There is a big difference in knowing how to climb a tree and knowing what to do once you’re up there. Overpruning is a common problem of some tree companies; every tree needs to be evaluated on an individual basis in regards to its species, health, and age to properly determine what needs to be removed and how much.

Type #3. The third type of company is the complete tree care service that offers a full range of tree care treatments, from fertilization to difficult removals. They will tend to have educated professionals on staff, highly skilled climbers and ground workers, and trained plant health care technicians to identify your problems and treat them. There are probably 20 to 30 of these types of companies in the metro Detroit area and many started out as one of the other types and grew into full service. These companies will tend to have affiliations with professional associations in our industry such as the ISA (International Society of Arboriculture) or the TCIA (Tree Care Industry Association). Look for these logos when hiring a tree company to help ensure quality work.

When writing estimates, they will tend to use ANSI standards to describe the work to be done. This is a national system of defining common tree pruning terms that all can understand and interpret the same way, in order to avoid misunderstandings and variances in services. Examples of these terms would be “crown clean” or “deadwood” to describe what will be removed from the tree. “Elevation” will specify to what height the tree will be raised, such as “10-foot elevation over house.” All these things help make it easier for the homeowner to understand what will be done, as well as receive competitive bids for the same level of work.

Most tree care companies bid by the time it will take to do the work and the amount of equipment needed to do it safely. Most will charge based on their hourly rate and the type of work, and then add on wood removal costs. Full-service companies tend to charge more for their services because their overhead is higher as well as their payroll to attract top professionals to their companies.

It is not advisable to automatically pick the lowest bid to do the work. Often, the lowest bid will also be the least experienced and knowledgeable company. Some might use spikes to climb your trees or take shortcuts that could damage your lawn or landscape. Just remember to keep in mind that you get what you pay for.

Steve Turner, Certified Arborist, is from Arboricultural Services in Fenton, MI.
RELATED: Why is it so expensive to remove trees?

RELATED: Identifying Trees of Michigan

Filed Under: Tree Tips Tagged With: company, how-to, select, tree care, trees

Using the heat index to monitor insect and plant activity in the landscape

March 31, 2020   •   Leave a Comment

by Steve Turner

Heat index is an important tool in determining insect and plant activity in the landscape. This is an effective way to determine when to begin looking for signs of problems or to take preventative measures.

The whole heat index system is based upon average degree days of 50 or above (called DD50), since most insect activity is triggered by temperatures of 50 degrees. 50 is used as a base, so for each degree above 50 the temperature rises, so does the DD50. For example, a 70 degree day would have a DD50 of 20. Entomologists have charted insects according to how many DD50s it takes for them to become active and develop into different life stages (egg, nymph, larva, and adult). For instance, it takes the birch leaf miner adult an average DD50 of 180 to emerge and start laying eggs in the tissue of birch leaves, while the larva needs 262 DD50s to become active.

You are now probably wondering how you are supposed to keep track of every degree above 50, add them all up, and use this information. The good news is you don’t have to—Mother Nature does it automatically. Just look at the plants around you and they will tell you when it’s time. Just like insects, plants are triggered by temperature to start and continue development as the season progresses. We use what are called phenological indicators to put the two together and read the signs that nature gives us. A good example would be lilacs: when the lilacs are blooming, we know that the birch leaf miner will be laying its eggs, so that’s when we need to start treating our birches to get the best control.

When we have erratic weather, you might as well throw your reference books out the window if they only specify dates. The plants in your landscape, however, are never wrong. They provide many excellent phenological indicators and also some that are just approximate. Many books and magazines will publish these indicators, so keep your eyes open for them. You can also discover and use your own. If you pay close attention to 1) when a problem is first noticed, and 2) what plant in your yard is coming into bloom or going through some other change at the same time as the problem, then often you can count on the two occurring at the same time next year. Make a note of it and when you see that same plant flowering next year, you will know to also check the other plant to see if the problem is indeed reoccurring. 

Here are some common indicators that can help you keep your pest problems under control:

  1. Eastern tent caterpillars egg hatch – red maple first bloom.
  2. Gypsy moth egg hatch – PJM rhododendron bloom.
  3. Elm, birch and box elder leaf miner – lilac bloom.
  4. Cooley spruce gall aphid egg hatch – viburnum lantana bloom.

Steve Turner, Certified Arborist, is from Arboricultural Services in Fenton, MI.
You might also like: When is the best time to prune trees and shrubs?

Learn more about: Using Degree Days to Time Treatments for Insect Pests

Filed Under: Tree Tips Tagged With: dd50, heat index, insect activity, plant activity

DNR advises caution to prevent spread of oak wilt disease

April 24, 2013   •   Leave a Comment

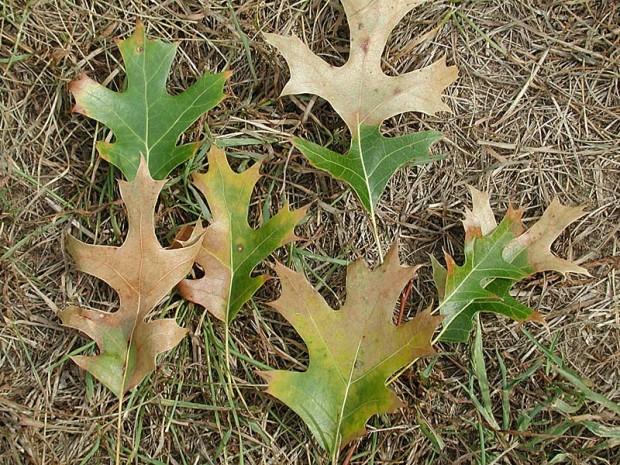
Oak wilt spreads from tree to tree through connected root systems. Untreated, the fungus spreads to adjacent red oak trees, often killing large groups of trees within a few years, eventually killing all nearby root-grafted oaks. These leaves are from an infected oak.

April 15 is the beginning of the yearly window when oak wilt can be transmitted from diseased to healthy red oak trees, the Department of Natural Resources announced.

According to Dr. Robert Heyd, forest pest management program manager for the DNR’s Forest Resources Division, oak wilt is a serious disease of oak trees—mainly red oaks, including northern red oak, black oak and pin oak. Red oaks often die within a few weeks after becoming infected. White oaks are more resistant, therefore the disease progresses more slowly.

“The normal time-tested advice is to prevent oak wilt by not pruning or otherwise “injuring” oaks from April 15 to July 15,” Heyd said. Heyd added that the spread of oak wilt occurs during this time of year as beetles move spores from fungal fruiting structures on the trees killed last year by oak wilt to wounds on healthy oaks. As warmer weather melts away snow and ice, the beetles that move oak wilt become active.

He said although oak wilt hasn’t been detected in every Michigan county, the need for vigilance is present statewide. “With the transport of firewood and other tree-related activities, you have to assume the risk is present, whether you live in metro Detroit or in the Upper Peninsula.”

Spring is a popular time for people to move firewood to vacation properties and other locations. During this April-to-July period, Heyd said it’s vital not to move wood from oak wilt-killed trees. These trees are often cut into firewood and moved, sometimes many miles from their original locations. Any wounding of oaks in this new area can result in new oak wilt infections as beetles move spores from the diseased firewood to fresh wounds on otherwise healthy trees.

The DNR recommends that anyone who suspects they have oak wilt-tainted firewood should cover it with a plastic tarp all the way to the ground, leaving no openings. This keeps the beetles away and generates heat inside the tarp, helping to destroy the fungus. Once the bark loosens on the firewood, the disease can no longer be spread.

New oak wilt sites have been traced to spring and early summer wounding from tree-climbing spikes, rights-of-way pruning, nailing signs on trees and accidental tree-barking. If an oak is wounded during this critical time, the DNR advises residents to cover the wound immediately with either a tree-wound paint or a latex paint to help keep the beetles away.

Once an oak is infected, the fungus moves to neighboring red oaks through root grafts. Oaks within approximately 100 feet of each other—depending on the size of the trees—have connected or grafted root systems. Left untreated, oak wilt will continue to move from tree to tree, progressively killing more red oaks over an increasingly larger area. These untreated pockets also serve as a source of inoculum for the overland spread of the disease.

To get more information on the background, symptoms and prevention of oak wilt, as well as other forest health issues, visit www.michigan.gov/foresthealth and take a look at the DNR’s 2012 Forest Health Highlights Report.

Filed Under: Clippings, Tree Tips Tagged With: disease, oak wilt, trees

How to properly handle construction projects near established trees

September 28, 2011   •   

Post-construction damage to mature trees is common, whether it is from a new home, new addition, or smaller projects like patios, driveways and even irrigation systems. They all can impact the health of mature trees by disturbing or damaging their root systems, as a result of digging and compacting the soil around them.

The important thing to remember with mature trees is that rarely will the signs of damage show up immediately after it has happened, unless it is very severe. It can take years to surface, and when it does, people don’t often associate it with the real cause. I have seen old oaks that have been holding on for fifteen or twenty years after the damage was done.

The reason for this is that large trees have tremendous ability to store food for tough times such as drought or early frost damage to new leaves. When this occurs the tree will turn to its reserves for the food it needs. If a tree’s root system is damaged, the tree must turn to those same reserves to survive until it can repair and replace the damaged roots to get nutrient and water uptake back to normal. If growing conditions are good and environmental pressures are low, it should recover without many problems, depending on how severe the original damage was. If the tree was in bad shape to begin with or has too many environmental pressures like drought, insects or disease, the odds of long-term survival decrease after construction.

The species of tree also plays an important role in determining a plan of action to ensure success during and after construction. Some trees, like oaks, elms and locust are quite tolerant of disruption, but other trees such as beech and cherry can be very sensitive to even moderate change.

Too often an arborist is called in after construction to try and “fix the trees” after the damage was done, and the process of trying to get an accurate account of activity around the tree begins. What was the original grade level of the soil? Where were trenches dug for utilities? What time of year did this take place? Where were heavy pieces of equipment, bricks and other building supplies placed? And the list goes on.

Once all the information is collected and sorted out, a determination can be made as to the tree’s chances for long-term survival or if the owner will just be delaying the inevitable. If the only option is to temporarily extend the life of the tree, the owner needs to determine for how long and if the money spent to do so is worth the end results. Out of desperation, many homeowners will unfortunately spend more money after the damage has been done “to save the tree” than they would have if they contacted someone in advance qualified to help plan out the construction project before it started. Many homeowners have had greater success in preserving trees through the inclusion of incentives in the building contract for the protection of their trees. Educating and informing all of the building employees on the site and enforcement of the agreed upon rules will go a long way to help ensure tree survival.

You need to determine how to keep disruption to the root zone to a minimum. The 3 most important factors are soil compaction, trenching, and grade changes.

If you need to trench near a tree for a foundation, a minimum of 4 to 5 feet is required from the base of the tree and if it is possible, bridging the foundation with an I-beam near the tree is an option. When trenching for utilities, try to have all of them placed in the same area as far away from the base of the trees as possible. If you can’t avoid the placement near the trunk then boring under the root zone is an option that will greatly decrease the damage to the roots. This is important even during the installation of irrigation systems.

Grade changes are common but can be minimized to avoid burying the roots or scraping them away when removing soil. Removing soil is much more damaging than adding it. Most of a tree’s root system is found in the first 12 inches of soil, with the majority of the feeder roots in the top 6 inches. These are the roots that absorb water and nutrients. The myth that trees have these massive root systems that go down as deep as the tree is tall is false. They do have anchor roots and tap roots that can go relatively deep, but by far the majority of the roots are near the surface. Removing as little as 6 inches of soil over a large area of the root system can cause a lot of damage. Adding soil can be just as bad, but it tends to be less of a shock because the change takes longer to impact the tree. If more than 12 inches of soil must be placed over the root system, a tree well and ventilation system should be installed at the existing grade before adding soil. The deeper the soil, the more ventilation will be needed. Many people install the wells, but neglect the ventilation system that will buy time and aid in the development of new roots in the new soil. By allowing air and water to get down to the original grade and gases to get out, you give the tree a big advantage for long-term survival. To minimize stress, try to keep added soil to a depth of less than 6 inches if possible.

Soil compaction is still the most common construction problem around trees in our area. Our heavy clay soil can easily be compressed (especially when wet) so that most of the air pockets are eliminated. When it hardens, it is like cement, making root growth and water absorption next to impossible. It takes a long time for the soil to recover and a lot of trees will run out of reserves before the soil improves. There are some things that can be done to lessen the compaction after construction, but preventing it in the beginning is the key to keeping your plants healthy. Keep heavy equipment and supplies away from root zones and make the areas of activity around the site large enough to get the job done, but keep disruption to a minimum. Examples of this would be establishing a zone to store supplies, setting a path for equipment and trucks to enter and leave the property, placing fencing around root zones, and mulching the root zones heavily. If a root zone cannot be avoided, then using old tires, plywood and a foot or two of mulch to minimize the compacting in that area is a great solution.

The time of the year can be important also – winter is the ideal time for construction to proceed around sensitive plants, while spring and early summer are the worst times.

Some quick do’s and don’ts to remember: Do repair all damaged roots by making clean cuts that will heal quicker than jagged, torn roots. Don’t allow the cement out of trucks and equipment to be rinsed on site near the root zones of trees – cement is very alkaline and when leached into the soil, can cause pH shock in many plants. Don’t allow trucks to be parked under the trees. Do consult a certified tree care professional prior to construction. Don’t fertilize construction-damaged trees the first year.

There are many variables to these recommendations and there are always exceptions to the rules, such as time of year, health, species, and the size of the tree affected. For example, smaller trees adapt easier than large trees, and this becomes crucial in deciding which trees to try to preserve and which to remove before construction.

Hopefully, I have made you more aware of the limitations trees have when it comes to construction around them and, in turn, helped save a few trees from demise. Just because they are alive when the construction is finished does not mean they will stay that way in the long haul. Be wise and plan ahead!

Filed Under: Tree Tips

Soil Basics 101: From pH to microbes, learn about the lifeblood for your plants

September 22, 2011   •   

by Steve Turner

All of us who deal with plants – big or small, annual or perennial, flowers or foliage – have one thing in common. Working with the soil in which they grow. It is often the most overlooked aspect of the garden for new gardeners and the most cherished aspect for seasoned gardeners, who have grown to appreciate the value of good soil. It quite simply is the difference between success and failure for many gardens and can be the difference between the pleasure of gardening and the tediousness of work.

Many of you are familiar with terms like soil structure, pH, humus, etc. But what do these terms really mean and how do they effect our efforts to improve or maintain our soil’s fertility?

Let’s start by looking at pH. Most people understand it as whether the soil is acidic (less than 7.0), alkaline (more than 7.0), or neutral (7.0), and that different plants prefer different ranges, but why? In different pH’s, nutrients move at different rates through the soil. The more acidic the soil, the faster the rate. If a plant is acid-loving and is in alkaline soil, it will not get nutrients at a fast enough rate. Fertilizer in this situation would have no effect because it is not a matter of whether the nutrients are present, it is the rate at which they are available to the plant.

Now, if you need to raise or lower the soil pH for a particular plant, you will need to understand cations and how they affect your ability to change the soil. Cations are positive-charged nutrients in the soil. The most common, in order, are calcium, magnesium, potash, sodium and hydrogen. Calcium is the most important nutrient in your soil and its proper balance to all others is vital since it helps regulate the soil’s pH. Here is why. All nutrients either have a positive or negative charge, and in nature the normal flow of electrical charge is from positive to negative. All clay and humus particles carry a negative charge on their surface which attracts desirable and/or undesirable positive-charged nutrients or minerals to them. If in proper balance to calcium, the clay and humus will keep these nutrients loosely held in a soil solution, which means the nutrients are readily available to the plants’ negative-charged root tips. The measurement of this exchange is called the Cation Exchange Capacity or CEC of the soil, and is measured on most soil tests.

CEC is important in determining how easy it will or won’t be to change your soil pH. A high CEC will make it difficult to change. In a poor soil, for example, as soon as you obtain the proper pH, you then increase the CEC by adding organic matter or humus to the soil. This will increase the amount of negative-charged particles in the soil and help “lock in place” the pH by making it more difficult to change. So, if you are preparing a new soil area, your first concern is the pH. It is critical that you make all adjustments to the pH prior to adding organic matter.

While organic matter raises the CEC, salts in the soil are the enemy to proper CEC. All commercial or synthetic fertilizers contain salt; this is how they bind the nutrients together. Every time you add one of these to your soil, you are adding salt, which in turn lowers the CEC. They lower it by using up all the negative-charged particles in the soil and, as a result, the positive-charged nutrients just leach away. This increases the need for more frequent fertilizing, which in turn adds more salts to the soil, and thus begins a vicious circle that many gardeners fall into. This is why the use of organic fertilizers is beneficial. While it is true that plants cannot tell an organic nutrient from a synthetic one, the soil can. The additives in synthetic fertilizers cause problems for the soil as a whole and a lowered CEC is just one of them.

If you have a poor CEC and lots of salts in the soil, then odds are you have compaction also, which limits root growth and the flow of water and air through the soil. This decreases the activity of beneficial soil microbes and increases the activity of pathogens in the soil, which in turn causes diseases and so the vicious circle continues. 

Humus is one of the keys to breaking this cycle. Humus (or “finished compost”) is organic matter that has been broken down by soil microbes as much as possible. These microbes in turn produce ideal nutrient storage for our plants. Humus can hold 3 to 4 times more water and nutrients than clay alone. It helps store water in the soil for drought periods as well as nutrients that plants can readily absorb as they need them. This holding capacity will help reduce the leaching of nutrients out of the soil and lessen the need for additional fertilizers.

Humus also helps reduce soil erosion. For example, an acre of soil with only 1 percent humus can only hold less than 1/2 inch of water; any more rain than that will simply erode the soil. However, if the humus content is increased to 6 percent, that acre will easily hold over two inches of rain in the same soil. For those of you having drainage problems, this is something to consider.

Soil microbes are the keys to producing humus – if they are not present in sufficient numbers, then all organic matter in the soils stays in its original form or takes much longer to break down into humus. It takes many different types of microbes to accomplish this and they do so in a very systematic fashion. To get an idea of how many organisms there are in the soil, at a depth of 1 to 3 inches in good garden soil, there will be on average 9,750,000 types of bacteria, 2,080,000 types of Actinomycetes (organisms classified between bacteria and fungi), 119,000 fungi, and 25,000 algae in a single gram of soil (Microbiology: An Introduction, 4th edition). These numbers drop rapidly as you go deeper in the soil, but remain pretty high until about 18 inches in depth.

If you live in a newer subdivision, most of the beneficial microbes left with the topsoil that was probably scraped off the land before construction started, and the remaining ones were severely reduced by the soil compaction that followed during construction. This is a problem for many gardeners and up until recent times most of the research was focused on nutrients and soil structure alone. In the last 10 to 20 years, the focus has shifted to the beneficial organisms that make up a living soil.

By getting back to soil basics, we can be much more successful in our gardening pursuits by increasing our soil’s fertility. To correct problems we need to focus on the soil as a whole and stop looking for that one “miracle solution” that will supposedly give us healthier plants. The soil is a vastly complex environment. It can be, and often is, damaged in many ways that need different solutions to help correct each of the individual problems. The terms we discussed should help put you on the right track. Start by doing a soil test to determine your soil’s pH and CEC. Then adjust the pH as necessary, add humus to raise the CEC, reduce or eliminate the use of synthetic fertilizers, and fine tune from there. Good luck!

Steve Turner, Certified Arborist, is from Arboricultural Services in Fenton, MI.
Filed Under: Tree Tips

Step-by-step guide to planting trees and shrubs

September 16, 2011   •   

by Steve Turner

Spring and fall are both great seasons for planting trees and shrubs. I know you have all read the pamphlets and have probably done it a few times, but it never hurts for a little review. If I had a dollar for all the improperly planted trees I have seen over the years, I would be rich!

First, dig the hole as deep as the root ball and at least twice as wide. Be sure to not dig too deep; a good way to prevent this is to measure the root ball against the shovel handle and check it often when digging. If you do dig too deep, remember to pack the soil firmly under the ball to prevent settling once the plant is in place. This is more important for trees than shrubs. On the other hand, if the hole is not deep enough, keep digging. Don’t make the mistake of planting high and then mounding soil up the root ball, even in clay soils. One exception is a compacted clay subsoil, which can be found in new subdivisions. If you can’t dig deep enough, then add a lot of topsoil around the top of the root ball to make a gradual decline down to the grade level.

After the tree is in the hole, cut and remove as much of the wire cage (if present) as possible. Any part that you can’t remove should be cut and bent down. Untie the twine around the trunk and pull down the burlap. If the burlap is in good condition, push it to the bottom or cut it out. If it is old and roots are growing through, then leave it and make several vertical slices instead. If you are planting potted shrubs, carefully remove them from their pots and make several vertical slices down the root ball. Grab the bottom of the roots and pull them back up like peeling a banana and set them in the hole with the cut sections pointing out. Next, begin to backfill using the same soil that came out of the hole, making sure to break up any large chunks of soil. Stop and firm the soil as you go. Stop about 6 inches from the top and add fertilizer to the remaining fill, preferably either slow release or organic fertilizer that is low in nitrogen. Complete backfilling to grade level.

When planting trees or large shrubs, do not mix soil amendments such as sand, peat, or topsoil to the fill. These work better as top dressings. They actually create a false environment within the planting hole and do not encourage outward growth of the roots. Instead, the roots tend to wind around in the hole, which can eventually lead to girdling roots. Also, drainage can be a problem with dissimilar soils. Water will not move from one soil type to another until the first is completely saturated. This is why it is important to check the soil of the root ball before you buy the plant. Ideally, you should not plant trees grown in sand in clay soils and vice versa. It will only cause problems in the future. Now that the plant is in the ground, water well and keep the soil moist for several weeks, but do not overwater. Before watering, move aside the mulch and feel the soil to verify it isn’t too wet before adding more water. Keep the mulch away from the base of the plant and do not add too much mulch — 3 to 4 inches is fine.

Filed Under: Tree Tips

When is the best time to prune trees and shrubs?

May 28, 2011   •   

by Steve Turner

I am often asked when is the best time and what should be pruned. The ideal time is when the tree is dormant, which is late fall to early spring. Since the tree is not active, the removal of limbs will be less stressful to the plant. It is also easier to see the structure of the tree without its leaves to better find problem areas like rubbing branches, weak crotches, cracked or broken limbs and competing leader branches. The tree will have more time to seal the wounds before the growing season starts and there will be less sap running from the wounds. Also, insect and disease organisms are not active at this time, so it reduces the risk of infection or pest infestation, which is why birches and American elms should only be pruned in the winter. The worst time to prune trees is late spring and early summer when their leaves are expanding and the tree is putting its energy toward growth.

A common myth is that large, mature trees can tolerate more pruning than small trees. In fact, the opposite is true. Only the outside inch or two of a tree is alive; the rest is made up of dead cells whose main function is to support the tree. That’s why a tree can be hollow but still be perfectly healthy. If you compare the percentage of live cells to dead cells between a small tree and mature tree, the difference is huge. A young tree might be made up of 90 to 100 percent live cells, while an old, mature tree might only have 10 percent or less. As you can imagine, the younger tree has a better chance to adjust to change.

A good rule for mature trees is that less is better. Try to avoid removing large limbs over 6 inches in diameter because it will be difficult for the tree to close the wound before decay sets in. Other options are cabling or thinning these large limbs as opposed to removing them. Good maintenance items for mature trees are removing deadwood and hazard limbs and thinning for weight reduction when necessary.

Young trees up to 8 to 12 inches in diameter need to be pruned properly for structure while they are still young to avoid the need to remove large limbs in the future. When pruning trees, keep in mind that the leaves produce the energy for the plant and that removing too much leaf surface from a tree or limb will starve the plant, causing die back or heavy sucker growth from that part of the tree.

“Topping” trees destroys them. They will never grow back to their natural shape and every branch that grows out of that wound area will be an accident waiting to happen. As the new limbs grow bigger and the rot in the wound increases, the branch will eventually break. A topped tree soon becomes a maintenance headache, with constant storm damage due to the weak branch attachment. If a tree is too large for its location, consider having it removed and replanted with a smaller species rather than topping it.

It is important to know what a tree’s natural shape will be when it matures before you prune it. For example, I see many weeping cherries that are pruned into a ball shape because all of the upright limbs were removed as they grew out of the top. If allowed to continue growing, these limbs would have eventually bent back down, creating the weeping effect that gives the tree its unique look. So it pays to do a little homework and find out what the tree’s natural shape is and help it reach its full potential. Not all ornamental trees need to be pruned into the traditional lollipop shape!

When it comes to shrubs, prune flowering shrubs soon after they are done blooming. Non-flowering shrubs and evergreens can be pruned as necessary to achieve a desired shape. Keep in mind that wider at the bottom is better than narrow — if you allow more sun to reach the bottom of the shrub, the plant won’t thin out as much. Avoid heavy, late summer pruning; too much pruning at this time will encourage new growth that may not harden off in time for winter. For those plants that don’t tolerate shearing well, like red or green twig dogwoods, it is best to prune them back to the ground when they become too large or sparse, and let them start over again by growing new limbs from the base.

Steve Turner, Certified Arborist, is from Arboricultural Services in Fenton, MI.

Filed Under: Tree Tips Tagged With: prune, pruning, shrubs, trees

Organic solutions for the lawn and garden

March 10, 2010   •   Leave a Comment

by Steve Turner

There seems to be a growing trend toward using organic products versus manmade, synthetic products in the garden industry. Today, many consumers are more educated and aware of the benefits of more natural solutions to common garden problems, rather than to rely on the quick fix of a synthetic product. Chemical companies are responding by offering more eco-friendly products than ever before. When you walk into a garden center you will find a host of newer products to help control insects and diseases right next to the old standbys. Some synthetic pesticides are being phased out due to increased government regulations and others are not available to homeowners anymore.

So how do you know what to buy for your problem and does it really work? And is an organic product really safer? First of all, there seems to be a misconception that all organic products are safe. While in most cases this is true, keep in mind that the definition of “organic” denotes a compound that contains a carbon molecule. Arsenic and lead meet this definition and yet are very toxic to humans. You still need to read the product labels, use the products as directed, and follow the safety procedures—organic or not.

Toxicity is measured in how many parts per million of a substance it takes to be toxic to humans. Table salt can be toxic to humans if enough is digested at once. A product that has a low toxicity means that it will take a lot more exposure to that product to have negative effects than one with a higher toxicity level. Most organic products will do what they are labeled for if applied properly. Some might need to be applied more frequently than synthetics because they break down quicker. Others will out-perform synthetics because of their ability to be absorbed by the plant and to have a longer residual effect.

Common organic products and their uses

Garlic oil – Garlic works by repelling insects, not killing them. It is mixed with water and sprayed on plants, and is absorbed into the leaf tissue where it can remain effective for up to 30 days. It works well at repelling mosquitoes, bees, flies, ants, spider mites, and other flying insects. Do not use on plants that need bees to pollinate them, i.e. vegetable gardens.

Neem oil – Derived from the neem tree, neem oil has many medicinal purposes and is well-known for its natural resistance to insects. It works by repelling insects, prohibiting eggs from hatching, and interfering with insects’ molting process. It works against a wide variety of chewing and sucking insects. It also has anti-fungal and anti-bacterial properties that can fight disease. Effective on blackspot for roses and white flies.

Chile extract/Mustard oil – Kills on contact and repels nematodes, fungi, insects and slugs. Works well on grubs and harmful nematodes.

Pyrethrins – This extract is from the chrysanthemum plant and is used in many products. It works by killing insects on contact. It has a low toxicity to humans and animals, and controls a large variety of insects. A common ingredient in flea collars.

Diatomaceous earth – Ground up seashells. Harmless to humans, works because its abrasive form breaks down an insect’s outer defense and then causes desiccation due to its highly absorbing qualities that dry up an insect’s bodily fluids. Ants, cockroaches, plant bugs, aphids, caterpillars and many more.

Beneficial nematodes – Work by attacking grubs and other insect larvae in the ground. They are a parasitic organism that can survive for many years in the soil without a food source. They work very well against grubs and black vine weevils.

Fish oil – Works by suffocation, just like horticultural oils. The advantage is that it is not petroleum-based and it contains many beneficial nutrients and vitamins that break down to fertilize the plant.

Petroleum-eating microbes – Great for accidental gas or oil spills on property. These microbes actually eat petroleum products and convert them to harmless carbon molecules.

Citric acid/Mint oil – Anti-fungal and anti-bacterial. Can be used against a wide variety of pathogens including Phytophthora.

Grapefruit seed extracts – Anti-fungal and anti-bacterial. Can be used against a wide variety of pathogens. Works as a barrier preventing diseases from getting started on plant foliage.

Hydrogen peroxide – Kills fungus on contact, literally melts the spores into jelly, then breaks down in the soil and releases oxygen. Works well on powdery mildew. A disadvantage is that it is very corrosive to metal.

Pepper sprays – Can kill some soft-bodied insects like aphids and is used to repel others. Also used to deter rodents and deer from gardens. Can be an extreme irritant to skin and eyes.

Milky Spore – A fungus that attacks grubs. Works well and has a long residual in the soil. Works so well that the company almost went bankrupt due to the lack of need for repeat sales in the 1950’s.

Mycorrhizae – A soilborne fungus that colonizes the roots of plants and prevents many soil pathogens from attacking the plant they are growing on. Works well against fusarium blight on lawns and many others. Great for preventing disease in seedling production.

Steve Turner, Certified Arborist, is from Arboricultural Services in Fenton, MI.

Filed Under: Tree Tips

  • 1
  • 2
  • Next Page »

Copyright 1996-2025 Michigan Gardener. All rights reserved.