Michigan Gardener

SIGN UP to stay in touch!
We will send you occasional e-mails with gardening tips and information!


Digital Editions

Click on the cover to read now!

  • Home
  • Departments
    • Ask MG
    • Books
    • Clippings
    • Garden Snapshots
    • MG in the News
    • Janet’s Journal
    • Plant Focus
    • Profile
    • Raising Roses
    • Thyme for Herbs
    • Tools and Techniques
    • Tree Tips
  • Garden Event Calendar
  • Resources
    • Alternatives to Impatiens
    • Garden Help
    • Soil and Mulch Calculator
    • Public Gardens
  • Web Extras
  • About
    • About Us
    • Editorial Content
    • Privacy Policy
    • Contact Us

PLEASE NOTE: In the autumn of 1995, we hatched the idea for a free, local gardening publication. The following spring, we published the first issue of Michigan Gardener magazine. Advertisers, readers, and distribution sites embraced our vision. Thus began an exciting journey of helping our local gardening community grow and prosper.
After 27 years, nearly 200 issues published, and millions of copies printed, we have decided it is time to end the publication of our Print Magazine and E-Newsletter.

Archive for the fall tag

What caused holly berries to not appear in the fall?

February 18, 2023   •   Leave a Comment

Holly berries
Although the holly plant is basically a male plant, their flowers and subsequent pollen are necessary for the fertilization of the flowers on the female berry-producing plants.

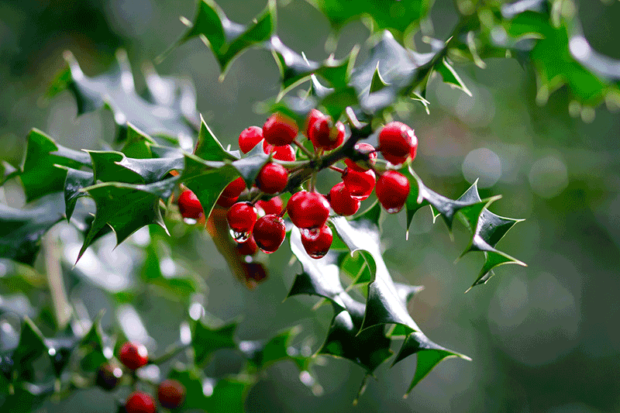
For years, our holly bushes have been lush with fall holly berries, but not last fall. I think they got their fair share of water during the summer heat wave. Any thoughts?

Think back to April 2012 and what happened with the late frost and freezing temperatures at the end of the month. Many of our beloved spring-flowering trees were heavily damaged at a critical time in fruit formation. The holly bushes were no exception. Even though the buds form in the fall of the previous year, April would have been the time these tiny flowers in the leaf base on male plants would have been opening. Many flowering shrubs and trees suffered great damage last spring due to the sudden cold temperatures. Michigan’s cherry and apple industries were significantly impacted by the cold snap.

Although the holly plant is basically a male plant, their flowers and subsequent pollen are necessary for the fertilization of the flowers on the female berry-producing plants. If they aren’t there, the female flowers are not pollinated and there is no berry. Maintaining a consistent watering routine early in the summer as well as during drought periods will also prevent premature berry drop. Covering plants when a freeze is posssible can substantially decrease the loss of flowers and future berry production.

Related: What are some suggestions for deer-resistant plants?

Elsewhere: Winterberry: Michigan’s native holly

Filed Under: Ask MG Tagged With: berries, fall, holly

Joe Pye weed adds a stately presence to the fall garden

September 7, 2022   •   Leave a Comment

With its large pink flowerheads, Joe Pye weed brings bold color to the fall landscape.
With its large pink flowerheads, Joe Pye weed brings bold color to the fall landscape. (Eric Hofley / Michigan Gardener)

As the hot days of summer succumb to the cool, crisp season that is fall, many gardeners choose to take advantage of this great weather for outdoor projects. Of course mums and black-eyed Susans will dominate many landscapes each September, but the huge palette of late performers is sorely overlooked and certainly deserves closer examination. Although there are many fall-blooming plants available, most remain very underused. Far fewer gardeners visit garden centers in the fall, and those that do often just look at the mums, pansies, and spring-blooming bulbs.

Great varieties of asters, anemones, pink turtleheads, toad lilies, sedum, and ornamental grasses are loaded with colorful flowers or beautifully textured foliage. Joe Pye weed (Eupatorium maculatum, syn. Eutrochium maculatum) adds large, stately flowers, a robust growth habit, and durability to your fall plant choices.

Joe Pye weed is native to North America, but is more commonly used in the finest gardens of Europe. In more dry and less fertile conditions, plants may only grow to 4 or 5 feet, but moist, fertile soil will produce plants up to 8 feet tall. Its pinkish purple flowers are produced in clusters that form larger clusters reaching up to 18 inches across. Large green leaves are attached to rich burgundy stems, resulting in a striking contrast of colors on each stalk.

How to grow

Plants prefer full or partial sun, where the stems grow strong and rarely require staking. If extensive soil preparation isn’t your cup of tea, Joe Pye weed may be the plant for you. It thrives in the moist, heavy soil conditions that are typical in mostly clay Michigan gardens. It is long-lived and extremely durable. In fact, a specimen in our display garden was once mistaken for a weed and almost completely removed. It grew back the following year and was covered with the large flowers that butterflies and bees find irresistible. Joe Pye weed spreads slowly but may eventually overstep its boundaries. This can be controlled in spring by dividing the whole clump or simply removing outside sections of the plant’s crown.

'Gateway' is a more compact cultivar of Joe Pye weed, reaching 5 to 6 feet tall.
‘Gateway’ is a more compact cultivar of Joe Pye weed, reaching 5 to 6 feet tall. (Jonathon Hofley / Michigan Gardener)

Companion plants

Joe Pye weed’s massive size makes it perfect to use in the back of a border. Combine it with other large, late bloomers that have contrasting colors, flower forms, and foliage. Try the blue, pink, or purple flowers of asters, especially the taller varieties like ‘Alma Potschke,’ ‘Patricia Ballard,’ and ‘Sailor Boy.’ The huge flowers of hardy hibiscus are available in reds, pinks, or white. Some rudbeckia varieties can also provide equally large plants and brightly contrasting yellow or gold flowers. For a great foliage contrast, try the silver leaves and lavender-blue flowers of Russian sage (Perovskia atriplicifolia). Position the massive architectural foliage of plume poppy (Macleaya cordata) next to Joe Pye weed for a great combination of flowers and foliage. Don’t forget ornamental grasses—some of the larger types like switchgrass, feather reed grass, or maiden grass would provide contrasting foliage and winter interest.

In your front yard, where tidy and multi-seasonal plants are desired, Joe Pye weed may have a place. Its large size and controllable vigor work well in combination with common shrubs. Its flowers fill the need for a sizable fall-blooming plant where only rose of Sharon, summersweet (Clethra), butterfly bush, and blue mist shrub (Caryopteris) are common. Other tidy and multi-seasonal perennials for the front yard include upright sedum, daylilies, hostas, ornamental grasses, and of course, groundcovers.

‘Chocolate’ snakeroot has eye-catching, dark bronzy-purple leaves. (Eric Hofley / Michigan Gardener)

Additional species

For a sturdier, more compact Joe Pye weed, the variety of choice is ‘Gateway,’ topping out at 5 to 6 feet in height. Plus, there are a few other species that are worth mentioning:

The coastal plain Joe Pye weed (Eutrochium dubium) has given us two slightly smaller introductions: ‘Little Joe’ and ‘Baby Joe’, both reaching 4-1/2 to 5 feet tall.

Hardy ageratum (Eupatorium coelestinum, syn. Conoclinium coelestinum) has blue, ageratum-like flowers on 2- to 3-foot tall plants that tend to spread.

Chocolate snakeroot (Eupatorium rugosum ‘Chocolate’, syn. Ageratina altissima ‘Chocolate’) has insignificant white flowers, but dark bronzy-purple leaves on 3- to 4-foot tall plants. ‘Chocolate’ will tolerate some shade. This foliage is incredible when contrasted with other gold, red, silver, or even green leaves.

‘Pink Frost’ (Eupatorium fortunei ‘Pink Frost’) boasts variegated leaves with white edges and pink flowers that pop when contrasted with the foliage.

These varieties, like Joe Pye weed, will tolerate moist, heavy soil, and prefer full or partial sun. 

'Pink Frost' has variegated leaves with white edges and pink flowers that pop when contrasted with the foliage.
‘Pink Frost’ has variegated leaves with white edges and pink flowers that pop when contrasted with the foliage. (Eric Hofley / Michigan Gardener)

As fall approaches, remember that the gardening season is far from over. Gardening becomes even more enjoyable and plants tolerate being moved more easily when temperatures are cooler. Take a moment to evaluate your landscape and see where late season interest is needed. Perhaps try Joe Pye weed to add color, height, texture, and architectural interest to your fall garden.

George Papadelis is the owner of Telly’s Greenhouse in Troy and Shelby Township, MI.

Joe Pye weed

Botanical name: Eupatorium maculatum (u-puh-TOR-ee-um mack-u-LAY-tum); syn. Eutrochium maculatum (u-TRO-kee-um)
Plant type: Perennial
Plant size: 4-8 feet tall; 2-4 feet wide
Habit: Upright
Hardiness: Zone 3 or 4
Flower color: Pinkish purple
Flower size: 6- to 18-inch wide clusters
Bloom period: Late summer and fall
Leaf color: Green, with burgundy stems
Leaf size: 8-12 inches long; lance-shaped
Light: Full to partial sun
Soil: Well-drained, moist soil. Drier, less fertile soil will restrict growth.
Uses: Back of the border, architectural plant
Companion plants: Perennials: upright sedums, ornamental grasses, rudbeckia, Russian sage, plume poppy, tall asters. Shrubs: rose of Sharon, summersweet, butterfly bush, blue mist shrub.
Remarks: Tolerates heavy, clay soil. Size can be controlled with late spring pruning. Long-lived and durable. ‘Gateway’ is more compact in habit.

ELSEWHERE: More photos of Joe Pye Weed (Eutrochium maculatum)

Filed Under: Plant Focus Tagged With: fall, fall flowering perennial, Joe Pye weed, perennials, plant focus

Plant Focus: Crocus

September 1, 2020   •   Leave a Comment

‘Pickwick’ (Photo: Dutch Gardens)

For a gardener, there are few sights as welcome as the first crocus of the year, peeking its flowers through the freshly melted snow of late winter. Crocus is a very hardy perennial and one of the few plants that can bloom as early as February or March. By being hidden deep in the soil, crocus corms are naturally insulated from severe temperature changes, ice and wind. Flowering is initiated by just a few consecutive days of temperatures above freezing. Once the first few inches of soil can thaw, flowers emerge and will last for several weeks despite more wintry weather. Crocus flowers can protect themselves by closing up in the evening and also whenever they experience severe weather.

‘Yellow Mammoth’ (Photo: Dutch Gardens)

Crocus have long been popular with gardeners for several reasons. Their durable flowers are available in many colors including yellow, white, purple, blue, and pink. One plant will usually return year after year and develop offspring that can produce additional flowers in beautiful drifts. The two-inch flowers are made up of 6 oval petals that surround 3 prominent yellow to orange stamens. Crocus grow from one-inch corms rather than actual “bulbs.” Both are just compressed stems: bulbs consisting of fleshy scales and corms being more solid. Gladiolus is another example of a corm.

‘Whitewell Purple’ (Photo: John Scheepers, Inc.)

Crocus are native to the rocky slopes of the Mediterranean countries and southwest Asia. They adapt to cold winters, full or partial sun, and well-drained soil. Most Michigan gardeners have the first two, but well-drained soil may have to be created if clay is prevalent. Drainage can be improved by adding aged pine bark or compost to your soil. Since crocus corms are planted 3 to 4 inches deep, only about 4 inches of soil below them needs to be well-cultivated. Corms should be at least 3 inches apart. However, this is the type of bulb that looks great planted in more natural and random masses.

‘Romance’ (Photo: Van Bourgondien)

Most crocus have only one serious threat to their perennial existence. Hungry bunnies seem especially tempted by the leaves, flowers and corms of several species. Corms can be protected by several methods. Gravel worked into the soil above the corms will make digging them up difficult. Liquid or powder deterrents can be used to treat corms before planting. Keep in mind that freshly planted bulbs and corms are most likely to create curiosity amongst browsers. Once established, they are rarely disturbed. If all else fails, you can plant in below-grade, wire mesh cages that are impenetrable. To protect leaves and flowers, apply a granular deterrent or a spray.

‘Ruby Giant’ (Photo: John Scheepers, Inc.)

There are many varieties of spring-blooming crocus but most of the hardy ones fall into four species. Crocus ancyrensis is golden bunch crocus. The selection ‘Golden Bunch’ produces up to five deep orange-yellow flowers in a “bunch” per corm. Of the four species, this is one of the earliest to bloom; late February is not unusual if Mother Nature is cooperating. This is also one of the more vulnerable to attack from the bunnies.

‘Jeanne d’Arc’ (Photo: John Scheepers, Inc.)

Crocus chrysanthus is available in several varieties, all of which are referred to as snow crocus or golden crocus. ‘Cream Beauty’ is a strong grower that is primarily white with a white center. ‘Ladykiller’ is also white but with purple on the outside of the petals. ‘Advance’ is yellow inside but the outside is unique because the petals alternate creamy yellow and purple. Corms produce 1 to 4 flowers each in late February or early March. Like C. ancyrensis above, rabbits admire this species.

Crocus tommasinianus is a wonderful choice for several reasons. This species is the most pest-resistant crocus available. If you have lost crocus to rabbits or squirrels, this may be the choice for you. C. tommasinianus is also the most prolific grower. It will quickly naturalize to form masses of flowers. The most readily available variety is ‘Barr’s Purple.’ Its deep violet petals fade to a bright white center that is highlighted by bright orange stamens. It blooms almost as early as the above two species, usually in early March.

The most popular species is Crocus vernus or Dutch crocus. Unlike the previous species, one large flower with large gold stamens is produced from each corm. It is available in several colors ranging from white to stripes to purples. ‘Jeanne d’Arc’ is a bright white with large flowers. ‘Pickwick’ has large white flowers with dark lavender stripes inside and out. ‘Remembrance’ and ‘Flower Record’ are deep lavender and pale lavender respectively. Dutch crocus usually bloom from March to early April.

Fall is a perfect season for planting. Cooler weather means less heat stress for both plants and people. Plants are naturally becoming dormant and are far less susceptible to drying out and experiencing transplant shock. Fall is also the only season for planting spring-blooming bulbs and corms. Once the ground freezes, the opportunity is lost and you’ll regret not having these heralds of spring glowing in your early season garden. Crocus are relatively inexpensive and are available almost anywhere bulbs are sold. With minimal effort this fall, you can enhance your existing landscape and welcome spring with the bright blossoms of crocus.

‘Blue Pearl’ (Photo: Van Bourgondien)

Crocus   CRO-kus
Plant type: Corm (commonly referred to as a “bulb”)
Plant size: 3-5 inches tall
Habit: Clump-forming
Flower colors: Purple, violet, reddish- purple, lilac, yellow, cream, white
Flower size: 2 inches wide
Bloom period: Late winter to early spring
Light: Full to partial sun
Soil: Well-drained
Uses: Plant in natural drifts in the perennial border, lawn or rock garden
Remarks: The corms develop offspring that can produce additional flowers to create a naturalized look

George Papadelis is the owner of Telly’s Greenhouse in Troy and Shelby Township, MI.

RELATED: Colchicum and Fall Crocus

ELSEWHERE: More on Crocus at Chicago Botanic Garden

Filed Under: Plant Focus Tagged With: bulb, Crocus, Crocus chrysanthus, fall, spring

Plant Focus: Plumbago

January 6, 2018   •   Leave a Comment

Plumbago
Plumbago (Ceratostigma plumbaginoides)

By George Papadelis

In the fall, most gardeners are amazed to find a multitude of blooming perennials that are available to brighten up their autumn garden. Besides mums, gardeners may choose from many underused late-blooming plants such as toad lily, butterfly bush, caryopteris, perennial lobelia, yellow wax bells, asters, hibiscus, and many more. Unfortunately, many gardeners shop for flowers in the spring and summer when the fall bloomers are difficult to appreciate and are often overlooked.

One of the most versatile and underused fall boomers is plumbago (Ceratostigma plumbaginoides). This perennial may be used as a groundcover in masses or as a clump-forming accent plant. It forms vibrant blue flowers that last from late summer well into the fall months. In the fall, the olive green foliage turns a bronze-red that provides a tasteful contrast to the bright blue blossoms.

Plumbago grows 8 to 12 inches tall and will grow in both sun or almost full shade. It prefers well-drained organic soil especially when winters are wet. To ensure overwintering, plant by late September so plants will become well established before winter sets in. Also provide a protective layer of mulch in late November or early December to eliminate soil temperature fluctuations. During the winter, plumbago dies completely to the ground and then emerges late in the spring. Gardeners need to be patient for this new growth to appear.

Plumbago’s small blue flowers are a great source of fall color in rock gardens and short border plantings. Also use it as a unique underplanting for trees and shrubs because of its beautiful color and texture. Whatever its use, plumbago’s brilliant flowers, excellent fall color, and short growth habit make this a versatile plant in any garden needing plants with late season interest.

George Papadelis is the owner of Telly’s Greenhouse in Troy and Shelby Township, MI.

Filed Under: Plant Focus Tagged With: blue flowers, fall, fall blooming, full shade, late-blooming, perennial, plumbago, sun

Janet’s Journal: Plant damage awareness will help prepare the garden for next year

September 1, 2015   •   2 Comments

Some leafhoppers pierce and suck the leaf veins, causing puckering and distortion as in these perennial sunflower leaves.

by Janet Macunovich /
Photos by Steven Nikkila

Next year. Perhaps the two most important and versatile words in gardening. They serve as battle cry, mantra, salute, farewell, promise, threat, review, vision and more. Are you using them now as you decide how to spend this long, gentle fall season? You should!

In nature’s cyclical way, fall is not only a wind-down of one season but a start-up of the next. Spring’s growth and summer’s vigor will be based in large part on how much energy plants stored the preceding fall. Soil nutrients accumulate in autumn, dropping in leafy form as coins into a bank. Plant damage that made us grind our teeth this summer are nestling into hideaway holes, ready to retake the garden when warmth returns.

Did you battle an insect or disease this year? Then don’t waste “next year” as a wistful sigh—make it an avenging war whoop by learning what those pests were, where they hide and how to head them off at the pass to ensure a healthy garden next year. Here’s what I’ve learned to do now or sometime before spring about leafhoppers, iris borers and peony botrytis.

A mature leafhopper...plenty of trouble in a small package. Most plant damage is done by the nymphs—immature leafhoppers far smaller than this.
A mature leafhopper…plenty of trouble in a small package. Most plant damage is done by the nymphs—immature leafhoppers far smaller than this.

Legions of leafhoppers

Leafhoppers, like most insect populations, go through periods of boom and bust. During the boom, sage, globe thistle, sunflowers, coneflowers, roses, privets, peashrubs, and other plants have stunted growth and stippled foliage or leaf edges that look drained of color and then yellowed in a pattern called “hopperburn.”

The damage isn’t terminal, just unsightly. It doesn’t stop established plants’ bloom. Newer plants are more affected, their energy levels perhaps so reduced that the year is a wash, so they emerge their second spring no larger than when first planted. The biggest trouble with leafhoppers is that some transmit plant viruses. Cross-infection is always possible in a garden, but where leafhoppers flourish the chances of it happening are much higher.

Leafhoppers don’t chew, but insert straw-like mouths into a leaf and suck. If we’re on the lookout, the first pale leaves and distorted new growth are evident in May. By late June, two or more hopper generations later, pale dots on the foliage or yellow halos along leaf edges may be evident from ten paces. At midsummer, even someone unfamiliar with the symptoms can’t miss the nymphs (immature leafhoppers) which spring in all directions when disturbed, like tiny gymnasts in pale green tights launched up and out off trampolines.

If you approach quietly, leafhopper nymphs are simple to kill with any insecticide, even soapy water. Keep two things in mind in choosing that course, though. First, don’t drop your guard—as many as five generations of leafhoppers can occur each year, depending on hopper species and weather. So the plants will probably host the insects again when eggs are laid by hoppers from plants nearby. Second, damage already done is irreversible. Leaves won’t return to full size or the correct shade of green.

Leafhopper species that pierce and suck a leaf’s meaty part create pale areas and a stippled look. The globe thistle leaf on the right is more normal in color than the stippled leaf on the left. Leafhopper stippling can be mistaken for spider mite damage—look on the leaf underside for the cast skeletons of leafhopper nymphs to determine the true culprit.
Leafhopper species that pierce and suck a leaf’s meaty part create pale areas and a stippled look. The globe thistle leaf on the right is more normal in color than the stippled leaf on the left. Leafhopper stippling can be mistaken for spider mite damage – look on the leaf underside for the cast skeletons of leafhopper nymphs to determine the true culprit.

Learn first, spray later

There are many leafhopper species. Some live on myriad unrelated plants while others are restricted to one genus or family—the aster leafhopper pesters aster relatives such as daisies, sunflowers, and coneflowers. Even entomologists have trouble telling leafhopper species apart as nymphs—the most damaging stage—so we group them and deal with them based on what they eat.

Those that feed primarily on woody plants overwinter as eggs on the host plants. The last generation of maple leafhopper adults, for instance, makes slits and lays eggs in maple twigs. Redbanded leafhopper, a pea-green critter with two magenta racing stripes along each flank, makes egg-laying slits in the leaves of the rhododendron, rose, privet, or any of about 50 other species it inhabits. On these woody plants, we can spray egg-smothering dormant oil on the bark, twigs and/or evergreen leaves of the host plants just before spring budbreak.

Hoppers that feed primarily on herbaceous plants lay eggs on those leaves and stalks. Next year’s first generation can be reduced by cutting down stems and removing leaf debris from affected herbaceous plants. No sense removing neighboring, unaffected debris—a leafhopper prefers to lay eggs on the plant on which it fed. Besides, every bit of plant debris is almost as likely to have beneficial insects’ overwintering eggs or pupae—don’t remove it unless you really have to.

Another sign of leafhopper is “hopper burn.” The leaves of this purple bush clover were first pale-rimmed then developed yellowed and dying margins. Potato leafhopper, a species attracted to pea family plants, probably caused this damage. It’s an insect that can’t survive Michigan winters so no fall clean-up is necessary.

Beware generalities

The more I learn, the more I know that generalities such as “clean up and remove all foliage to reduce pest problems” can cause more work and problems than they solve. For instance, I won’t remove bush clover and peashrub foliage that was hopper-burned this year, or spray them with oil next spring. That’s because it’s very likely those insects were potato leafhopper, a species that can’t overwinter here. It wafts in as an adult from the Gulf of Mexico. No kidding. Why waste time spraying horticultural oil or reduce soil nutrients by raking up egg-harboring leaves when I know the eggs will die and high-altitude winds from Louisiana may not be so buggy next year? I’ll let winter cold do its work, let overwintering ladybugs, lacewings and other beneficials live, and keep an eye peeled for any new windborne infestation next Memorial Day.

Iris foliage and peony foliage are another matter. These are so likely to be attacked by iris borer and peony botrytis each year that clean-up is mandatory. That, or grow them only until the pests build up, then stop growing them for a few years until the pests starve out.

Rx for rotted iris

Irises are laid waste by soft rot, a fungus that spots the foliage and turns the root-like rhizome into malodorous mush. The fungus is too weak to infect whole tissue but gets into leaves and rhizomes through holes made by a moth larva we call iris borer. Bearded irises are particularly vulnerable to soft rot. Siberian irises and others are resistant—they usually don’t rot even when riddled by borers.

To control soft rot, control borers. That means learning the moth’s life cycle.

Small, brown, night-flying iris borer moths lay eggs on iris foliage—especially dead foliage – from late August through October. The eggs hatch in April or May and tiny larvae crawl to emerging iris leaves. They chew into the tight folds of an iris leaf then eat down into the rhizome, growing all the while. By the time they are in the rhizome in July they’re as big as macaroni noodles. From the rhizome they move into the soil, pupate, and emerge in fall as moths.

Bearded irises (once known as Iris germanica) are particularly susceptible to iris soft rot. Siberian irises (I. sibirica) and zebra iris (I. pallida ‘Variegata’) are usually resistant to the rot, even when riddled with borers.

Iris borer grub (larva) in an iris rhizome in July.

So we remove and burn, compost or bury at least 12 inches deep all iris foliage after egg-laying stops in November. As extra protection in spring, we can spray irises as leaves emerge and every so often–depending on which insecticide is used—until flower buds are well developed. Cygon, a systemic insecticide with a long-lasting effect, can be applied just once or twice, but insecticidal soap must be applied every few days and renewed after rains. Every two or three years we dig up the irises in July when iris borer grubs are in the rhizome, discard rotted or borer-infested rhizomes, and replant clean ones.

Clearing up splotchy peonies

Peonies suffer from peony botrytis, another weak fungus that can’t penetrate healthy tissue but can infect and fester in weak, damaged or dead parts. Purple-brown splotches on foliage, purplish streaks on stems, and hollow, brown-interior stalks are showing the symptoms of peony botrytis.

Purple-brown splotches on peony foliage and streaks of the same color on stems are signs of peony botrytis.

Peony botrytis can splash from disease-laden debris to infect and kill frost-damaged flower buds early in spring—before we even recognize them as buds. The infection lingers there, splashing around and getting new toeholds in weak spots on leaves and stems damaged by wind or insects. The degree of infection increases over years until the plant is too weak to bloom or is a splotchy mess by midsummer. Infected roots harbor shoot-infecting disease spores even below ground and are often too weak to support the stems.

Remove and burn or put peony foliage into a hot compost—if stems are hollow and brown where you cut, cut further down until you see solid white pith. If the infection goes below ground, dig and divide that peony, replanting only solid, uninfected roots. A copper-based fungicide such as Bordeaux mix can be applied in spring as the shoots emerge and weekly until they’re about a foot tall, but removing diseased debris is more important.

Sometimes it’s depressing to know that next year’s problems are already lurking, but only in the narrow view. In the broader view, it’s clear that only a few of the many plant species we grow have significant problems in any given year. We also see there are many living things attached to each plant—perhaps 30 different organisms overwinter on each plant. Many are next year’s “good guys,” so I limit fall garden-scouring to areas of known trouble and let the blessed unknown on other plants rest undisturbed.

Janet Macunovich is a professional gardener and author of the books “Designing Your Gardens and Landscape” and “Caring for Perennials.” Read more from Janet on her website www.gardenatoz.com.


Filed Under: Janet’s Journal Tagged With: disease, fall, globe thistle, insects, iris, iris borers, Janet Macunovich, leafhoppers, peony botrytis

Avoiding autumn allergies in the garden

October 6, 2013   •   Leave a Comment

WSJ:

People hoping that the approach of autumn will mean fewer allergies, may want to prepare for some sneezing with their leaf-raking.

For many people, allergic reactions go into overdrive late summer and into fall because pollen counts soar. Mold counts rise, too, thanks largely to wet leaves sitting on the ground, a terrific breeding situation for mold spores.

While many popular garden plants are insect-pollinated—often with showy flowers that attract pollinators, and bearing heavier, stickier pollen grains—it is the wind-pollinated plants that cause the most problems for allergy sufferers, says Susan Littlefield, horticulturist for the National Gardening Association.

Read the full story here…

Filed Under: Clippings Tagged With: allergies, autumn, fall, garden, pollen

Tips for dividing daylilies

August 29, 2010   •   

My Stella d’Oro daylilies need to be divided. I would like to do it this fall. Do I have to remove and discard the center of each plant like I do with my Sedum ‘Autumn Joy’? Also, should I cut back the foliage after the division?

Make sure the daylilies actually need dividing. Many varieties, especially ‘Stella d’Oro’, can go several years before they need dividing. Check if they are crowded or lack flowers or vigor. Sometimes they just need a bit more deep watering (water that reaches 8 to 10 inches into the soil) especially on hot days or a light mulch to help them retain moisture. They also need fertilizer to keep them blooming happily. This is especially true for larger clumps and those planted in light or sandy soils that leach badly. The best way to determine the fertilizer needs of your plants is to do a soil sample through your MSU Extension office. You can call or go to the office and pick up a soil sample kit. Otherwise a general fertilizer low in nitrogen such as 5-10-10 should be applied a few times throughout the spring and summer.

If you’ve now determined they do need dividing, fall is a good time because the roots will grow rapidly before next year’s flowering. Dig around the clump and make sure you dig up all of the roots, especially if you will be moving the plants to another area. Otherwise a small section of root may produce another plant in the original spot. Shake off the soil so you can see the roots. You do not need to discard any part of the clump unless it is diseased or does not look like it is actively growing; the roots should look white. Cut or break the clump into sections of 3 to 5 fans each. If it is a large clump, you may only want to cut it into quarters. A single section or fan will root, but it will take a long time to form a showy plant.

Cut the tops of the plants to about 8 inches and plant the daylilies at the same level they were growing before. Prepare the soil where you will plant the divisions by loosening it about 1 foot deep. Add organic matter if you have sandy soil. Dig the hole larger than the roots and make a mound in the center of the hole. Spread the roots over the mound, cover with soil, firm it in and water well. Space plants approximately 18 inches apart. You can cover with light mulch, but leave space around the base of the plant so the mulch doesn’t smother it.

Also read: Maximizing daylily blooms

MSU Extension: Daylilies are a smart choice for many difficult garden locations

Filed Under: Ask MG Tagged With: daylilies, dividing, fall

Copyright 1996-2025 Michigan Gardener. All rights reserved.