Michigan Gardener

SIGN UP to stay in touch!
We will send you occasional e-mails with gardening tips and information!


Digital Editions

Click on the cover to read now!

  • Home
  • Departments
    • Ask MG
    • Books
    • Clippings
    • Garden Snapshots
    • MG in the News
    • Janet’s Journal
    • Plant Focus
    • Profile
    • Raising Roses
    • Thyme for Herbs
    • Tools and Techniques
    • Tree Tips
  • Garden Event Calendar
  • Resources
    • Alternatives to Impatiens
    • Garden Help
    • Soil and Mulch Calculator
    • Public Gardens
  • Web Extras
  • About
    • About Us
    • Editorial Content
    • Privacy Policy
    • Contact Us

PLEASE NOTE: In the autumn of 1995, we hatched the idea for a free, local gardening publication. The following spring, we published the first issue of Michigan Gardener magazine. Advertisers, readers, and distribution sites embraced our vision. Thus began an exciting journey of helping our local gardening community grow and prosper.
After 27 years, nearly 200 issues published, and millions of copies printed, we have decided it is time to end the publication of our Print Magazine and E-Newsletter.

Cut and come again vegetable harvesting technique

April 4, 2023   •   Leave a Comment

By harvesting just the outer stalks of the chard, it will continue to send up new shoots for later cutting.

What do leaf lettuces, kale, Swiss chard, spinach, broccoli, and cabbage have in common? They are all examples of “cut and come again” vegetables. What exactly do we mean by that? Well, as the name implies, it is a vegetable that can have edible portions cut off, but will continue to grow and produce more portions that can be cut again at a later time. Usually, leafy vegetables that grow as a rosette (in a circular fashion or from a central point) are most likely to be cut and come again. Rosette-type plants include: broccoli, Brussels sprouts, cabbage, kale, leaf lettuces, spinach and Swiss chard, among a few others.

Many gardeners are probably familiar with cutting just the outer leaves of kale, spinachand leaf lettuce, so that the plant continues to produce fresh leaves that can be cut again a few days or weeks later. This helps extend the harvest without adding more plants to the garden. Eventually the plant will bolt (go to seed), at which point the vegetable will no longer produce the sweet edible leaves you want to cut, and the plant will need to be removed. It is also possible to cut the entire head of leaf lettuce providing the cutting is done about 1-1/2 inches above the crown, the growing point of the plant. If you cut off the crown, you may as well remove the whole plant.

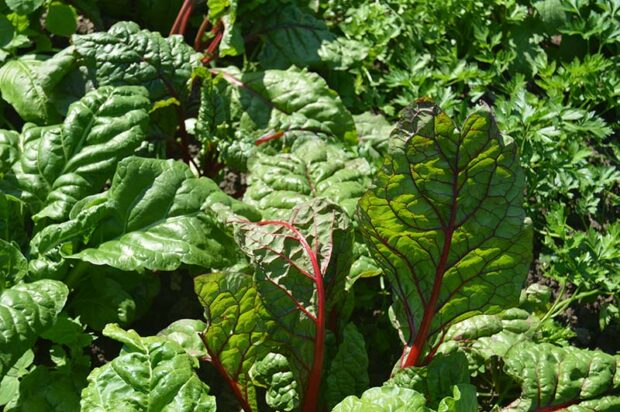
Swiss chard and beet leaves also grow as a rosette. By harvesting just the outer stalks of the chard, it will continue to send up new shoots for later cutting. If you like to eat the greens on a beet, then you can harvest a couple of the outer leaves from each plant. When you cut the outer greens, leave about an inch or so of the stem on the beet.

While broccoli, Brussels sprouts and cabbage are also rosette plants, we don’t think of them the same way as most of the loose, leafy plants. Probably because we are harvesting the flower head of broccoli, the large head of the cabbage, and the small buds of the Brussels sprouts. However, done correctly, these vegetables will also continue to produce more for harvesting.

For Brussels sprouts, harvest from the bottom up. Cut the larger heads that develop at the bottom and allow the buds higher up to continue developing, then harvest as they grow. If you cut the rosette tip of the plant, the sprouts will tend to mature at the same time. For broccoli, if you cut the terminal head, side shoots will develop. They will not be as large as the main head, but will continue to be produced for several weeks. Lastly, for cabbage, cut the large central head, leaving the outer leaves and the root in the ground. Wait a few weeks and you should begin to see smaller heads forming at the base of the leaves that were left. These will grow into small cabbage heads, just a few inches in diameter, but sweet and delicious in soups, stews or salads.

Think of “cut and come again” as a type of plant pruning. As with all pruning, be sure that your cutting tool is clean and sharp. Take care not to cut the growing crown. Cut the mature outer leaves, preferably while they are still a little young, to help maintain the quality of the successive cuttings. Use care to maintain watering to reduce stress on the plant. Eventually all good things come to an end, so when the cuttings begin to lose flavor, the plant loses vigor, or seed formation (bolting) begins, the harvest is over and it’s time to grow something new!

Mary Gerstenberger was the Consumer Horticulture Coordinator at the Michigan State University Extension in Macomb County, MI. For vegetable and gardening information from MSU, visit www.migarden.msu.edu.


Call the toll-free Michigan State University Lawn and Garden Hotline at 888-678-3464 for answers to your gardening questions.

Elsewhere: Use this harvesting technique to have a continuous supply of vegetables during your growing and eating season.

Filed Under: Vegetable Patch Tagged With: Cut and come again, Harvest, vegetables

Identifying and controlling Lecanium scale

April 4, 2023   •   Leave a Comment

There are several species of lecanium scales (Parthenolecanium) throughout North America. European fruit scale and oak lecanium scale are the ones most commonly found in Michigan on maple, birch, redbud, quince, beech, ash, ivy, fruit trees, locust, arborvitae and many others.

This young pin oak (Quercus palustris) has yellowing leaves. This can indicate an iron or other nutrient deficiency, a problem that affects pin oaks in alkaline soil. Nutrient deficiencies weaken the plant and make other problems more likely to occur.

Description

Mature female lecanium scales are less than 1/4 inch in diameter, rounded, and reddish to brown in color. Males are brown, flying insects, and have two long, tail-like, whitish hairs. Eggs are whitish, very small and may look like pollen. Young nymphs (crawlers) are flat, pale white to yellow with legs, eyes and antennae. Older crawlers are flat, brown and have less noticeable legs and antennae.

Lecanium scales have three (in the female) or four (in the male) stages of development (called “instars”). Males develop into pupa that are a pale peach, covered by a translucent waxy coat. Females overwinter in the second instar on 1- to 3-year-old twigs. They mature in the spring, lay many eggs (1,500 or more) in May or June, and then die. Their dead bodies protect the eggs beneath. Crawlers hatch out in June or July, migrate to the underside of leaves along the mid-rib and veins to feed. In late summer they migrate back to the twigs and develop their waxy coating to overwinter. There is one generation per year.

Damage

Damage caused by lecanium scale includes smaller flower size, discolored leaves, and premature leaf and fruit drop. In heavy infestations there can be dieback of twigs and branches, and stunted growth. Scale feeding weakens a plant but is rarely life threatening on its own. They produce a great deal of honeydew, a sticky excrement that can coat almost anything under the tree. A sooty mold may develop on a honeydewed surface. This can discolor the branches and trunk so they are nearly black.

However, a closer look at the pin oak shows tiny bumps along the twigs.
The bumps are oak lecanium scale. They are covered with a sticky substance called honeydew.
Peeling back the soft shell reveals that the insect is dead, its eggs have hatched, and the crawlers have migrated to the leaves.

Control

Control of this scale comes first and foremost from proper cultural practices that keep the plant otherwise healthy and vigorous, so it is able to withstand scales’ feeding and produce natural defenses and deterrents to their reproduction. Avoid stressing or overfertilizing the plant. If pesticides are determined to be necessary, timing of the application is everything.

The crawlers are the most vulnerable stage. There are different approaches to deciding when to apply a pesticide. You can use a calendar approach, applying on a reference’s recommended date. With this approach, control is difficult because weather is so influential in insect development and yet so variable from year to year.

Another approach is to use indicator plants to time your control. In his book Coincide: The Orton System of Pest Management, Don Orton says when smooth hydrangea (Hydrangea arborescens ‘Grandiflora’), bottlebrush buckeye (Aesculus parviflora), and yucca (Yucca filamentosa) are blooming, lecanium scale crawlers will be present.

The crawlers settle on the underside of the leaves along the midrib and veins.

Lastly, there is the most reliable approach: go look at the plants to see when the crawlers are present.

There are natural predators that attack lecanium scale such as ladybeetles, lacewings, mites and wasps. However, as Dr. Dave Smitley from Michigan State University says: “These soft scale insects go in cycles and rarely cause any harm to landscape trees. The scale infestation sometimes becomes worse when the trees are sprayed for other reasons…because the insecticide kills predators and parasites that keep the scale insects under control.”

A horticultural oil may be used in the early spring to smother the females on the twigs. Also, a systemic with the active ingredient imidacloprid can be used as a soil soak to allow the tree to take in the pesticide before the crawlers emerge. Remember, before applying a pesticide, ALWAYS read the label to ensure proper use for that insect and that plant. 

Article and photos by Steven Nikkila, www.gardenatoz.com.

Filed Under: Plant Patrol

Follow these five steps to grow fabulous roses

April 4, 2023   •   Leave a Comment

Roses are just like people—they need just five things to thrive:

  1. Sun
  2. Air
  3. Food
  4. Water
  5. Love

Mother Nature can handle the first two needs (sun and air) by herself. But she needs your help with the second two (water and food) in order for your roses to survive. You are the sole provider of the last need (love). And it’s that one that spells the difference between roses that simply survive, and those that thrive.

Let’s consider each of these needs:

Sun. Roses are sun-loving plants. Typically roses need at least six hours of full, direct sunlight daily and will do better if they receive more.

For areas that receive between 4 and 6 hours of direct sun, select five-petaled roses. These are roses with a lower petal count and, in general, the lower the petal count, the more shade a rose will tolerate. As a group, hybrid musk and antique alba roses are fairly shade tolerant—mainly because they have simple blooms. 

Typically roses need at least six hours of full, direct sunlight daily and will do better if they receive more.

Air. Roses like good air circulation to keep their leaves dry and to prevent fungal diseases. However, avoid exposure to strong winds. Consider the most rugged roses, like rugosas and Canadian explorers, for your cottage on the Great Lakes. Otherwise, plant your roses where they will enjoy gentle breezes. Remember this if you plant near a wall or solid fence.

Remember, roses grow quickly, which means you should thoughtfully consider the spacing between bushes. Follow this rule of thumb: roses generally grow to be as wide as they are tall. So, roses expected to be four feet tall should be planted about four feet apart, as measured from the center of one bush to the center of the next.

Hybrid tea roses can be planted closer together, while antique and shrub roses should be placed a little further apart. Remember, too, that climbing roses need lots of room. Plant them at least 6 to 8 feet from neighboring climbers.

It’s a common misconception that roses shouldn’t be planted near other types of plants. In truth, they can be part of an integrated landscape provided neighboring plants don’t crowd them and prevent good air circulation.

Food. Roses are heavy feeders and appreciate richly amended soil. They are adaptable to soil type. They’ll thrive in sandy soil if you feed them frequently, and in clay soil if they have good drainage. The solution to sandy-soil and clay-soil problems is the same: organic amendments. Many municipalities produce wonderful compost from the grass clippings collected from homeowners. Usually this compost is free for the hauling.

Apply your first fertilizer in late April or early May. Slow-release fertilizers need only be used once or twice a year. Organic options should be used every 4 to 6 weeks. In any event, your last fertilizer application should be in mid-August, so that your roses ease into dormancy before the first heavy frosts.

The commonly available rose fertilizers with systemic insecticides should be avoided because they will kill earthworms. Treat insect problems as they occur—you don’t need to “nuke” your entire garden to eliminate a few aphids or budworms when targeted attacks will be sufficient. Also, foliar-feed fertilizers give your roses a nice snack, but they are too quick-acting and transient to be used exclusively.

Water. Roses like lots of water, but not wet feet. In other words, be sure the plants are in a well-drained soil. We simply do not receive enough natural rainfall in Michigan for roses to thrive, which begs the question, how much is enough? Some will tell you 1 or 2 inches per week. However, it really depends upon your soil type and drainage. The goal is to keep the soil near the rose roots evenly moist. This means you’ll need more water in sandy soil than in clay. Try installing a rain gauge near your roses so you can see exactly how much water they are receiving.

The belief that you shouldn’t permit rose leaves to get wet is a myth. In our nursery, we watered our roses exclusively with overhead watering. We found that it helped wash off powdery mildew and insects. It helped that we watered early in the morning so that the leaves dried as the day came on. This prevented fungal diseases that can form when leaves are wet for an extended period or overnight.

Most residential in-ground irrigation systems are optimized for turf grass and do not provide enough water for roses. You can supplement these systems by hiding a soaker hose under the mulch around your roses. Your irrigation contractor may recommend a special drip irrigation circuit for roses, but be prepared to check the emitters frequently—clogging is a common problem.

A good organic mulch, such as finely ground pine bark, pine needles or garden compost will help the soil retain moisture and reduce the need for frequent watering.

Love. Spend a little time with your roses, deadheading spent blooms and checking the moisture content of the soil at their roots. That way, while you are enjoying their beauty, you’re likely to notice “conditions” before they become “problems.”

Roses can be the stars of your garden, so plant where you can admire them frequently—their blooms are abundant and fabulous. Follow the guidelines presented here, and you’ll be amazed at their display!

Nancy Lindley was the co-owner of Great Lakes Roses in Belleville, MI.

Related: Simple steps to keep roses healthy for the summer

Elsewhere: Downy mildew control on roses

Filed Under: Raising Roses Tagged With: grow fabulous roses, growing, roses

  • « Previous Page
  • 1
  • …
  • 12
  • 13
  • 14
  • 15
  • 16
  • …
  • 285
  • Next Page »

Copyright 1996-2025 Michigan Gardener. All rights reserved.