Michigan Gardener

SIGN UP to stay in touch!
We will send you occasional e-mails with gardening tips and information!


Digital Editions

Click on the cover to read now!

  • Home
  • Departments
    • Ask MG
    • Books
    • Clippings
    • Garden Snapshots
    • MG in the News
    • Janet’s Journal
    • Plant Focus
    • Profile
    • Raising Roses
    • Thyme for Herbs
    • Tools and Techniques
    • Tree Tips
  • Garden Event Calendar
  • Resources
    • Alternatives to Impatiens
    • Garden Help
    • Soil and Mulch Calculator
    • Public Gardens
  • Web Extras
  • About
    • About Us
    • Editorial Content
    • Privacy Policy
    • Contact Us

PLEASE NOTE: In the autumn of 1995, we hatched the idea for a free, local gardening publication. The following spring, we published the first issue of Michigan Gardener magazine. Advertisers, readers, and distribution sites embraced our vision. Thus began an exciting journey of helping our local gardening community grow and prosper.
After 27 years, nearly 200 issues published, and millions of copies printed, we have decided it is time to end the publication of our Print Magazine and E-Newsletter.

2023 Flower & Vegetable Winners: Part 1 of 3

May 2, 2023   •   Leave a Comment

All-America Selections (AAS) tests significantly improved new flowers and vegetables in trials across North America. This year’s AAS Winners are new cultivars with superior performance. Look for these plants or seeds at your local garden center.
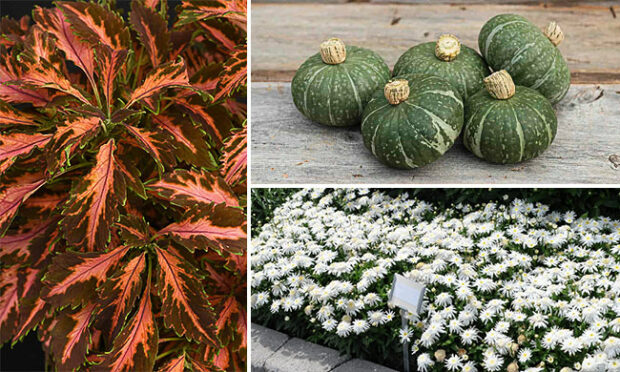
Left: Coleus: ‘Premium Sun Coral Candy’ Top right: Squash: ‘Sweet Jade’ Bottom right: Shasta Daisy: ‘Carpet Angel’

Coleus: ‘Premium Sun Coral Candy’

The first seed coleus to be an AAS Winner. Unique, multicolored foliage on a uniformly compact plant. Narrow, serrated leaves gracefully drape down the mounded plants. Holds its color well, even when grown in full sun. ‘Coral Candy’ was evaluated in the container trial, meaning it’s great for small spaces. It held up well into the fall and had almost no flowers, even late in the season.

Squash: ‘Sweet Jade’

This single-serving-sized squash proved itself with high yields. Each fruit is between 1 and 2 pounds and can be used for single servings, as an edible soup bowl, or in Asian-style dishes where a sweet, earthy squash is typically used. The deep orange flesh of ‘Sweet Jade’ is dry, yet sweet and flavorful, whether roasted, baked, or pureed.

Shasta Daisy: ‘Carpet Angel’

The first-ever groundcover Shasta daisy (Leucanthemum). Large, three-inch flowers boast a second inner frilly bloom, adding to the unique look. Only growing to six inches tall, this unique Shasta daisy spreads up to 20 inches wide. Excellent branching means more flower stems sporting pure white blooms that look like angels dancing over the carpet of dark green foliage. A little deadheading of spent flowers will reward you with even more blooms.

Elsewhere: Search past All-America Selections winners

Filed Under: Clippings, Uncategorized Tagged With: AAS Winners, All-America Selections, Flower, vegetable

What are good deer-resistant plants for shade?

May 2, 2023   •   Leave a Comment

by Bev Moss

Are there any deer-resistant plants that will grow under large pine trees? Four feet of the bottom limbs have been trimmed off. There is a little bit of light, but the upper limbs block most of the rain. I tried hostas, but the deer ate them. G.R., Clinton Twp

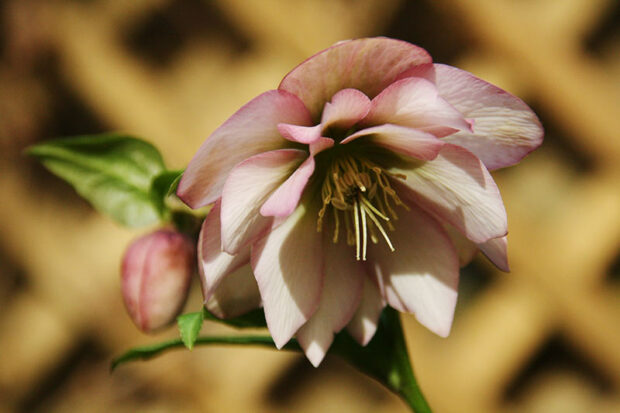
Dry shade and deer resistant are two of the most common requests in planting under trees. Forget the hosta buffet and look to early-flowering hellebores and the many varieties of epimediums. Even the exotic-looking hardy cyclamen likes dry shade. All are ignored by deer and have a nice range of flower color for spring into early summer and excellent leaf texture into the season. Look at the shorter varieties of astilbe as well as brunnera and lungwort, which have great mid-spring flowers and colorful leaves all season. Leaf texture and variegation take the place of flowers when blooming is done. There are a few ferns that will survive in dry shade. Christmas fern, maidenhair fern, and marginal wood fern will establish in those conditions and be disinteresting to deer.

Forget the hosta buffet and look to deer-resistant plants like early-flowering hellebores (above) and the many varieties of epimediums.

Note well: to get established, all of these plants need regular watering in the first year. Create a 2- to 2-1/2-foot planting area around the dripline of the tree so they can benefit from rainfall and auxiliary watering. Consider a soaker hose woven through the plantings that you can hook up regularly to facilitate watering. Do not expect a plant to thrive up against the trunk of the tree where the canopy is darkest and water is negligible.

Beverly Moss is the owner of Garden Rhythms.

Related: What are some suggestions for deer-resistant plants?

Elsewhere: Smart gardening with deer: Deer-resistant bulbs to plant in fall

Filed Under: Ask the Experts Tagged With: deer-resistant, deer-resistant plants for shade, plants, shade

How-to make hypertufa garden troughs

May 2, 2023   •   Leave a Comment

These handmade hypertufa garden troughs mimic old stone and look great in the garden

by Jean, Roxanne, and Rita Riggs

Hypertufa is the name given to the plant containers made of cement, vermiculite (or perlite), peat, and fiberglass fibers. The name comes from the porous, volcanic rock (tufa) that is so popular with alpine gardeners because it can be hollowed out and used for planting.

The handmade containers described here have been popular since the 1930s, when the old stone sinks and watering troughs that were prized as planters for special small plants became hard to find and incredibly expensive, not to mention too heavy for the average person to handle.

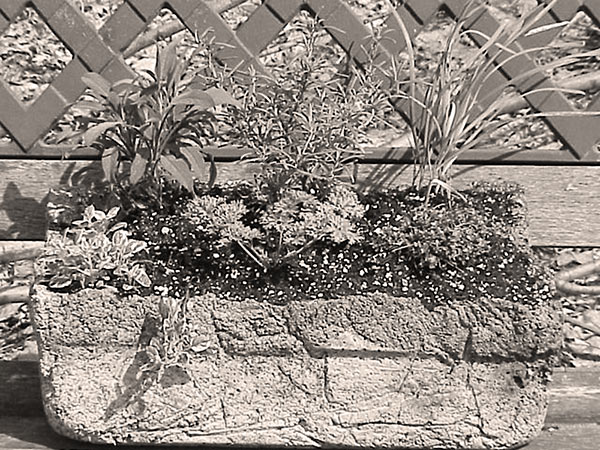
Hypertufa planters have been used in English gardens for many years, and are being used more commonly in the United States as gardeners realize how good they look. They provide the drainage and the rough, rocky surface that displays the plants perfectly. We have found them to be excellent planters for many herb plants as well, including rosemary, lavender, thyme and santolina topiaries. Sedums, hens and chicks, and many choice miniatures seem to thrive in them as well.

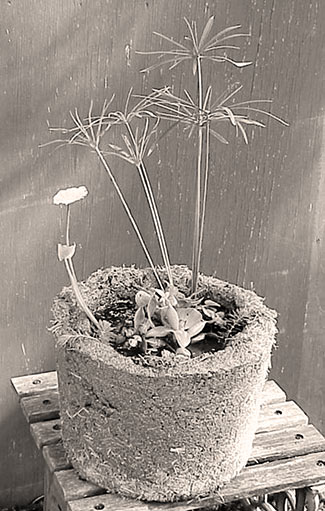
The finished trough will take the shape of the mold you selected to build in or around. (Photos: Jean, Roxanne, and Rita Riggs)

Material List

  • Portland cement
  • Vermiculite or perlite
  • Sphagnum peat moss
  • Fibermesh fiberglass fibers (for reinforcement)
  • Molds
  • Mixing container (a wheelbarrow works well)
  • Measuring container
  • Rubber gloves with long sleeves
  • Water for mixing
  • Plastic drop cloth
  • Plastic garbage bags (to cover the molds so the mixture doesn’t stick to them)
  • Pencils or dowels to make drainage holes
  • Hardware cloth or chicken wire (optional; for extra reinforcement on larger troughs)

A few notes on the materials. It is preferable to use cement as opposed to concrete, which is a mixture of cement and aggregates (sand, gravel, etc.). You will often find the cement bags listed as “Portland cement.” It is best to avoid using sand in the hypertufa mix because it doesn’t seem to bond as well as the vermiculite or perlite, not to mention the fact that it makes the finished product much heavier. The fibermesh is obtainable from a building supply company and looks like tiny strands of white hair. Since the hypertufa is only part cement, the fibermesh helps add strength to the mixture.

Hypertufa recipes

Before you start, select a place in the shade where the newly molded trough can dry for several weeks, and where it doesn’t freeze. Spread the plastic drop cloth over your work surface.

Recipes for the hypertufa mixture vary quite a bit from reference to reference, but this one worked best for us:

  • (1) 60-pound bag of cement with fibermesh already mixed in
  • (4) 1-pound coffee cans of vermiculite
  • (4) 1-pound coffee cans of peat moss
  • A supply of water to mix the ingredients together into a stiff, mud pie consistency

The mixture should hold its shape without pooling water on the surface. If you get it too wet, add some dry ingredients and mix them in until the consistency is correct. For some of your molds, you may want to mix in a couple more handfuls of fibermesh for additional strength. We also found that we could better tell if the water proportion was correct if we mixed the materials with our gloved hands instead of using a hoe.

To illustrate the variance in recipes, others have had good luck with these proportions, which will yield a lighter trough:

  • 1 part cement
  • 1 part vermiculite or perlite
  • 1 part peat moss
  • 1/5 part fibermesh

Step-by-step instructions

Select a mold, which can be a sturdy cardboard box, small plastic tub, a metal pan, or something equivalent. You can build the trough on the outside or inside of this mold. If you build on the outside, you will be shaping and forming the trough’s exterior walls. If you build on the inside, the trough’s exterior walls will take the shape of the mold’s interior walls.

For building on the outside of the mold, cover it with plastic and then start patting the hypertufa mixture onto the mold. Remember that you are building the trough upside-down and the mold will be the trough’s planting (inside) area. We found that steep-sided molds worked better if we used the inside, and slope-sided molds could be done inside or out. The bottom should be 1-1/2 to 2 inches thick, and the sides should be at least 1 to 1-1/2 inches thick. Use the pencils or dowels to create several drainage holes in the bottom. Make sure the bottom is level or the final product will rock slightly.

If you are making a large trough, now is the time to consider adding the reinforcement wire, already shaped to the mold. Since it can be tricky getting the chicken wire to stay in place while you are patting away adding the hypertufa mix, it is preferable to simply build the joints (where the walls and bottom come together) sufficiently thick so that they are strong enough on their own.

The finished planter will often have the fuzzy hairs of the fibermesh sticking out. You can easily remove these by melting them with a handheld propane torch or barbeque lighter.

Allow the trough to sit and dry for 2 or 3 days. If it is drying too fast or your work area is warm, mist it daily to keep the surfaces moist to avoid cracking. When the container is semihardened—that is, hard enough to not make a fingerprint, but still soft enough to scratch with your fingernail, you can unmold it, remove any plastic that sticks to it, and make whatever natural-looking gouges, artistic pictures, or signatures you want for the trough. Make sure the drainage holes haven’t filled in.

Removing the mold allows the hypertufa to dry thoroughly inside and out. Total drying time varies according to humidity and temperature. Ideally, you want the mixture to cure as slowly as possible since this will yield a stronger trough. You can achieve this longer curing time by covering the trough with plastic and misting it every couple days to keep the humidity high. Most recipes say to let them dry or cure until they sound hollow when tapped.

The finished planter will often have the fuzzy hairs of the fibermesh sticking out. You can easily remove these by melting them with a handheld propane torch or barbeque lighter. When the flame passes over the fibermesh, the hairs melt away quickly.

Some sources say to neutralize the chemicals in the cement by rinsing the trough repeatedly or by using chemicals. We prefer to avoid the chemicals and simply be patient. We let the troughs weather naturally by sitting outside through several rainfalls before planting. In terms of durability, our troughs have been left outside winter and summer, and they have not cracked or broken. They are somewhat heavy to move around (although not nearly as heavy as concrete), so if you make a large one, you may want to construct it where it is going to be placed.

The material cost to make your own trough is very low. Considerable savings can be had by making your own compared to purchasing an actual stone trough. And, of course, the satisfaction of knowing you built it yourself.

Jean and Roxanne Riggs operated Sunshine Farm and Garden in Oakland County, MI.

Related: Growing vegetables in containers

Elsewhere: Successful container gardening

Filed Under: Uncategorized Tagged With: garden container, hypertufa, hypertufa garden trough, trough

How to select the right potting soil

May 2, 2023   •   Leave a Comment

When it comes to choosing potting mixes, there are two basic types: soil-based and soilless mixes.

by Nancy Szerlag

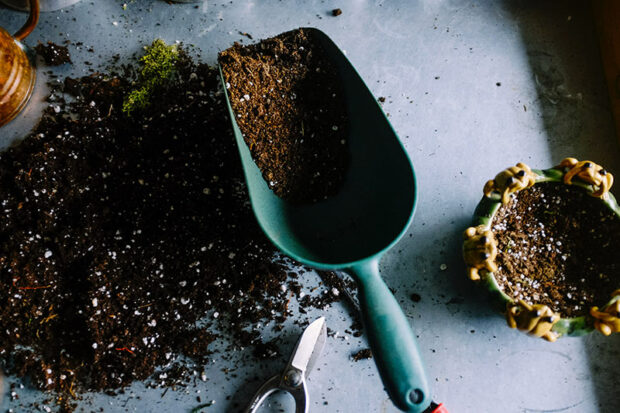
When gardening in containers, just like gardening in the ground, success often depends on the soil. In order for plants to flourish, they must have a healthy root system. That’s why a good quality potting mix makes such a big difference on a plant’s ability to flower and thrive.

The soil in containers is watered far more frequently than garden soil. This continual bombardment of water droplets beats the potting soil down and compacts it, squashing all the little air pockets that allow oxygen to move through the soil. And roots need oxygen for healthy growth. In the garden, earthworms and soil dwellers are constantly tunneling about, creating new air spaces, but they are not present in containers. Also, the walls of the containers prevent outside air from circulating through the soil.

Soil vs. soilless mixes

When it comes to choosing potting mixes, there are two basic types: soil-based and soilless mixes.

The main ingredient usually found in soil-based potting mixes is reed sedge, also called Michigan peat. These products, the remains of reeds, sedges, grasses and other marsh plants, have been broken down to the point they look like dark brown or black, silt-like dirt. When added to a container, the fine particles, almost powder-like in nature, quickly settle and compact, leaving little or no space for air.

While reed sedge may look nutrient rich, it’s actually very lean. Reed sedge also has a very low moisture-holding capacity. However, when wet, because of its density, it becomes sodden and heavy. In spite of its drawbacks, a lot of folks use reed sedge-based potting mixes because they are, pardon the pun, dirt cheap.

Soilless potting mixes made of Canadian sphagnum peat moss, commonly called peat moss, cost quite a bit more than soil-based mixes, but in the long run they are well worth the expense. Canadian sphagnum peat moss is an all-organic, disease-free material that’s prized for its ability to grow great plants. A quality peat moss-based soilless potting mix gives gardeners the same medium that professionals have enjoyed for decades. Sphagnum peat moss has many more times the air space capacity than reed sedge. Plus, it has the capacity to hold nutrients as well as moisture.

Soilless mixes are also lighter; about one half the weight of a soil-based mix when soaked with water. They are also generally free from pests and diseases that may be harbored by ordinary garden soil or soil-based potting mixes.

Additional potting soil ingredients

Good quality potting soils also contain other ingredients such as vermiculite and perlite to further increase moisture retention, aeration and drainage. Composted forest products, such as fir bark, may also be added to increase friability and further improve drainage.

Once it dries out, sphagnum peat moss can be difficult to rewet, so many potting mixes also contain wetting agents. Not to be confused with moisture-holding polymers, these wetting agents, also called surfactants, are added to help the potting mix absorb water more readily.

Water-retaining polymers look like tiny bits of clear Jell-O when they are wet, and may be added to a potting soil to help increase its ability to retain water even further. This fascinating material, in a crystal-like form when dry, will hold up to 40 times its weight in water. Potting soils with moisture-retaining polymers are good to use in hanging planters and other sun-drenched pots that dry out quickly in the heat of summer.

Many potting soils also contain a slow-release fertilizer, which takes the hassle out of having to worry about feeding the plants. It should be noted however, that the fertilizer will release when the potting soil gets wet, so avoid broken bags and store the unused portion in a protected area where it will be kept dry.


Helpful planting hint

When planting containers, it’s always best to moisten the potting soil before planting. A mix of 2 to 3 parts potting soil to one part water will give you a moderately moist consistency that is easy to work with. To make sure the water absorbs evenly, mix up a batch several hours before planting. A five-gallon bucket with a lid or a large storage tote works well for both mixing and storing.


Specialty potting soils are formulated specifically for plants with special requirements, such as orchids, cacti and African violets. There are also special blends of container soil for aquatic plants that contain specially-processed clay that adds needed weight, but without the perlite or other products that float and foul pond water.

When shopping for potting soils it’s important to read the labels. There are few restrictions on the labeling of potting soils, so words like “professional” in a name or description means little. However, the makers of good quality potting soils do list their contents and the Federal Trade Commission regulates that the bag must contain a minimum of 75 percent peat moss to warrant the use of the term “peat moss” on the bag. Many companies also include detailed instructions on how to use their products as well as hints for successful planting.

Many independent garden centers have sample containers of various soil products for you to look at. It’s worth taking the time to grab a handful to get a feel of the various potting soils before you make a purchase.

If you use a lot of potting soil, for economy sake consider buying a commercial product that is typically packaged in larger bags. Nurseries that grow their own plants usually have these larger sizes on hand. They won’t contain the slow-release fertilizers and water-retaining polymers, but those products are also available in larger sizes, so you can mix up your own specialty potting soil and save some bucks.

Nancy Szerlag is a Master Gardener and Master Composter.

Related: Why doesn’t our garden have earthworms in the soil?

Elsewhere: Potting soils and seed-starting mixes for your garden

Filed Under: Tools and Techniques Tagged With: container gardening, potting soil, soil, soilless mixes

Improve water quality by selecting a healthy lawn care service

May 2, 2023   •   Leave a Comment

Rain and melting snow impact water quality through small amounts of oil, grease, soil, debris, and other pollutants carried to rivers, lakes, and wetlands. Lawn fertilizer and pesticides are among the pollutants that have been found in storm water runoff. Lawn service providers throughout southeastern Michigan are being asked to minimize fertilizer and pesticide use, but this chemical use reduction depends on the consumer interest as well.

A “one size fits all” approach to lawn care can result in the application of unnecessary quantities of fertilizer and herbicides. A healthy lawn care program depends on customers that know their own goals and are interested in an environmentally-friendly alternative to standard practices.

Depending on the type of grass you have, ask for an application rate of 2 to 4 pounds of nitrogen fertilizer per 1000 square feet be applied to the lawn over the growing season.

Questions to ask yourself

  • What are your lawn care goals? Are you concerned about potential pollution from storm water runoff? Are you concerned about exposure to lawn pesticides?
  • Are you interested in a “rescue operation” for your lawn to remove excessive weeds and/or to rejuvenate lawn grasses and soils—before starting a healthy lawn program?
  • Are a few weeds in your lawn acceptable? Are you willing to dig a few weeds by hand?
  • Are you willing to follow recommended mowing and watering practices? Tall grass (2-1/2 to 3 inches after cutting) is healthier and shades out many weeds. Regular watering (daily, if possible) is the most essential factor supporting a green, healthy lawn.
  • Are you willing to consider “extra” services such as core aeration or over-seeding? Seeding may be helpful for increasing turf density and crowding out weeds.
  • Are you interested in low-maintenance groundcovers in shady areas as a substitute for grass?

Questions to ask lawn care services

  • Do you offer an on-site consultation?
  • Are you willing to provide a program tailored to my lawn?
  • Do you obtain a soil test before recommending a fertilizer program?
  • Do you offer organic and/or slow-release nitrogen fertilizer options?
  • Do you offer a low-phosphorus or zero-phosphorus fertilizer option?
  • Do you offer reduced pesticide or zero-pesticide options?
  • Do you wait until May to begin fertilizer applications?

Lawn service programs

Alternative lawn care programs that address many of the above questions concerning fertilization and weed control are available from some firms. Here are examples of the programs offered:

Fertilizer options

Types of fertilizer – Slow-release fertilizers provide a steady supply of nutrients over an extended period of time, building healthy grass and reducing the potential for fertilizer runoff. Slow-release options include:

Organic fertilizers. Organic fertilizers are derived from remains or by-products of living organisms. Examples include bone meal, blood meal, cottonseed meal, fish emulsion, manures, and sewage sludge. Organic fertilizers enhance the biological activity of the soil system by contributing organic matter as well as a wide spectrum of macronutrients and micronutrients.

Synthetic fertilizers. Synthetic slow-release fertilizers may be applied in liquid or granular form. A formulation with 40 percent or more water insoluble nitrogen (W.I.N.) is recommended. 

Quantity of nitrogen fertilizer – Depending on the type of grass you have, ask for an application rate of 2 to 4 pounds of nitrogen fertilizer per 1000 square feet be applied to the lawn over the growing season. Kentucky bluegrass typically requires 4 pounds, while fescues, ryegrasses, and grass mixtures require less. It is usually not necessary to begin fertilizing until May. Fall is the most important time to fertilize.

Low-phosphorus fertilizer – Ask for a low-phosphorus or zero phosphorus fertilizer to provide a high level of water quality protection.

Weed control options

Zero pesticide – No herbicide (or other pesticide) applied at any time.

Spot-treatment for weeds – The applicator identifies and treats for individual types of weeds. This approach minimizes herbicides and avoids the blanket application of a weed-and-feed combination.

One-time “rescue operation” for weed control – The applicator uses herbicides to remove significant quantities of weeds from the lawn. After the cleanup, a reduced herbicide program is followed.

Courtesy of SOCWA (Southeastern Oakland County Water Authority, www.socwa.org).

Elsewhere: Lawn Care without Pesticides

Related: Diagnosing and preventing brown spots in lawn

Filed Under: Healthy Lawns Tagged With: lawn care service, selecting, water quality

Hidden garden in the woods

May 2, 2023   •   Leave a Comment

Editor’s Note: The following are bonus photos from a profile of Tim and Dawn Condon’s garden featured in the May 2023 issue of Michigan Gardener. To read the full story, pick up a copy of Michigan Gardener in stores or see it in our Digital Edition, which you can read for free at MichiganGardener.com.

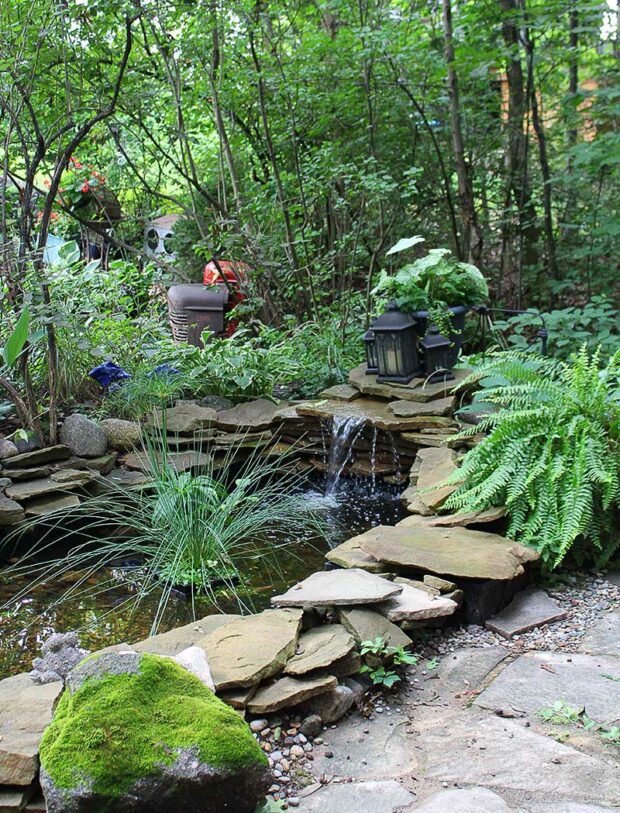
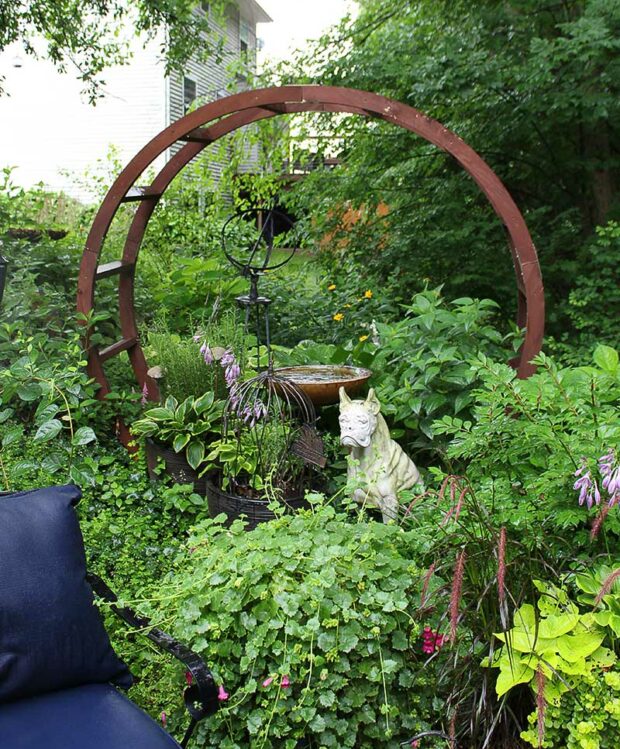
The pond adds soothing sound to Tim and Dawn Condon’s garden.
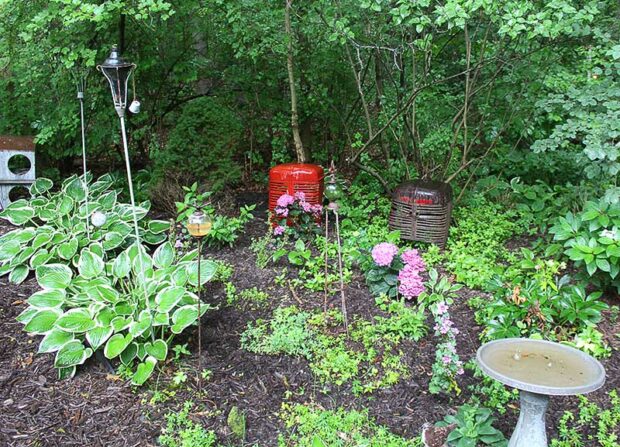
Dawn Condon uses found items and antiques to decorate the garden, including these antique tractor grills, which are brought inside for the holidays and used to hide the tree stand.
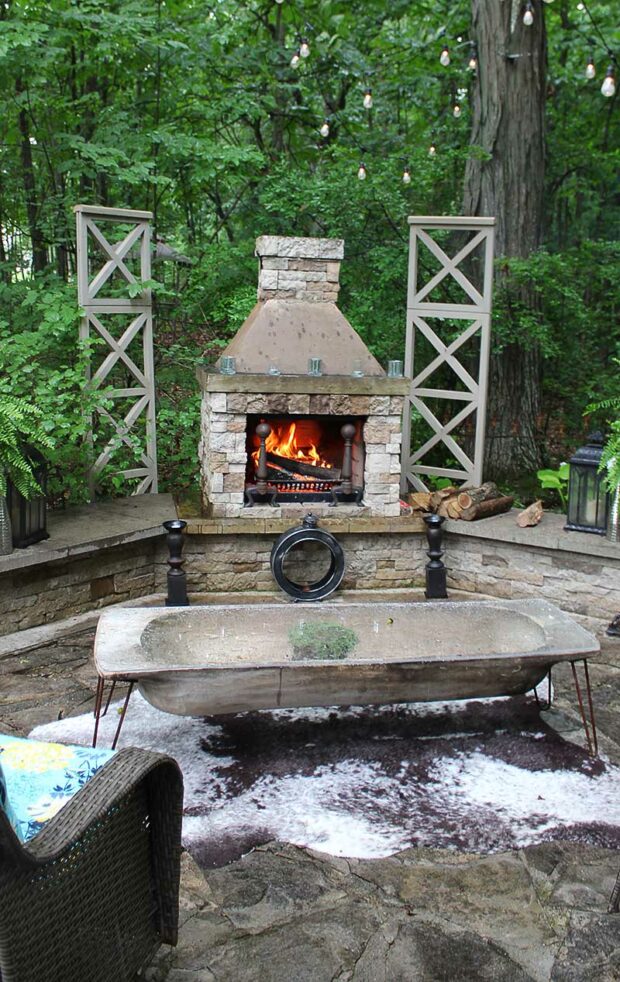
This outdoor fireplace is a cozy place to sit any time of the year.
This round artwork frames a lovely scene.

Filed Under: Website Extras Tagged With: condon, dawn, profile, tim

Rock cress (Aubrieta) pairs beautifully with spring bulbs

April 18, 2023   •   Leave a Comment

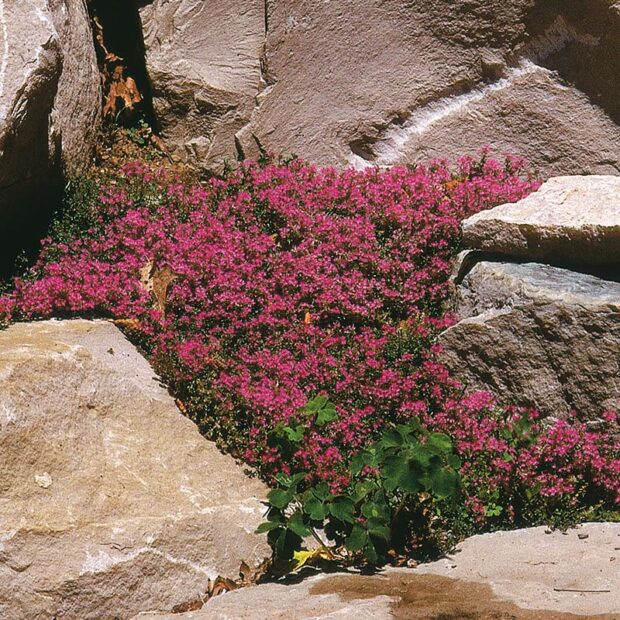
Aubrieta is used effectively in this rock garden.
Aubrieta is used effectively in this rock garden. (Photo: Steven Nikkila)

by George Papadelis

Of all the perennial plants we have available for April flowers, rock cress (Aubrieta) is one that combines beautifully with early season bulbs.

Aubrieta has the common names rock cress and false rock cress. This is an excellent example of when common names can be confusing. Another popular rock garden plant, Arabis, is also called rock cress. Our focus here will remain on Aubrieta, whose characteristics are similar to Arabis.

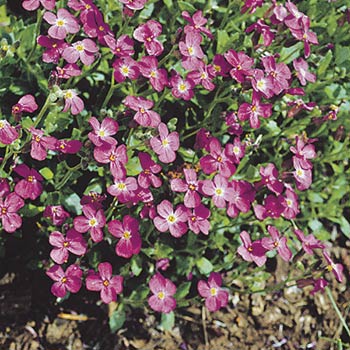
Aubrieta ‘Dr. Mules’
Aubrieta ‘Dr. Mules’ (Photo: Valleybrook Gardens)

Aubrieta is considered an excellent rock garden plant. Rock gardens can vary, but this term typically describes sunny gardens with smaller, shorter plants that look good growing among rocks. Alpine plants are usually rock garden plants; however, the term “alpines” refers to plants that originate from mountains, above the timberline. They are always compact to better withstand strong winds and are happiest in well-drained “rocky” soil. This is a little confusing, but it is interesting to note that most alpines are rock garden plants, but rock garden plants are not necessarily alpines. Aubrieta is in fact an alpine plant that originated on the mountains of southern Europe and Turkey.

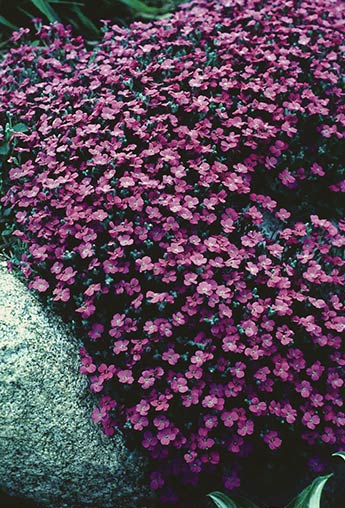
Aubrieta ‘Whitewell Gem’
Aubrieta ‘Whitewell Gem’ (Photo: Walters Gardens)

Aubrieta usually begins to bloom in mid to late April and continues into May. They bloom 4 to 6 weeks, which is twice as long as the popular creeping phlox. Plants rarely grow taller than six inches and may spread as far as 24 inches. Almost all aubrieta have mat-forming, gray-green leaves that hold their color and remain alive all four seasons. The only maintenance they may require is a light trim of the leaves after flowering is completed.

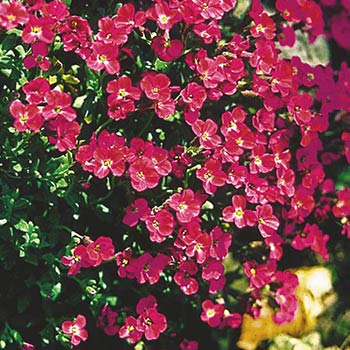
Their flowers are rarely over 3/4-inch wide, but are produced in masses. Flower colors include white, pink, red, blue, and violet. Many seed-grown varieties produce flowers in a range of colors. ‘Royal Blue,’ for example, has flowers of blue, lavender, and violet. ‘Royal Red’ has flowers in shades of red, purple, and magenta. For semi-double flowers, try ‘Bengal,’ which comes in shades of lavender, cerise, and purple. Some varieties are truly one color, such as the dark purple flowers of ‘Whitewell Gem’ and the fluorescent blue flowers of ‘Novalis Blue.’

Aubrieta ‘Red Carpet’
Aubrieta ‘Red Carpet’ (Photo: Valleybrook Gardens)

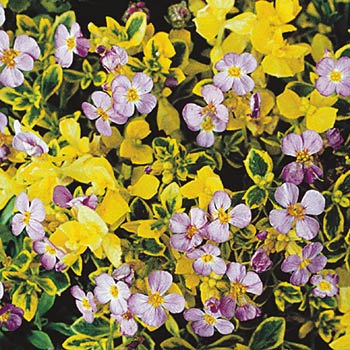
Some aubrieta are grown from cuttings to more perfectly reproduce the desirable characteristics of the parent. ‘Aurea,’ also called golden aubrieta, has gold-yellow leaves that provide another attractive feature long after its blue-violet flowers have faded. ‘Aurea Variegata’ has bright gold and green bicolored leaves topped with blue-violet flowers. ‘Argenteovariegata’ forms a extra dense, 2- to 4-inch tall mound of creamy yellow variegated foliage and bluish flowers.

There are several other rock garden or wall plants for sun that bloom about the same time as aubrieta. Some of the more popular ones include Arabis, candytuft, perennial alyssum, pasque flower, and cushion spurge. All of these are great companions for bulbs that, like aubrieta, prefer well-drained, slightly alkaline soil and full sun. The blues, purples, and reds of aubrieta make perfect companions for pink tulips or golden daffodils.

Aubrieta ‘Argenteovariegata’
Aubrieta ‘Argenteovariegata’ (Photo: Valleybrook Gardens)

The well-known garden designer Lauren Springer created a beautiful combination in her garden using aubrieta. She planted it with blue-leafed, donkey-tail spurge (Euphorbia myrsinites). Its chartreuse flowers are planted with the purple flowers of rock cress in a dry corner of her yard. She writes “it is perhaps the most psychologically effective combination in the garden, setting the mood for advancing spring, filling me with delight and anticipation each time I go in and out of the otherwise still dormant garden.”

After a Michigan winter, I think it is especially important to celebrate the long-awaited spring. If you can find or create a well-drained sunny site, try using aubrieta to herald the promise of another gardening season—just like Lauren Springer.

Rock cress, false rock cress

Botanical name: Aubrieta deltoidea (aw-bree-EH-tuh del-TOY-dee-uh)
Plant type: Perennial
Plant size:  Height: 6 inches / Width: 24 inches
Habit: Mat-forming mound
Hardiness: Zone 4
Flower colors: Purple, blue, violet, red, white and pink
Flower size: 3/4-inch wide
Bloom period: Mid April to May
Leaf color: Gray-green; some varieties are variegated
Light: Full sun
Soil: Well-drained, average fertility
Uses: Rock garden, wall garden, edge of perennial beds
Companion plants: Arabis, candytuft, perennial alyssum, pasque flower, cushion spurge, short tulips and daffodils
Remarks: To prevent legginess, cut back stems after flowering to allow new growth to emerge and maintain compactness.

George Papadelis is the owner of Telly’s Greenhouse in Troy and Shelby Township, MI.

Filed Under: Plant Focus Tagged With: Aubrieta, perennial, Rock cress

Mulch volcanoes are harmful to trees—here’s why.

April 18, 2023   •   Leave a Comment

by Steve Turner

Mulching is one of the best things you can do for your plants if it is done right, but too much or improperly installed mulch can be a real problem.

The problem

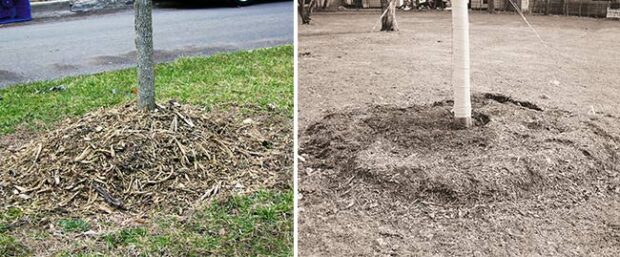
The common practice of mounding mulch against the trunk has proven to be a fatal one for many trees. These often seen “mulch volcanoes” are perfect circles 8 to 12 inches thick (or more) piled against the trunk. They are actually creating more problems than they are solving.

What compounds the problem is that many of these trees are on commercial properties under professional care, and this has helped create the false impression that this is the proper way to mulch trees. Homeowners see this and imitate the practice on their own trees. The neat, clean appearance it gives a landscape is appealing to many. Actually, I have had several customers over the years ask me if there is a mold they can buy to make these volcanoes on their own trees! So in our quest for a beautiful landscape, we are unknowingly sacrificing the long-term health of the trees.

LEFT: Mounding mulch against the trunk of a tree can create problems, including wounds, decay, and girdling roots. RIGHT: Mulch should be placed in a ring around the tree, with the center around the trunk empty, like a wide doughnut.

How does it harm trees?

The bark on the roots of a tree is much different than the bark on its trunk or branches. It is able to tolerate moisture as well as the lower oxygen levels in the soil. The aboveground portion of the tree, which starts at the root flares, has bark that contains tiny openings which are used to release gases and toxins from its system. On plants such as cherry trees or forsythias, these sites (called lenticels) are easily seen as tiny white dots or dashes on the bark. Because of this important function, trees can’t tolerate soil or mulch placed above its root flares. The lack of air and the presence of excess moisture prevents natural respiration from the bark and causes a build up of gases and toxins in the bark tissue.

The damage

If soil or mulch disrupts the respiration of the bark, the tree will usually respond in one of two ways. On thin-barked, young trees or species with naturally thin bark, like beech or linden, this disruption causes cankers (wounds) on the trunk. These appear as areas of dead tissue and provide an opportunity for decay to enter the tree. Other species will react by sending out additional roots from the trunk. These roots often end up circling around the trunk and become girdling roots in the future. Researchers are finding out that trees with girdling roots and excess soil and mulch build-up are much more prone to snapping off at the base in wind and ice storms. The longer the problem exists, the more damage occurs, and the chances of correcting it decrease.

Note that not all trees will respond in the same way—species, age, and health all need to be considered when trying to evaluate the effects of past damage. Most willow trees, for example, are very adaptable to a change of grade and often will show no problems at all.

Can the problem be fixed?

If caught soon enough, it can be corrected and tree will recover. However, upon root crown inspection, if it is found that large cankers have formed and decay is present, or if the tree has developed extensive girdling roots, it might be wiser to remove and replace the tree than attempt to save it. During the root crown inspection, arborists use a high pressure air device called an “air spade” to safely remove the excess soil and mulch without damaging the root system. Once the soil is removed, there is a clear view of the buried trunk and roots. Then the damage can be evaluated, and a decision made as to which roots to leave and which can be safely removed. It is very important not to remove too much too soon or the tree will be shocked. Sometimes the work will have to be done in stages over a couple years.

Proper mulching

While it is common to see 4 to 6 inches of mulch around a tree, this is usually too much. I would suggest 2 to 3 inches placed in a ring around the tree with the center around the trunk empty, like a doughnut. How wide to make the ring is up to you, but the bigger the better. Trees don’t like to compete with lawns for nutrients and water, and the more mulched area you can give them, the better off they will be. Mulched trees have fewer problems than trees growing in lawns. Even a small, 2- to 3-foot ring can make a big difference. The mulch creates a more natural growing environment with its organic material breaking down and supporting vital soil microbes. Other benefits include increased moisture retention and cooler soil temperatures, both of which favor optimal root growth.

If done properly, mulch is a great asset to your landscape and aids your trees during summer drought periods by maintaining soil moisture. It also helps insulate the roots during the winter months, which allows them to remain active longer through the seasons.

Steve Turner, Certified Arborist, is from Arboricultural Services (248-259-8420).

RELATED: Janet’s Journal – How to improve your clay soil

ELSEWHERE: Mulch overload!

Filed Under: Tree Tips Tagged With: mulch, mulch volcanoes, mulching, trees

Growing vegetables in containers

April 18, 2023   •   Leave a Comment

by Jeff Ball

Many homeowners live in a situation where there is insufficient space for even a small veggie patch. Those folks should consider growing vegetables in containers that can be placed almost anywhere as long as they get 8 hours of full sun.

Containers can be used to grow all the salad ingredients: lettuce, carrots, cabbage, cucumbers and tomatoes. Other popular vegetables enjoyed by most everyone are also easily grown in containers, including green beans, beets, Swiss chard and zucchini squash, just to name a few.

There are really just three criteria for the container used to grow vegetables: It must have plenty of drainage holes in the bottom, it must be at least 12 inches deep (deeper is better), and there should never be real soil used as a growing medium. All containers should use a soilless potting mix because it has no weed seeds, carries no disease spores, and drains very well. A good potting mix can be used for years, although it is wise to renew it each spring with some fresh compost and additional potting mix.

Finding containers for growing vegetables is not that difficult. Sometimes you can find some that do the job and are free for the asking. Just keep your eye out. I once spotted lots of used plastic barrels at a food processing facility. Sure enough, they were happy to get rid of them. I got four barrels, cut them in half with a saber saw and drilled a dozen holes in the bottom of each for drainage. That gave me eight large containers that I filled with potting soil and grew a nice harvest of potatoes.

A common container that is effective, but not free, is a whiskey barrel cut in half and sold in many garden centers. Again, you need to drill additional drainage holes, but because of their size, you can grow almost any vegetable in those devices. Tomatoes do especially well because there is so much space for their rather large root systems. 

Years ago, I visited a serious vegetable gardener who lived in a row house. These connected houses have tiny front yards and often no backyard. He had a significant garden growing in over 50 plastic milk crates which he had appropriated for what he considered a “higher” use. He lined the crates with black plastic bags with holes in the bottom and filled them with potting soil. The colorful boxes filled his front yard, his front porch, a second floor balcony he built for holding more boxes, and on a platform he built on top of his garage. 

I asked him if he had any complaints from the neighbors since his garden, while obviously productive, probably did not add much to the aesthetics of the neighborhood. He said he solved that problem by sharing fresh vegetables with his neighbors—a gardener with some political skills. 

All of these containers I have described require watering each day or two by hand. Unlike the soil in the garden, a container filled with plants does run out of water more frequently and must be watched every day. That said, there are self-watering containers available that significantly reduce this worry of missing a watering need. These products are designed specifically for growing vegetables and several have been on the market long enough to have proven that they work well.

Nothing tastes better than homegrown vegetables and those grown in a container can taste just as good as those from a garden.

Jeff Ball has authored eight books on gardening, vegetables, and lawn care.

RELATED: Growing low-maintenance vegetables

ELSEWHERE: MSU Guide to growing vegetables

Filed Under: Vegetable Patch Tagged With: containers, Growing vegetables in containers, vegetables

Cut and come again vegetable harvesting technique

April 4, 2023   •   Leave a Comment

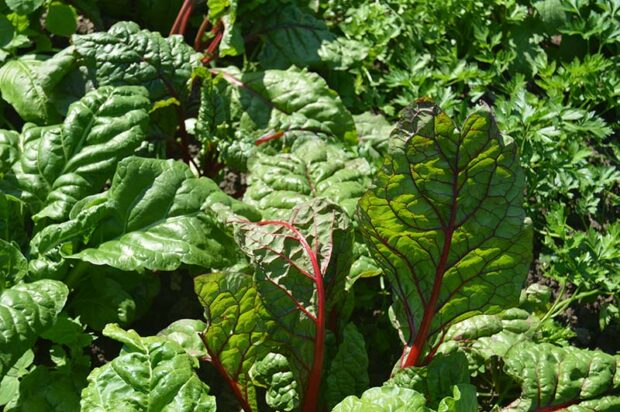
By harvesting just the outer stalks of the chard, it will continue to send up new shoots for later cutting.

What do leaf lettuces, kale, Swiss chard, spinach, broccoli, and cabbage have in common? They are all examples of “cut and come again” vegetables. What exactly do we mean by that? Well, as the name implies, it is a vegetable that can have edible portions cut off, but will continue to grow and produce more portions that can be cut again at a later time. Usually, leafy vegetables that grow as a rosette (in a circular fashion or from a central point) are most likely to be cut and come again. Rosette-type plants include: broccoli, Brussels sprouts, cabbage, kale, leaf lettuces, spinach and Swiss chard, among a few others.

Many gardeners are probably familiar with cutting just the outer leaves of kale, spinachand leaf lettuce, so that the plant continues to produce fresh leaves that can be cut again a few days or weeks later. This helps extend the harvest without adding more plants to the garden. Eventually the plant will bolt (go to seed), at which point the vegetable will no longer produce the sweet edible leaves you want to cut, and the plant will need to be removed. It is also possible to cut the entire head of leaf lettuce providing the cutting is done about 1-1/2 inches above the crown, the growing point of the plant. If you cut off the crown, you may as well remove the whole plant.

Swiss chard and beet leaves also grow as a rosette. By harvesting just the outer stalks of the chard, it will continue to send up new shoots for later cutting. If you like to eat the greens on a beet, then you can harvest a couple of the outer leaves from each plant. When you cut the outer greens, leave about an inch or so of the stem on the beet.

While broccoli, Brussels sprouts and cabbage are also rosette plants, we don’t think of them the same way as most of the loose, leafy plants. Probably because we are harvesting the flower head of broccoli, the large head of the cabbage, and the small buds of the Brussels sprouts. However, done correctly, these vegetables will also continue to produce more for harvesting.

For Brussels sprouts, harvest from the bottom up. Cut the larger heads that develop at the bottom and allow the buds higher up to continue developing, then harvest as they grow. If you cut the rosette tip of the plant, the sprouts will tend to mature at the same time. For broccoli, if you cut the terminal head, side shoots will develop. They will not be as large as the main head, but will continue to be produced for several weeks. Lastly, for cabbage, cut the large central head, leaving the outer leaves and the root in the ground. Wait a few weeks and you should begin to see smaller heads forming at the base of the leaves that were left. These will grow into small cabbage heads, just a few inches in diameter, but sweet and delicious in soups, stews or salads.

Think of “cut and come again” as a type of plant pruning. As with all pruning, be sure that your cutting tool is clean and sharp. Take care not to cut the growing crown. Cut the mature outer leaves, preferably while they are still a little young, to help maintain the quality of the successive cuttings. Use care to maintain watering to reduce stress on the plant. Eventually all good things come to an end, so when the cuttings begin to lose flavor, the plant loses vigor, or seed formation (bolting) begins, the harvest is over and it’s time to grow something new!

Mary Gerstenberger was the Consumer Horticulture Coordinator at the Michigan State University Extension in Macomb County, MI. For vegetable and gardening information from MSU, visit www.migarden.msu.edu.


Call the toll-free Michigan State University Lawn and Garden Hotline at 888-678-3464 for answers to your gardening questions.

Elsewhere: Use this harvesting technique to have a continuous supply of vegetables during your growing and eating season.

Filed Under: Vegetable Patch Tagged With: Cut and come again, Harvest, vegetables

  • « Previous Page
  • 1
  • 2
  • 3
  • 4
  • 5
  • 6
  • …
  • 43
  • Next Page »

Copyright 1996-2025 Michigan Gardener. All rights reserved.