Michigan Gardener

SIGN UP to stay in touch!
We will send you occasional e-mails with gardening tips and information!


Digital Editions

Click on the cover to read now!

  • Home
  • Departments
    • Ask MG
    • Books
    • Clippings
    • Garden Snapshots
    • MG in the News
    • Janet’s Journal
    • Plant Focus
    • Profile
    • Raising Roses
    • Thyme for Herbs
    • Tools and Techniques
    • Tree Tips
  • Garden Event Calendar
  • Resources
    • Alternatives to Impatiens
    • Garden Help
    • Soil and Mulch Calculator
    • Public Gardens
  • Web Extras
  • About
    • About Us
    • Editorial Content
    • Privacy Policy
    • Contact Us

PLEASE NOTE: In the autumn of 1995, we hatched the idea for a free, local gardening publication. The following spring, we published the first issue of Michigan Gardener magazine. Advertisers, readers, and distribution sites embraced our vision. Thus began an exciting journey of helping our local gardening community grow and prosper.
After 27 years, nearly 200 issues published, and millions of copies printed, we have decided it is time to end the publication of our Print Magazine and E-Newsletter.

Boundless tomato harvests contain infinite possibilities

September 8, 2015   •   Leave a Comment

The Salt at NPR.org:

It’s that time of year when some gardeners and tomato-coveting shoppers face a vexing question: What on earth am I going to do with all these tomatoes I grew (or bought)?

A select few up to their elbows in tomatoes may have an additional quandary: How am I going to prepare different kinds of tomatoes to honor their unique qualities?

Chef Jamie Simpson of the Culinary Vegetable Institute faced a particularly challenging version of this last week: 100 pounds of 60 different kinds of tomatoes to transform into a seven-course dinner. Fortunately, it’s Simpson’s job to come up with creative solutions to such problems of abundance. And as Simpson deftly reminded us, the possibility of the tomato is pretty much infinite.

Read the rest of the article here…

Filed Under: Clippings Tagged With: cooking, dinner, prepare, tomato, tomatoes

Janet’s Journal: Plant damage awareness will help prepare the garden for next year

September 1, 2015   •   2 Comments

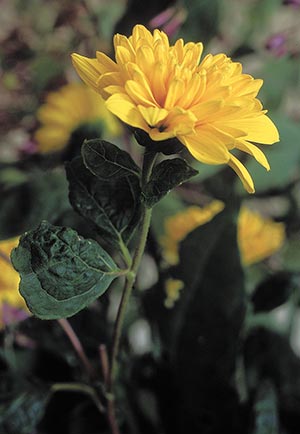
Some leafhoppers pierce and suck the leaf veins, causing puckering and distortion as in these perennial sunflower leaves.

by Janet Macunovich /
Photos by Steven Nikkila

Next year. Perhaps the two most important and versatile words in gardening. They serve as battle cry, mantra, salute, farewell, promise, threat, review, vision and more. Are you using them now as you decide how to spend this long, gentle fall season? You should!

In nature’s cyclical way, fall is not only a wind-down of one season but a start-up of the next. Spring’s growth and summer’s vigor will be based in large part on how much energy plants stored the preceding fall. Soil nutrients accumulate in autumn, dropping in leafy form as coins into a bank. Plant damage that made us grind our teeth this summer are nestling into hideaway holes, ready to retake the garden when warmth returns.

Did you battle an insect or disease this year? Then don’t waste “next year” as a wistful sigh—make it an avenging war whoop by learning what those pests were, where they hide and how to head them off at the pass to ensure a healthy garden next year. Here’s what I’ve learned to do now or sometime before spring about leafhoppers, iris borers and peony botrytis.

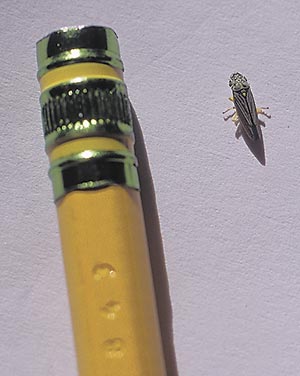
A mature leafhopper...plenty of trouble in a small package. Most plant damage is done by the nymphs—immature leafhoppers far smaller than this.
A mature leafhopper…plenty of trouble in a small package. Most plant damage is done by the nymphs—immature leafhoppers far smaller than this.

Legions of leafhoppers

Leafhoppers, like most insect populations, go through periods of boom and bust. During the boom, sage, globe thistle, sunflowers, coneflowers, roses, privets, peashrubs, and other plants have stunted growth and stippled foliage or leaf edges that look drained of color and then yellowed in a pattern called “hopperburn.”

The damage isn’t terminal, just unsightly. It doesn’t stop established plants’ bloom. Newer plants are more affected, their energy levels perhaps so reduced that the year is a wash, so they emerge their second spring no larger than when first planted. The biggest trouble with leafhoppers is that some transmit plant viruses. Cross-infection is always possible in a garden, but where leafhoppers flourish the chances of it happening are much higher.

Leafhoppers don’t chew, but insert straw-like mouths into a leaf and suck. If we’re on the lookout, the first pale leaves and distorted new growth are evident in May. By late June, two or more hopper generations later, pale dots on the foliage or yellow halos along leaf edges may be evident from ten paces. At midsummer, even someone unfamiliar with the symptoms can’t miss the nymphs (immature leafhoppers) which spring in all directions when disturbed, like tiny gymnasts in pale green tights launched up and out off trampolines.

If you approach quietly, leafhopper nymphs are simple to kill with any insecticide, even soapy water. Keep two things in mind in choosing that course, though. First, don’t drop your guard—as many as five generations of leafhoppers can occur each year, depending on hopper species and weather. So the plants will probably host the insects again when eggs are laid by hoppers from plants nearby. Second, damage already done is irreversible. Leaves won’t return to full size or the correct shade of green.

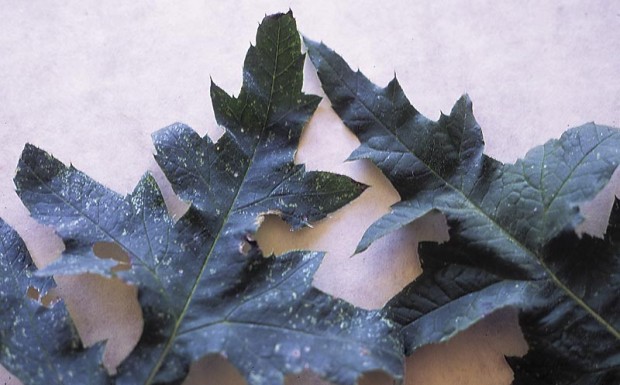
Leafhopper species that pierce and suck a leaf’s meaty part create pale areas and a stippled look. The globe thistle leaf on the right is more normal in color than the stippled leaf on the left. Leafhopper stippling can be mistaken for spider mite damage—look on the leaf underside for the cast skeletons of leafhopper nymphs to determine the true culprit.
Leafhopper species that pierce and suck a leaf’s meaty part create pale areas and a stippled look. The globe thistle leaf on the right is more normal in color than the stippled leaf on the left. Leafhopper stippling can be mistaken for spider mite damage – look on the leaf underside for the cast skeletons of leafhopper nymphs to determine the true culprit.

Learn first, spray later

There are many leafhopper species. Some live on myriad unrelated plants while others are restricted to one genus or family—the aster leafhopper pesters aster relatives such as daisies, sunflowers, and coneflowers. Even entomologists have trouble telling leafhopper species apart as nymphs—the most damaging stage—so we group them and deal with them based on what they eat.

Those that feed primarily on woody plants overwinter as eggs on the host plants. The last generation of maple leafhopper adults, for instance, makes slits and lays eggs in maple twigs. Redbanded leafhopper, a pea-green critter with two magenta racing stripes along each flank, makes egg-laying slits in the leaves of the rhododendron, rose, privet, or any of about 50 other species it inhabits. On these woody plants, we can spray egg-smothering dormant oil on the bark, twigs and/or evergreen leaves of the host plants just before spring budbreak.

Hoppers that feed primarily on herbaceous plants lay eggs on those leaves and stalks. Next year’s first generation can be reduced by cutting down stems and removing leaf debris from affected herbaceous plants. No sense removing neighboring, unaffected debris—a leafhopper prefers to lay eggs on the plant on which it fed. Besides, every bit of plant debris is almost as likely to have beneficial insects’ overwintering eggs or pupae—don’t remove it unless you really have to.

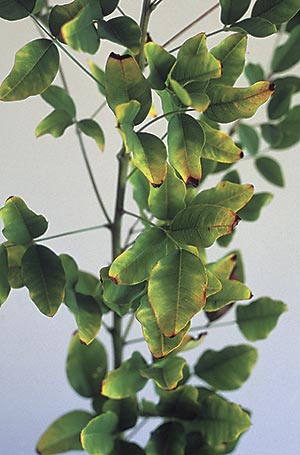
Another sign of leafhopper is “hopper burn.” The leaves of this purple bush clover were first pale-rimmed then developed yellowed and dying margins. Potato leafhopper, a species attracted to pea family plants, probably caused this damage. It’s an insect that can’t survive Michigan winters so no fall clean-up is necessary.

Beware generalities

The more I learn, the more I know that generalities such as “clean up and remove all foliage to reduce pest problems” can cause more work and problems than they solve. For instance, I won’t remove bush clover and peashrub foliage that was hopper-burned this year, or spray them with oil next spring. That’s because it’s very likely those insects were potato leafhopper, a species that can’t overwinter here. It wafts in as an adult from the Gulf of Mexico. No kidding. Why waste time spraying horticultural oil or reduce soil nutrients by raking up egg-harboring leaves when I know the eggs will die and high-altitude winds from Louisiana may not be so buggy next year? I’ll let winter cold do its work, let overwintering ladybugs, lacewings and other beneficials live, and keep an eye peeled for any new windborne infestation next Memorial Day.

Iris foliage and peony foliage are another matter. These are so likely to be attacked by iris borer and peony botrytis each year that clean-up is mandatory. That, or grow them only until the pests build up, then stop growing them for a few years until the pests starve out.

Rx for rotted iris

Irises are laid waste by soft rot, a fungus that spots the foliage and turns the root-like rhizome into malodorous mush. The fungus is too weak to infect whole tissue but gets into leaves and rhizomes through holes made by a moth larva we call iris borer. Bearded irises are particularly vulnerable to soft rot. Siberian irises and others are resistant—they usually don’t rot even when riddled by borers.

To control soft rot, control borers. That means learning the moth’s life cycle.

Small, brown, night-flying iris borer moths lay eggs on iris foliage—especially dead foliage – from late August through October. The eggs hatch in April or May and tiny larvae crawl to emerging iris leaves. They chew into the tight folds of an iris leaf then eat down into the rhizome, growing all the while. By the time they are in the rhizome in July they’re as big as macaroni noodles. From the rhizome they move into the soil, pupate, and emerge in fall as moths.

Bearded irises (once known as Iris germanica) are particularly susceptible to iris soft rot. Siberian irises (I. sibirica) and zebra iris (I. pallida ‘Variegata’) are usually resistant to the rot, even when riddled with borers.

Iris borer grub (larva) in an iris rhizome in July.

So we remove and burn, compost or bury at least 12 inches deep all iris foliage after egg-laying stops in November. As extra protection in spring, we can spray irises as leaves emerge and every so often–depending on which insecticide is used—until flower buds are well developed. Cygon, a systemic insecticide with a long-lasting effect, can be applied just once or twice, but insecticidal soap must be applied every few days and renewed after rains. Every two or three years we dig up the irises in July when iris borer grubs are in the rhizome, discard rotted or borer-infested rhizomes, and replant clean ones.

Clearing up splotchy peonies

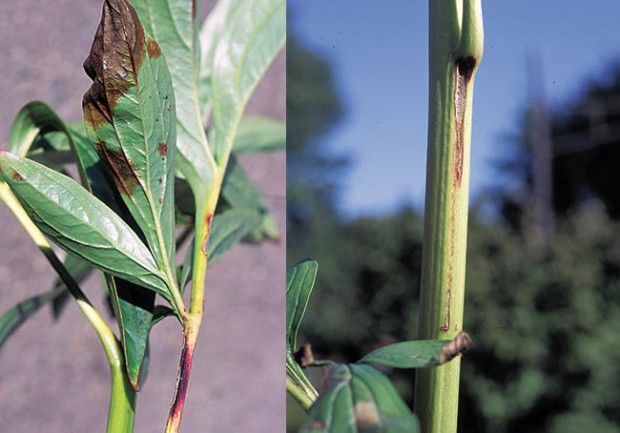
Peonies suffer from peony botrytis, another weak fungus that can’t penetrate healthy tissue but can infect and fester in weak, damaged or dead parts. Purple-brown splotches on foliage, purplish streaks on stems, and hollow, brown-interior stalks are showing the symptoms of peony botrytis.

Purple-brown splotches on peony foliage and streaks of the same color on stems are signs of peony botrytis.

Peony botrytis can splash from disease-laden debris to infect and kill frost-damaged flower buds early in spring—before we even recognize them as buds. The infection lingers there, splashing around and getting new toeholds in weak spots on leaves and stems damaged by wind or insects. The degree of infection increases over years until the plant is too weak to bloom or is a splotchy mess by midsummer. Infected roots harbor shoot-infecting disease spores even below ground and are often too weak to support the stems.

Remove and burn or put peony foliage into a hot compost—if stems are hollow and brown where you cut, cut further down until you see solid white pith. If the infection goes below ground, dig and divide that peony, replanting only solid, uninfected roots. A copper-based fungicide such as Bordeaux mix can be applied in spring as the shoots emerge and weekly until they’re about a foot tall, but removing diseased debris is more important.

Sometimes it’s depressing to know that next year’s problems are already lurking, but only in the narrow view. In the broader view, it’s clear that only a few of the many plant species we grow have significant problems in any given year. We also see there are many living things attached to each plant—perhaps 30 different organisms overwinter on each plant. Many are next year’s “good guys,” so I limit fall garden-scouring to areas of known trouble and let the blessed unknown on other plants rest undisturbed.

Janet Macunovich is a professional gardener and author of the books “Designing Your Gardens and Landscape” and “Caring for Perennials.” Read more from Janet on her website www.gardenatoz.com.


Filed Under: Janet’s Journal Tagged With: disease, fall, globe thistle, insects, iris, iris borers, Janet Macunovich, leafhoppers, peony botrytis

Identifying and treating blossom end rot

August 24, 2015   •   Leave a Comment

MSU Extension:

Blossom end rot is a physiological problem usually associated with tomatoes. Many gardeners have seen it, but may not know why it happened. Michigan State University Extension horticulture educators and Master Gardener hotlines receive a number of calls as gardeners begin circling their gardens looking for ripe produce.

Tomatoes, being the biggest garden diva, are alarmed and shocked at many situations that other less neurotic vegetables ignore. Tiny doses of herbicide, blowing sand and lack of water will produce damage to tomatoes while other vegetables tough it out. But other plants, if stressed enough, can also experience blossom end rot. These are peppers, eggplant, summer squashes and melons.

Read the rest of the article…

Filed Under: Clippings Tagged With: bloossom end rot, peppers, squash, tomatoes, vegetables, watermelon

Students grow more than just plants in school gardens

August 13, 2015   •   Leave a Comment

NPR’s The Salt:

School is still out for the summer, but at Eastern Senior High School in Washington, D.C., students are hard at work — outdoors.

In a garden filled with flowers and beds bursting with vegetables and herbs, nearly a dozen teenagers are harvesting vegetables for the weekend’s farmers market.

Roshawn Little is going into her junior year at Eastern, and has been working in this garden for three years now. “I didn’t really like bugs or dirt,” Little says, thinking back to when she got started. “Well, I still don’t really like bugs, but I like the dirt,” she laughs. She gathers a handful of greens, yanks from the stem and pulls up a baseball-sized beet.

During the summer, Little gets paid to work Tuesday through Saturday from 9 a.m. until 2 p.m. with City Blossoms, a nonprofit that brings community gardens to schools, community centers and other places where kids gather in urban areas.

Read the rest of the story…

Filed Under: Clippings Tagged With: school gardens, students, urban gardens

How to transplant poppies

August 7, 2015   •   Leave a Comment

My father planted some poppy plants back in the 50’s and they have thrived very well in his yard. Every year I would take one to him. He passed away in 1979. I now have my own home, and I have tried to transplant them to my garden in the spring, fall, and summer, but with no luck. The problem is I only have one plant left. They are a very pretty orange. When is the best time and what is the best way? J.J.F., Dearborn

The Oriental poppy is the most conspicuous of all the poppies and a popular garden plant. Poppies are easy to grow and care for, and are relatively maintenance-free and deer-resistant because many parts of the plants are poisonous if eaten. There are no special cultural requirements for Oriental poppies; they perform well under average garden conditions. However, because they have a large, fleshy taproot they are very difficult to transplant except when they are dormant. After the June blooming period is over, the plants die down entirely to the ground and remain practically dormant for a month or more, leaving large, bare spaces in the garden. About the middle of August new growth begins and a little tuft of green leaves appears.

The plants should be lifted and divided while they are dormant or just after the new growth begins. Root cuttings may also be made at this time and are very easily handled. The roots should be cut into small pieces 1 to 2 inches long, each piece containing at least one joint. These should be placed on a bed of soil, either in a flat or in a cold frame, being laid in a horizontal position. A light covering of sand or sandy loam should be spread over them to a depth of about 1/2 inch and the bed should be kept well-watered and partially shaded until active growth has started. If conditions are favorable, roots will develop from each joint and in a short time the leaves will begin to appear.

Oriental poppies will reseed and often revert to the brilliant flame of the old-fashioned type. Harvest the seedpods when the poppies go dormant, split them open, and gather the seeds to plant the following year. After they have sprouted and you have thinned the seedlings, you may consider mulching the bed to help retain water. In the heat of summer when the plants are dormant, there is no need to water them unless you are experiencing a period of drought. Poppies do best in full sun, although a few varieties can handle light shade. They rarely need fertilization. In the early winter after the first frost, apply a protective layer of mulch over the bed; remove it as the weather warms in the spring.

Filed Under: Ask MG Tagged With: oriental poppy, poppies, trasnplant

Hogweed that can blind humans found in Michigan

August 4, 2015   •   Leave a Comment

The Batlle Creek Enquirer:

The Calhoun County Public Health Department has found the dangerous giant hogweed plant in the county and is asking residents to be cautious.

According to a Monday news release from health officials, the plant was found in Pennfield Township. The plant was completely removed and the site will be monitored by township and county officials for several years.

Hogweed is dangerous because the sap on the leaves, roots, flower heads, seeds and stem hairs can cause blistering and scars if they touch bare skin. Sap can also cause permanent blindness if it gets in the eyes.

Read the rest of the article (with video)…

Filed Under: Clippings Tagged With: blinding, blindness, calhoun county, hogweed, Michigan

Eliminating snow-on-the-mountain from the garden

July 31, 2015   •   Leave a Comment

Snow-on-the-mountain (Aegopodium podagraria) was introduced in English gardens during the Middle Ages by the Romans, and was used as an herb. Due to its vigor, it escaped to the wild where it made itself at home on the edge of woodlands and in waste places. Historically it has been used medicinally as a treatment for gout, bee stings, burns, wounds, etc. In his book The Herbal, John Gerard made this comment in 1633: “… it groweth of it selfe in gardens without setting or sowing, and is so fruitful in his increase, that where it once hath taken root, it will be hardly got out againe, spoiling and getting every year more ground, to the annoying of better herbs.” (Nearly 400 years later, we are still battling this plant!)

A few people love it as a groundcover, but most people have grown to thoroughly dislike it, to say the least. It can take over a garden so aggressively that some people even consider bulldozing the entire garden. It spreads like wildfire, by rhizomes and by seed. Under the right conditions, 3 little starter plants can spread 30 feet in two years! This is a serious pest for any climate that gets regular rainfall or moisture. It smothers other plants up to 12 inches tall. Roots break off (especially in hard, packed soil) and sprout, even a year or more later.

There are several ways to try to get rid of it. In loose soil, you can pull/sift it out of the soil by hand, with lots coming back from parts you missed. Even the smallest piece of root left behind will start a new patch. You can try multiple applications of Roundup: spray, wait until new growth starts, then spray again. You’ll have to repeat this process multiple times, for several years. You can also try a combination of Roundup and covering the area with black plastic or carpet. You would have to leave that on for 2 years at least, and still monitor for any shoots coming up. A possible biological control: groundhogs. They love it. They, however, have their own downsides in the garden.

Filed Under: Clippings Tagged With: Aegopodium podagraria, groundcover, Snow-on-the-mountain

How to identify and manage caterpillar pests of the cabbage family

July 25, 2015   •   Leave a Comment

Michgan State University Extension:

During this time of year in many backyard vegetable gardens, members of the cabbage family are growing vigorously, but their leaves are beginning to take on the appearance of lace. Several caterpillar pests find cabbage, Brussels sprouts, kale, collards, broccoli, cauliflower and related cole crops very appealing.

Identifying caterpillar pests

One of the most common caterpillar pests of the cabbage family is the cabbage butterfly. Cabbageworms are the larvae of cabbage butterflies, a species with white wings that have black margins and black spots. They can be seen fluttering around vegetable gardens where they stop to lay eggs. In three to five days, the eggs hatch into velvety, pale green caterpillars. After feeding for two to three weeks, larvae are full grown and pupate. Younger larvae chew holes in the foliage, leaving the veins behind. Older larvae may keep feeding on leaves or tunnel into heads. There can be four to five generations per year. They overwinter as pupae near their host plants.

Read the rest of the article here…

Filed Under: Clippings Tagged With: broccoli, Brussels sprouts, cabbage family, caterpillar pests, cauliflower, collards, kale

Television personality Jamie Durie comes to Metro Detroit

July 21, 2015   •   Leave a Comment

jamie-durie-0715
Jamie Durie

On Saturday, July 25 from 1 p.m. to 3 p.m., award-winning landscape designer Jamie Durie is appearing at the English Gardens store in Royal Oak, Michigan (4901 Coolidge Highway). Durie will share tips on creating a beautiful outdoor living space, answer questions and sign two of his books: “Edible Garden Designs” and “The Outdoor Room,” available for purchase. The event is free and open to the public. Space is limited. Register in-store or online at www.EnglishGardens.com to reserve your seat.

An exclusive event will be held on Friday, July 24 from 6 p.m. to 8 p.m. for English Gardens Garden Club members. Customers can sign up for the Garden Club in-store or online to attend the exclusive event.

The author of ten best-selling books, Jamie Durie has hosted over 50 prime time design television shows, airing in over 30 countries. Durie was introduced to America by Oprah Winfrey in 2006 and since then has starred in “The Outdoor Room” on HGTV, hosted “The Victory Garden” (the longest-running gardening program on PBS), and won numerous awards for his television work. Today, he continues to work on design TV projects with the A&E Network on the FYI channel.

Filed Under: Clippings Tagged With: detroit, jamie Durie

Healthy-looking rose bushes fail to bloom

July 13, 2015   •   Leave a Comment

I have 6 rose bushes that get morning sun. The foliage looks great but I get no roses. I inherited these plants when I bought the house and I don’t know anything about them. I have good drainage and have given them rose fertilizer. C.M., Allenton

Your roses with no blooms are more than likely not receiving enough direct sunlight. In order to produce flowers, roses must have full sun, which is usually defined as a minimum of 6 to 8 hours of direct sunshine. Morning sun doesn’t sound like it fulfills that requirement. Perhaps the rose bushes have become shaded as the surrounding landscape has matured and trees and shrubs have grown larger, creating shade where there was once full sun. If that is the case you have two options.

First, it may be possible to prune back the offending trees or plants that are creating the afternoon shade, thereby allowing more sunshine to the roses. In a mature landscape that can be difficult due to the probable destruction of the aesthetics provided by the larger plants. A second and more viable option is to simply transplant the roses to a new space with the full sun they need. The best time to transplant roses is in the very early spring, while they are still dormant, before any new leaves have sprouted. You can get a jump on the process by digging and preparing the new rose bed this growing season in anticipation of the big move. Then, next spring, dig each bush with the largest root ball you can handle and move them into the light.

Filed Under: Ask MG Tagged With: bloom, fail, rose bushes, roses

  • « Previous Page
  • 1
  • …
  • 23
  • 24
  • 25
  • 26
  • 27
  • …
  • 43
  • Next Page »

Copyright 1996-2025 Michigan Gardener. All rights reserved.