Michigan Gardener

SIGN UP to stay in touch!
We will send you occasional e-mails with gardening tips and information!


Digital Editions

Click on the cover to read now!

  • Home
  • Departments
    • Ask MG
    • Books
    • Clippings
    • Garden Snapshots
    • MG in the News
    • Janet’s Journal
    • Plant Focus
    • Profile
    • Raising Roses
    • Thyme for Herbs
    • Tools and Techniques
    • Tree Tips
  • Garden Event Calendar
  • Resources
    • Alternatives to Impatiens
    • Garden Help
    • Soil and Mulch Calculator
    • Public Gardens
  • Web Extras
  • About
    • About Us
    • Editorial Content
    • Privacy Policy
    • Contact Us

PLEASE NOTE: In the autumn of 1995, we hatched the idea for a free, local gardening publication. The following spring, we published the first issue of Michigan Gardener magazine. Advertisers, readers, and distribution sites embraced our vision. Thus began an exciting journey of helping our local gardening community grow and prosper.
After 27 years, nearly 200 issues published, and millions of copies printed, we have decided it is time to end the publication of our Print Magazine and E-Newsletter.

Archive for the Uncategorized department

Dormant pruning: Make a positive start to your gardening season

March 18, 2025   •   Leave a Comment

by Evelyn Koponen

As you look forward to a fresh gardening season, it is a good time to consider what you can do to improve the health and overall look of your landscape. A tree or shrub that is not maintaining the shape you desire, or has stopped producing as many flowers as it did in the past may need a good pruning. Trees and shrubs in dormancy can be pruned more aggressively, with less stress to the plant and minimal risk of disease because pests that would attack these trees and shrubs are dormant as well. An aggressive dormant pruning will promote more vigorous growth in the spring, which can bring new life and shape to a tired area of your garden.

To encourage and support you in your pruning ventures, here are some standard pruning guidelines for shrubs.

Step 1: Analyze

Be familiar with the plants that you are pruning. This seems obvious, but misidentification can happen—common names can be very similar and confusing, and different pruning forms may be needed on variations of the same plant type. Doing your own research on the best time of year to prune your particular shrub is important. For example, oakleaf hydrangea (Hydrangea quercifolia) and smooth hydrangea (H. arborescens) should not be pruned at the same time. Oakleaf hydrangea flowers on old wood, so pruning right after flowering is appropriate. Smooth hydrangea flowers on new wood, so cutting back severely in the late fall or early spring is ideal.

Make sure that you know your reason for pruning. Consider the whole of the plant, identify dead wood and potentially diseased areas that need to be removed, and plan how you want the end shape of the plant to be. Healthy, corrective shaping of a shrub or tree can take several years, so be patient with your plant and with yourself.

Step 2: Tools

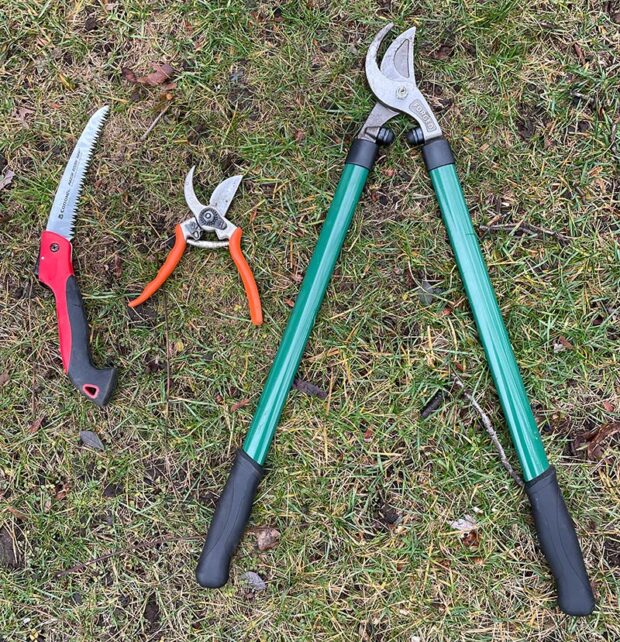
For pruning most shrubs, a few simple tools will go a long way. On bigger limbs, use a sharp hand saw. On smaller branches, use bypass pruners and bypass loppers. These should cover most of your pruning needs. To help prevent the spread of disease, it is a good habit to keep a spray bottle with 91 percent isopropyl alcohol on hand, to sanitize your tools after pruning a shrub or tree. Using proper tools that are sharp is essential to prevent jagged cuts or crushed branch tissues that will prevent the cut from healing over.

Basic tools for dormant pruning: a sharp hand saw, small bypass pruners, and bypass loppers.
Basic pruning tools: a sharp hand saw, small bypass pruners, and bypass loppers.

Step 3: Making cuts and removing branches

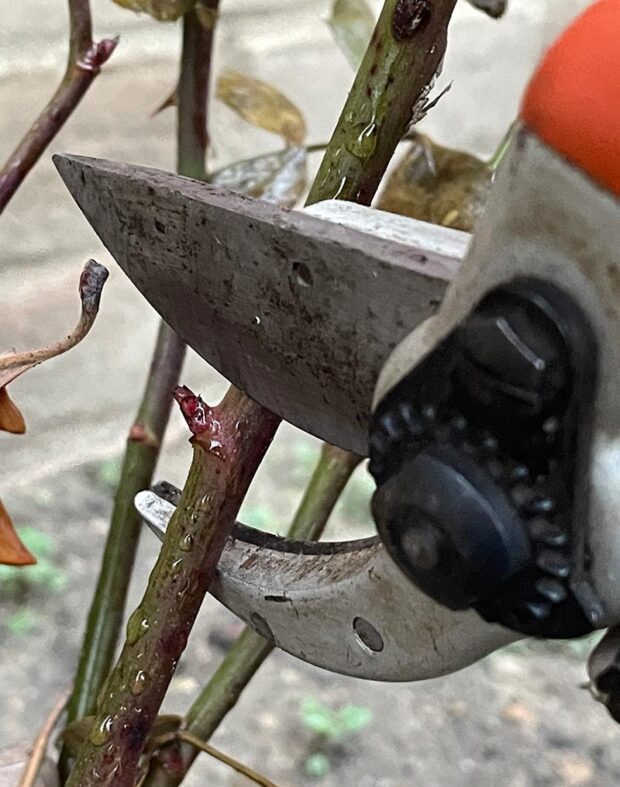
To help your plant recover quickly and efficiently from pruning, make clean, slightly angled cuts just above a bud or branch collar. Leaving torn cuts and stumps heightens the likelihood of disease and further dieback. Giving your cut a slight angle will help rainfall drain from the cut instead of pooling and causing rot or disease.

Make clean, slightly angled cuts just above a bud or branch collar.

A simple pruning consists of removing any diseased or dead branches all the way to the base of the shrub. If the plant experienced fungal problems the previous season, remove infected plant parts and either burn or throw away any debris to prevent spreading fungal disease to other areas of your garden.

If your shrub is dense and congested, make thinning cuts on the interior of the plant, back to the main stem.

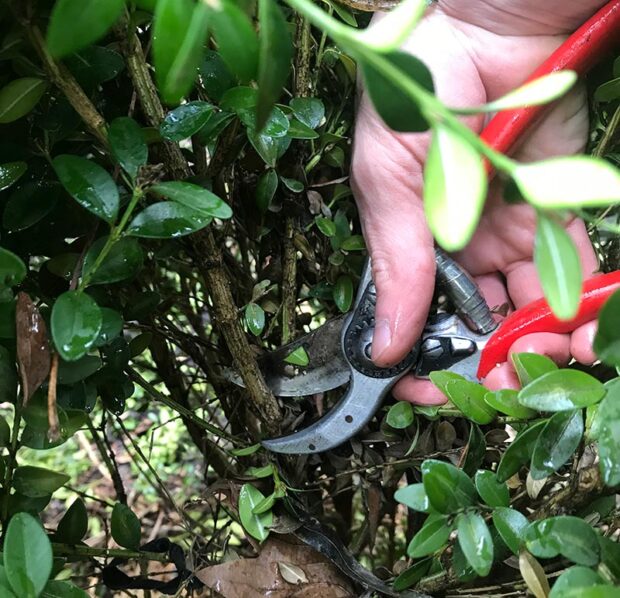
If two branches are crossing, choose which branch has the better form and then remove the other crossing branch. The same idea applies to any branches that are rubbing each other. Keeping a bowl shape in mind, make thinning cuts to your shrub by removing one-third of the oldest, largest branches. This encourages new, vigorous growth. It is important to remind yourself, throughout pruning a plant, of what shape you are attempting to achieve in the end.

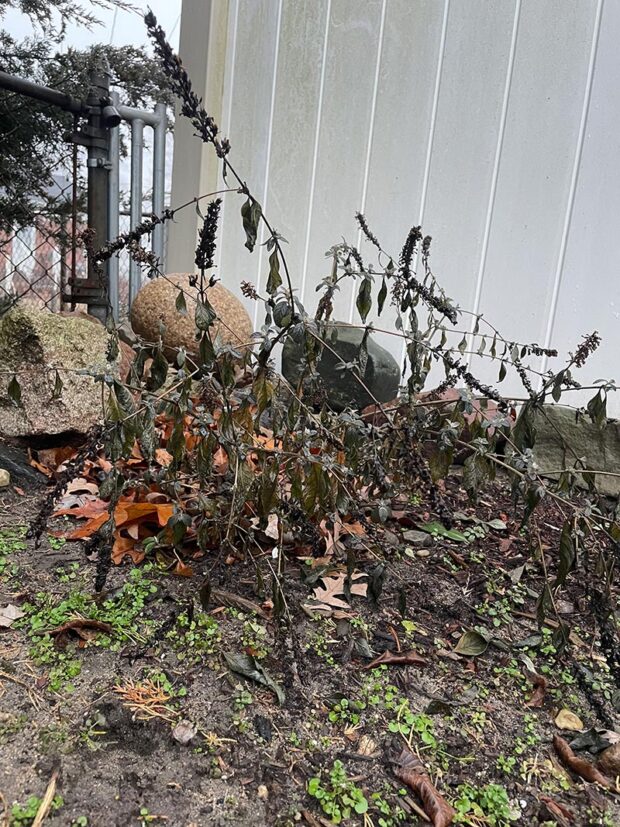
In some cases, coppicing your shrub may be a good option. Coppicing is cutting the whole shrub back to nearly ground level, sometimes referred to as “stooling” a plant. This promotes entirely new growth and is a good practice for shrubs that are becoming unmanageable in size and density, or for shrubs which benefit from a flush of new growth for flowering on new wood. Butterfly bushes and spireas are a couple shrubs that benefit from coppicing.

A butterfly bush before coppicing.
The same butterfly bush after coppicing, which promotes entirely new growth.

Entering the world of ornamental trees may require more research on your part. There are a multitude of styles and techniques depending on what tree you have and what you are trying to achieve. Reaching out to a local professional gardener for advice or an initial pruning can help start you on your way to becoming a pruning expert yourself.

Evelyn Koponen studied rural development and had several jobs in cultural and social development before changing careers to horticulture. Evelyn was able to bring her previous experience from rural permaculture development and greenhouse work to Atzinger Gardens, where she is a head gardener.

RELATED: Pruning ornamental trees

RELATED: How to grow great roses: Pruning and fertilizing

ELSEWHERE: Pruning evergreen shrubs

Filed Under: Uncategorized

2023 Flower & Vegetable Winners: Part 1 of 3

May 2, 2023   •   Leave a Comment

All-America Selections (AAS) tests significantly improved new flowers and vegetables in trials across North America. This year’s AAS Winners are new cultivars with superior performance. Look for these plants or seeds at your local garden center.

Left: Coleus: ‘Premium Sun Coral Candy’ Top right: Squash: ‘Sweet Jade’ Bottom right: Shasta Daisy: ‘Carpet Angel’

Coleus: ‘Premium Sun Coral Candy’

The first seed coleus to be an AAS Winner. Unique, multicolored foliage on a uniformly compact plant. Narrow, serrated leaves gracefully drape down the mounded plants. Holds its color well, even when grown in full sun. ‘Coral Candy’ was evaluated in the container trial, meaning it’s great for small spaces. It held up well into the fall and had almost no flowers, even late in the season.

Squash: ‘Sweet Jade’

This single-serving-sized squash proved itself with high yields. Each fruit is between 1 and 2 pounds and can be used for single servings, as an edible soup bowl, or in Asian-style dishes where a sweet, earthy squash is typically used. The deep orange flesh of ‘Sweet Jade’ is dry, yet sweet and flavorful, whether roasted, baked, or pureed.

Shasta Daisy: ‘Carpet Angel’

The first-ever groundcover Shasta daisy (Leucanthemum). Large, three-inch flowers boast a second inner frilly bloom, adding to the unique look. Only growing to six inches tall, this unique Shasta daisy spreads up to 20 inches wide. Excellent branching means more flower stems sporting pure white blooms that look like angels dancing over the carpet of dark green foliage. A little deadheading of spent flowers will reward you with even more blooms.

Elsewhere: Search past All-America Selections winners

Filed Under: Clippings, Uncategorized Tagged With: AAS Winners, All-America Selections, Flower, vegetable

How-to make hypertufa garden troughs

May 2, 2023   •   Leave a Comment

These handmade hypertufa garden troughs mimic old stone and look great in the garden

by Jean, Roxanne, and Rita Riggs

Hypertufa is the name given to the plant containers made of cement, vermiculite (or perlite), peat, and fiberglass fibers. The name comes from the porous, volcanic rock (tufa) that is so popular with alpine gardeners because it can be hollowed out and used for planting.

The handmade containers described here have been popular since the 1930s, when the old stone sinks and watering troughs that were prized as planters for special small plants became hard to find and incredibly expensive, not to mention too heavy for the average person to handle.

Hypertufa planters have been used in English gardens for many years, and are being used more commonly in the United States as gardeners realize how good they look. They provide the drainage and the rough, rocky surface that displays the plants perfectly. We have found them to be excellent planters for many herb plants as well, including rosemary, lavender, thyme and santolina topiaries. Sedums, hens and chicks, and many choice miniatures seem to thrive in them as well.

The finished trough will take the shape of the mold you selected to build in or around. (Photos: Jean, Roxanne, and Rita Riggs)

Material List

  • Portland cement
  • Vermiculite or perlite
  • Sphagnum peat moss
  • Fibermesh fiberglass fibers (for reinforcement)
  • Molds
  • Mixing container (a wheelbarrow works well)
  • Measuring container
  • Rubber gloves with long sleeves
  • Water for mixing
  • Plastic drop cloth
  • Plastic garbage bags (to cover the molds so the mixture doesn’t stick to them)
  • Pencils or dowels to make drainage holes
  • Hardware cloth or chicken wire (optional; for extra reinforcement on larger troughs)

A few notes on the materials. It is preferable to use cement as opposed to concrete, which is a mixture of cement and aggregates (sand, gravel, etc.). You will often find the cement bags listed as “Portland cement.” It is best to avoid using sand in the hypertufa mix because it doesn’t seem to bond as well as the vermiculite or perlite, not to mention the fact that it makes the finished product much heavier. The fibermesh is obtainable from a building supply company and looks like tiny strands of white hair. Since the hypertufa is only part cement, the fibermesh helps add strength to the mixture.

Hypertufa recipes

Before you start, select a place in the shade where the newly molded trough can dry for several weeks, and where it doesn’t freeze. Spread the plastic drop cloth over your work surface.

Recipes for the hypertufa mixture vary quite a bit from reference to reference, but this one worked best for us:

  • (1) 60-pound bag of cement with fibermesh already mixed in
  • (4) 1-pound coffee cans of vermiculite
  • (4) 1-pound coffee cans of peat moss
  • A supply of water to mix the ingredients together into a stiff, mud pie consistency

The mixture should hold its shape without pooling water on the surface. If you get it too wet, add some dry ingredients and mix them in until the consistency is correct. For some of your molds, you may want to mix in a couple more handfuls of fibermesh for additional strength. We also found that we could better tell if the water proportion was correct if we mixed the materials with our gloved hands instead of using a hoe.

To illustrate the variance in recipes, others have had good luck with these proportions, which will yield a lighter trough:

  • 1 part cement
  • 1 part vermiculite or perlite
  • 1 part peat moss
  • 1/5 part fibermesh

Step-by-step instructions

Select a mold, which can be a sturdy cardboard box, small plastic tub, a metal pan, or something equivalent. You can build the trough on the outside or inside of this mold. If you build on the outside, you will be shaping and forming the trough’s exterior walls. If you build on the inside, the trough’s exterior walls will take the shape of the mold’s interior walls.

For building on the outside of the mold, cover it with plastic and then start patting the hypertufa mixture onto the mold. Remember that you are building the trough upside-down and the mold will be the trough’s planting (inside) area. We found that steep-sided molds worked better if we used the inside, and slope-sided molds could be done inside or out. The bottom should be 1-1/2 to 2 inches thick, and the sides should be at least 1 to 1-1/2 inches thick. Use the pencils or dowels to create several drainage holes in the bottom. Make sure the bottom is level or the final product will rock slightly.

If you are making a large trough, now is the time to consider adding the reinforcement wire, already shaped to the mold. Since it can be tricky getting the chicken wire to stay in place while you are patting away adding the hypertufa mix, it is preferable to simply build the joints (where the walls and bottom come together) sufficiently thick so that they are strong enough on their own.

The finished planter will often have the fuzzy hairs of the fibermesh sticking out. You can easily remove these by melting them with a handheld propane torch or barbeque lighter.

Allow the trough to sit and dry for 2 or 3 days. If it is drying too fast or your work area is warm, mist it daily to keep the surfaces moist to avoid cracking. When the container is semihardened—that is, hard enough to not make a fingerprint, but still soft enough to scratch with your fingernail, you can unmold it, remove any plastic that sticks to it, and make whatever natural-looking gouges, artistic pictures, or signatures you want for the trough. Make sure the drainage holes haven’t filled in.

Removing the mold allows the hypertufa to dry thoroughly inside and out. Total drying time varies according to humidity and temperature. Ideally, you want the mixture to cure as slowly as possible since this will yield a stronger trough. You can achieve this longer curing time by covering the trough with plastic and misting it every couple days to keep the humidity high. Most recipes say to let them dry or cure until they sound hollow when tapped.

The finished planter will often have the fuzzy hairs of the fibermesh sticking out. You can easily remove these by melting them with a handheld propane torch or barbeque lighter. When the flame passes over the fibermesh, the hairs melt away quickly.

Some sources say to neutralize the chemicals in the cement by rinsing the trough repeatedly or by using chemicals. We prefer to avoid the chemicals and simply be patient. We let the troughs weather naturally by sitting outside through several rainfalls before planting. In terms of durability, our troughs have been left outside winter and summer, and they have not cracked or broken. They are somewhat heavy to move around (although not nearly as heavy as concrete), so if you make a large one, you may want to construct it where it is going to be placed.

The material cost to make your own trough is very low. Considerable savings can be had by making your own compared to purchasing an actual stone trough. And, of course, the satisfaction of knowing you built it yourself.

Jean and Roxanne Riggs operated Sunshine Farm and Garden in Oakland County, MI.

Related: Growing vegetables in containers

Elsewhere: Successful container gardening

Filed Under: Uncategorized Tagged With: garden container, hypertufa, hypertufa garden trough, trough

Is it OK to water my houseplants with softened water?

March 31, 2023   •   Leave a Comment

You can’t taste any sodium in softened water, but it is there, and it builds up in the container mix, eventually killing the plant if you do nothing.

No, you cannot water with softened water. That, however, is the water that some people have, so they need to find ways to avoid damaging their houseplants. The damage results from the softening salt that replaces the naturally-occurring calcium and magnesium in the water with sodium. You can’t taste any sodium, but it is there, and it builds up in the container mix, eventually killing the plant if you do nothing.

First, explore other options. Your plumbing system should have an outlet valve that allows you to draw water before it enters the softener, so you can get “hard” water there. Before using it, let that water sit in an open container overnight to allow the chlorine from a municipal water system to evaporate and for the water to come to room temperature. Another option is to use a rain barrel to collect and use rainwater. In some areas rainwater is very acidic. If yours is, add a teaspoon of ground limestone to each 6-inch diameter container of potting medium to counteract the acidity.

If none of these options are viable, use the softened water and take the following steps. Always use containers with drainage holes and never let the containers sit in a pool of the softened water. Use a houseplant fertilizer that contains trace minerals, and use it “weakly, weekly.” For instance, if the label says one teaspoon of fertilizer per quart of water monthly, then use 1/4 teaspoon weekly. Divide the recommended dosage so that you use an appropriately reduced amount every time you water. Then, every time you water make sure the amount of water is enough to go entirely through and run completely out the bottom so that it is carrying away any built-up sodium. As time goes by, the soft water sodium causes the potting mix to harden as the salts accumulate. Watch for this symptom and repot as often as it happens. Usually once a year is enough, but you must wash away all of the potting mix from the roots using tepid water and start over with new mix. That routine will do as much as possible to reduce the damage to the houseplants.

If any of your houseplants are in huge containers, just do what you can. I have a two-wheeled dolly to lift and wheel them out to the patio to sit in the summer rain sometimes to leach out their soil. In the winter my ficus likes to be leached by taking a shower in my walk-in shower stall. That’s one way to leach away the yucky stuff from a monster pot. Put your thinking cap on, and you will find a way.

As for annuals in outdoor containers, soft water may not have time to do much damage in only one summer growing season, as opposed to houseplants that are expected to grow and thrive for many years. Fertilize the same “weakly, weekly” and water thoroughly every time you water to leach out the salts from the previous watering. Then use new container mix each season and any build-up of salts should be eliminated in the process.

Answer by Martha Ferguson.

Related: What is the white build-up on houseplant pots?

Filed Under: Uncategorized Tagged With: houseplants, softened water, water, Watering

Propagating star magnolias

January 13, 2020   •   Leave a Comment

My star magnolia has some strange-looking pods where the buds for next year’s flowers appear. Out of curiosity, I cut one open to find orange seeds. Is this normal? Can I plant them and when?

The strange-looking pods are just your star magnolia’s (Magnolia stellata) fruit. They are completely normal and if left to open naturally, the orange seeds would have scattered on the ground. They could possibly germinate or be eaten by birds and other wildlife. Because the habit of a star magnolia is that of a rounded shrub, they are often grouped in a bank or hedge. They also can be limbed up and shaped to a small tree. The smooth gray bark is exemplary on mature plants. Although star magnolias are hardy to zone 4, their early spring flowering is at the mercy of weather. Late freezes and damaging spring winds take a toll on the delicate, white, and fragrant multi-petal blossoms. If your star magnolia is not a named cultivar, such as ‘Centennial’ or ‘Rosea,’ but the species, then the orange seeds could be viable and produce the same plant from which they came. However, the method most often used to propagate star magnolias is rooted stem cuttings. This ensures that the same plant characteristics will be generated. That is not to say collected seed will not germinate. For production propagation, stem cuttings and occasionally grafting are used to maintain and ensure consistency in genetics. The fact you cut the pod open could mean the seeds are not yet fully matured, and if planted before the ground freezes, may not germinate. If you want to experiment, plant the seeds in a protected area, in full sun and preferably in a peaty, organic, well-amended soil and see what happens.

Filed Under: Uncategorized Tagged With: Magnolia stellata, pods, Propagating, star magnolias

Why does my columbine droop in my garden?

July 31, 2019   •   Leave a Comment

One of the most frequently used words to describe a columbine is “nodding.” The flowers are described as either nodding or upright, with a short, broad tube in front and backward projecting spurs. All columbines flower in spring or early summer and prefer rich soil in light to moderate shade with plenty of moisture. Many of the species are short-lived, especially if the drainage is poor. Aquilegia canadensis, a popular variety in garden centers, is native to eastern North America and found in moist, shady areas. The 1-1/2 inch flowers are nodding, appear in early spring, and continue blooming for about 6 weeks.

Why does your columbine droop and nod over in your garden? That is probably its nature. Planting a sturdier plant which blooms later, in front of the columbine, may help it stand up.

Filed Under: Uncategorized Tagged With: Aquilegia canadensis, columbine, droop

Getting rid of aggressive lily of the valley

December 1, 2017   •   2 Comments

One side of my backyard is overgrown with lily of the valley that came from my neighbor’s yard under the fence. I try digging them out in the spring when the ground is somewhat workable but I always seem to lose the battle. The soil is mostly clay and very hard to work with. I would like to get rid of them; any advice? B.P., Taylor

The creeping rhizomes of lily of the valley (Convallaria majalis) allow for rapid spread even in mediocre conditions. The clay may be hard for you to work in, but it hardly deters their persistent rootstock. Even a small piece of lingering rhizome can erupt in basal leaves. Lily of the valley spawns a love-hate relationship from gardeners in spring. They are one of the earliest fragrant white flowers, but once bloomed, the foliage browns out and dies back. In the meantime, the rhizomes grow and further invade areas of established lawns and gardens.

As they are in your neighbor’s yard, you will have to put a seamless metal (sheet roll aluminum) or stiff plastic barrier at least 18 inches down into the soil along the fence on your side where the plants grow. Stake it against the fence to prevent the rhizomes from pushing and bending the barrier. Diligently spade fork the rhizomes out and reduce the amount of shade and moisture in that area, which they prefer. Be aggressive in your approach by target spraying with an herbicide, such as glyphosate, any leaves that break the soil’s surface. Do not plant other plants in this area for a season while you do battle. Any compost or granular fertilizers you would use for your plants will only feed leftover rootlets. Perhaps you can negotiate with your neighbor to move the lily of the valley to another part of their yard where it won’t invade your yard. If not, practice patience and persistence to get rid of this invasive perennial.

Filed Under: Uncategorized Tagged With: eradicating, lily of the valley, removing

Under the unsightly exterior, bruised fruit might contain better nutrition

May 4, 2016   •   Leave a Comment

An imprefect exterior of some fruits might be a sign of increased nutrition.

NPR’s The Salt:

When orchardist Eliza Greenman walks through a field of apple trees and gazes upon a pocked array of blemished and buckled fruits — scarred from fighting fungus, heat and pests — she feels a little thrill of joy. “I’m absolutely infatuated with the idea of stress in an orchard,” says Greenman, who custom grafts and grows pesticide-free hard cider apples in Hamilton, Va. These forlorn, scabbed apples, says Greenman, may actually be sweeter.

In an unofficial experiment, Greenman tested scabbed and unscabbed Parma apples, a high-sugar variety native to southwestern Virginia, and found the scarred apples had a 2 to 5 percent higher sugar content than unmarred apples from the same tree. More sugar means a higher alcohol content once fermented, producing a tastier hard cider.

But she loves these ugly apples for another reason: They may be more nutritious and have a higher antioxidant content. Says Greenman: “I believe stress can help create a super fruit.”

Read the rest of the article…

Filed Under: Uncategorized Tagged With: bruised, fruit, nutrition, ugly

Japanese garden expert to present lecture at Cranbrook Institute of Science

April 16, 2016   •   Leave a Comment

George and Ellen Booth transformed a humble rock garden on their country estate in Bloomfield Hills into a serene Japanese garden.

On Sunday, April 24, 2016, 3:00 p.m., Dr. Kendall H. Brown presents “Cranbrook’s Japanese Garden in Context: Japanese-style Landscapes in America, Then and Now.” Co-sponsored by the Japan America Society of Michigan and Southwestern Ontario and hosted in partnership with Cranbrook Institute of Science (map), the lecture admission is free. Seating is limited; doors open at 2:30 p.m.

In 1915, Cranbrook founders George and Ellen Booth attended the Panama-Pacific International Exposition in San Francisco. Inspired by the exposition’s Japanese pavilion, they returned to Cranbrook and transformed a humble rock garden on their country estate in Bloomfield Hills into a serene Japanese garden. This lecture explores the fashion for Japanese gardens in America in the first decades of the 20th century, tracing their presence at worlds’ fairs, commercial sites, and great country homes. The presentation concludes by sketching how Japanese gardens are playing new, dynamic roles as sites of wellness and transformation today.

Dr. Brown is Professor of Asian Art History in the School of Art at California State University, Long Beach. He received BA and MA degrees in history and art history from the University of California, Berkeley, and a Ph.D. in art history from Yale University. Professor Brown is a leading figure in the study of Japanese gardens in North America. His book, Quiet Beauty: The Japanese Gardens of North America, is considered the definitive study in this field. This is his first lecture in Michigan.

Filed Under: Uncategorized Tagged With: Cranbrook, expert, japanese garden, Kendall H. Brown

Invasive-plant removal efforts to start this summer on Belle Isle

July 18, 2014   •   Leave a Comment

Efforts to remove invasive plant species on Belle Isle in the Detroit River begin this summer, thanks in large part to a $470,000 Great Lakes Restoration Initiative (GLRI) grant through the Environmental Protection Agency (EPA) to the Friends of the Detroit River (FDR), a nonprofit based in southeast Michigan.

The two-year project, which is currently in the planning phase, aims to control invasive plant species already present on Belle Isle—Michigan’s 102nd state park—and prevent additional invasive species through an outreach and education program that builds public awareness about invasive species and ways to minimize their introduction and spread on the island park.

“The Detroit River is a designated area of concern,” said FDR project manager Sam Lovall. “One of this project’s objectives is to remove the river’s top two impairments: loss of fish and wildlife habitat and degradation of fish and wildlife populations. We can assist in doing this through invasive plant species removal on the island.”

Improving habitat diversity
Four invasive plant species—including phragmites, which encompass 50 acres of the island, reed canary grass, purple loosestrife and Japanese knotweed—will be targeted for removal. “Invasive plant species can monopolize the landscape, growing in large groves, patches and stands that destroy the diversity of the habitat,” Lovall said. “The more plant species that live in an area, the healthier that area tends to be.”

Partnership makes it possible
The Belle Isle Conservancy—in partnership with the Department of Natural Resources—will oversee volunteer efforts, enlisting organizations such as the Greening of Detroit and Student Conservation Association to assist in removal of invasive species and evaluation of progress.

For more information on Belle Isle Park, visit www.belleislepark.org and www.belleisleconservancy.org. Information on Friends of the Detroit River can be found at www.detroitriver.org.

Filed Under: Uncategorized

  • 1
  • 2
  • 3
  • Next Page »

Copyright 1996-2025 Michigan Gardener. All rights reserved.