Michigan Gardener

SIGN UP to stay in touch!
We will send you occasional e-mails with gardening tips and information!


Digital Editions

Click on the cover to read now!

  • Home
  • Departments
    • Ask MG
    • Books
    • Clippings
    • Garden Snapshots
    • MG in the News
    • Janet’s Journal
    • Plant Focus
    • Profile
    • Raising Roses
    • Thyme for Herbs
    • Tools and Techniques
    • Tree Tips
  • Garden Event Calendar
  • Resources
    • Alternatives to Impatiens
    • Garden Help
    • Soil and Mulch Calculator
    • Public Gardens
  • Web Extras
  • About
    • About Us
    • Editorial Content
    • Privacy Policy
    • Contact Us

PLEASE NOTE: In the autumn of 1995, we hatched the idea for a free, local gardening publication. The following spring, we published the first issue of Michigan Gardener magazine. Advertisers, readers, and distribution sites embraced our vision. Thus began an exciting journey of helping our local gardening community grow and prosper.
After 27 years, nearly 200 issues published, and millions of copies printed, we have decided it is time to end the publication of our Print Magazine and E-Newsletter.

Archive for the Ask MG department

What is causing fruit to drop early on my apple tree?

December 15, 2020   •   Leave a Comment

McIntosh apples on a tree. Photo: George Chernilevsky / Wikimedia Commons

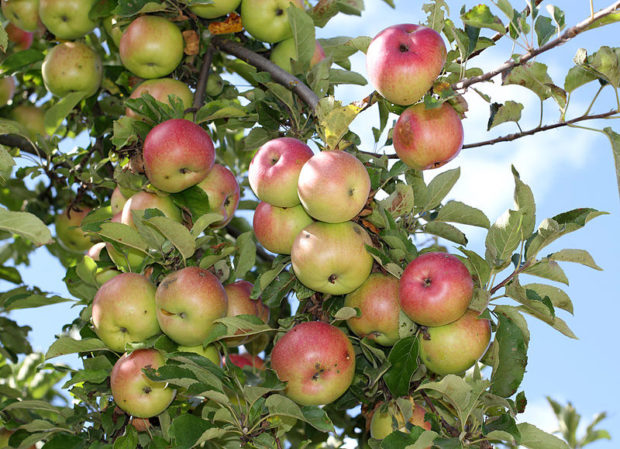
We have a McIntosh apple tree that is about 30 years old. We have never sprayed it. In the spring, lots of tiny, green apples start falling. The remaining apples are wormy and misshapen, thus we end up composting all of them. Is there anything we can do so the apples are good to eat?

Every McIntosh apple has a direct lineage to a single tree discovered in 1811 by John McIntosh in Dundas County, Ontario. Your 30-year-old McIntosh is a venerable species worthy of treatment.

Premature apple drop can stem from several factors. A tree unable to support the vast number of fruits it has produced naturally thins out the fruit to decrease competition and conserve energy. Environmental conditions such as later frosts, excessive heat and cold, and abrupt changes in humidity can cause fruit to drop. The soil may be nutrient-deficient to support fruit growth. A soil test targeting apple trees is in order. Irregular watering can also cause fruit drop. Examine the weather patterns of the last few years to determine what weather conditions occurred. Consider your watering practices and note changes and improvements.

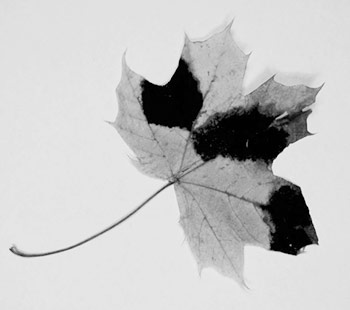
The condition of your remaining apples suggests a strong pathological source. If there are “worms” in the fruit, you probably have codling moth (Cydia pomonella). The worms are the larval stage of this pest. The second generation adults emerge in July laying eggs on the apples. The young caterpillars can tunnel into the developing fruit shortly after egg hatch, exiting to pupate into another generation moth. This is when the most damage is done.

To get good eating apples again, you need a steady maintenance program of vigilance and treatment. Homeowners can manage watering and fertilizing consistently. You can also practice good yard hygiene by removing fallen leaves, fruit, and debris from the tree’s vicinity. Such plant debris provides opportunities for re-infestation. Through observation in the spring, verify the codling moth is the culprit before embarking on any spray insecticide program. Because of the critical timing of sprays and the chemistry of insecticides, hiring a professional arborist who is experienced in tree fruit culture is a wise move. In the space of one season, you should see a marked improvement in edible fruit.

ALSO READ: Tips for Growing Apples in Michigan

Filed Under: Ask MG Tagged With: apple tree, codling moth, Cydia pomonella, McIntosh, Premature apple drop

How do I overwinter small potted evergreens?

November 4, 2020   •   Leave a Comment

Can I overwinter boxwoods in plastic pots (about 5-gallon size)? I’m not sure what variety they are. Or should I plant them in the ground even though it is November?

Any small ornamental evergreen or conifer in a container needs special treatment to overwinter a zone 5 winter (-20 degrees). If you have the space, you can bury the entire container in the ground and mulch leaves and compost over the base to protect it from freeze and thaw. If the location is subject to winds, a wind barrier of burlap or fabric to protect the leaves and needles is essential to avoid desiccation. You can also surround them with a staked chicken wire cage and fill the space with fall leaves. This also protects against sunscald. If no ground space is available, then place the boxwood containers in a sheltered area, cluster them together for protection, and place a windbreak around them for added protection from desiccation. Once the soil is frozen, the shrubs can’t take up moisture through their root systems to replenish what is lost in their leaves. You can also use an anti-desiccant spray on the foliage to further prevent moisture loss.

Once ground soil shows signs of thawing, night temperatures remain above freezing, and you see signs of spring growth on other plants, then you can remove the heavy winter protection. Give them a few weeks to acclimate and day temperatures to warm before moving them from their sheltered location.

Related: Overwintering Sweet Potato Tubers

Filed Under: Ask MG Tagged With: evergreens, overwinter, Overwintering, pots

How do I establish moss on a shady path?

July 23, 2020   •   Leave a Comment

We have a shady, worn path on the north side of our house. If I installed stepping stones there, how can I get moss to grow between the stones?

Moss has a unique beauty and has become the focus of a new form of gardening. Since it generally loves acidic, compacted, deeply shaded and poorly drained sites, moss is wonderful for locations that would otherwise be a gardening nightmare.

Four types are typically used in moss gardens: fern (or sheet) moss, the most versatile and fastest-spreading groundcover; rockcap, used for walls, boulders and pond edging; haircap, which prefers partial sun and well-drained soil; and cushion, which prefers sandy soil, tolerates partial sun and is excellent for rock gardens.

In your situation, to get moss to take hold, the first thing you need to do is make sure the growing requirements are met. Think about where you would find it in a natural setting: normally in a shady, relatively cool and damp location, like the woods, shady areas next to a stream, or under a tree where it is shaded, damp and cool.

Do a soil test first. The soil needs to be poor in nutrients and slightly acidic—the pH should be between 5.0 and 6.0; lower is okay, with 6.5 the maximum but not ideal. The soil can be amended to the desired pH with liquid sulfur or aluminum sulfate, or mix in coffee grounds or peat moss. Using Roundup to clear an area of weeds will also help create favorable moss-growing conditions. Moss plants need a firm soil bed rather than loose, fluffy soil, so if the area has been cultivated recently it should be tamped down lightly. Remove any debris, plants, or leaves (moss doesn’t like compost).

Once you have taken care of the soil, you are ready to “plant.” With some patience you can grow your own moss. You will need some moss to start. See if you can find some growing in your yard (or a neighbor’s or friend’s) in conditions similar to where you will apply it. Take a good size strip of healthy moss (remove as much dirt as possible) and crumble it in a blender. Add 2 cups of buttermilk and 2 cups of water. Blend at the lowest speed until it is completely mixed and the consistency of a thin milkshake (add water if necessary). Spread this mixture on the soil. You might need to make more than one batch.

It is imperative to keep the area slightly damp at all times! Keep an eye on it and mist regularly with water, especially the first 3 weeks. It usually takes about a month to get established but it also can take up to a year. The easiest way to ensure success would be to install misters and a timer if the area is not naturally moist or damp. You can use the same mixture (but slightly thicker) to grow moss on rocks, flowerpots, etc. Use a paintbrush to apply the mix and mist regularly to keep it moist.

Having the opposite problem? Dealing with moss in your lawn

Related: Trees are hosts to many non-harmful plants, insects and animals

Filed Under: Ask MG Tagged With: moss, path, shady

Why is my blue spruce struggling?

April 25, 2020   •   Leave a Comment

About 4 years ago, a company planted 11 blue spruces in my yard. The following year, 4 of them died and the company replaced them. The next year, 3 died and the company replaced them. Last year 2 died. The soil is mostly clay and that side of the yard sometimes stays damp. I also have a lawn sprinkling system which waters them each day when hot. Any ideas on what’s happening? The remaining trees, now 9, don’t look very blue like blue spruce should, and are kind of yellowish.

Colorado blue spruce (Picea pungens) is native to the Southwestern U.S., not Michigan. It prefers rich, well-drained, yet moist soil in full sun. They are overused by landscapers for screening and large vista plantings because they have greater tolerance for less than ideal growing conditions. Unfortunately, your clay soil holds water like a sponge. “Moist soil” does not equate with saturated soil. Since your yard stays damp and you are augmenting it with lawn irrigation, the roots are simply drowning. The chlorotic needles are also an indicator of excess water in soil that does not drain. 

The tree roots are in the top two feet of the soil. Sacrifice some turf grass for 2 to 3 inches of organic compost to enrich the tree roots out to the drip line. Redirect your sprinkling system away from the trees, and reduce the frequency of water, if possible. Consider installing a field drain to move water out of the area. Trees and lawns simply have different water needs.

If you lose any more blue spruces, try replacing them with white spruce (Picea glauca), a Michigan native that also has a pyramidal shape and a blue-green cast to the needles. Consider breaking up the monoculture by interspersing lacy Eastern hemlocks (Tsuga canadensis). They will tolerate more moisture. Still want groundcover? Consider a mix of low-maintenance sun and shade perennials. Canadian ginger (Asarum canadense) works well in shade, and woodland geranium (Geranium maculatum) will work well in the sun-shade margin at the turf line, with a bonus of light purple flowers in late spring.

RELATED: Suggestions for deer-resistant plants

LEARN MORE: The Blue Spruce at The Morton Arboretum

Filed Under: Ask MG Tagged With: blue spruce, Clay Soil, Colorado blue spruce, picea pungens

Why are the leaves on my Japanese maple scorched?

April 14, 2020   •   Leave a Comment

I have a dwarf Japanese maple that gets a lot of sun. Last summer I noticed many of the leaf edges were brown and curled. That was the first time I’ve noticed it. The maple is planted near the front of the house so I see it every time I come home. My neighbor had the same problem with his two trees as well.

Although Japanese maples (Acer palmatum) can handle full sun, they do need protection from strong afternoon sun, heat, and wind. Otherwise they respond with the leaf scorch you are observing. Since this was the first time you had seen it, review any changes to the ambient shade it might have originally received in afternoons. Consider your watering frequency. Water thoroughly but less frequently. Make sure the soil is enriched with organic compost and that it is well-drained. Clay soil retains water and drains slowly, encouraging roots to rot. Watering every day never gives the soil a chance to dry out. Provide 2 to 2-1/2 inches of mulch over the root zone to stabilize the surface moisture loss between waterings and keep the soil temperature cooler. If there is no ambient tree shade for the potent afternoon sun, be creative and mount a golf umbrella to a stake to give protection to your favorite welcome-home specimen.

RELATED: Why are the leaves on my Japanese maple green?

READ MORE: More about Japanese Maples at the Morton Aboretum

Filed Under: Ask MG Tagged With: Acer palmatum, Japanese Maple, scorched

Why won’t my hydrangeas bloom?

March 26, 2020   •   Leave a Comment

I planted 2 Endless Summer hydrangeas and they bloomed beautifully. Over the next 2 years, I planted 4 more in a row next to the 2 originals, and they bloomed well. Last summer, however, the first two (which are 3 times the size of the last two) had beautiful, healthy foliage but absolutely no blooms. There were a couple of buds just forming in late August. Any suggestions to get the originals to bloom again this summer?

Endless Summer hydrangea (H. macrophylla) is a remontant (everblooming) variety. There is the initial late spring flush followed by sporadic blooming through the growing season. It blooms on both old and new wood growth. Wonderful attributes, if managed properly. In the North, these hydrangeas like full morning sun and afternoon shade from heat. Make sure the plants are getting about 5 to 6 hours of sun. Check that a tree or outbuilding isn’t shading them more than necessary.

Lack of bloom and robust foliage can indicate too much water and too much nitrogen-rich fertilizer. Check your watering practices. Water thoroughly but less frequently. They like rich, moist soil, but not saturated soil. A quality, slow-release granular fertilizer applied once in spring or early summer should suffice for these acid-lovers.

Be careful when and how much you prune. Don’t cut them back to the ground like the old-fashioned ‘Annabelle.’ Endless Summer does bloom on new wood, but if you severely prune them, you lose the benefit of old wood flower buds. The few buds you saw forming in August is how long it took the new wood to catch up. Review and adjust your maintenance practices, and you should have a better bloom season on the originals as well as the newer plantings.

Other posts about hydrangeas:

Why have my Hydrangeas changed bloom colors?

Filed Under: Ask MG Tagged With: bloom, Endless Summer, hydrangea, macrophylla

Choosing drought-tolerant annuals

March 8, 2020   •   Leave a Comment

Last summer we planted portulacas on a cemetery plot. Unfortunately, critters ate and pulled out the blooms. The cemetery requires annuals only. Could you suggest some other flowers we could use that are critter proof and will do well in full sun and with limited watering.

Moss roses (Portulaca) are drought tolerant since they have a taproot as well as surface roots, and their leaves and stems are able to store water. This drought tolerance makes them desirable to animals that are looking for a drink during a dry spell. Your moss roses were probably a tasty treat for the critters that helped themselves to them. A cemetery is a safe environment for animals that are nocturnal eaters, such as rabbits. The moss roses were a good choice for a cemetery if not for those pesky critters. There are some traits that may make plants less desirable to rabbits and deer, and those include strong odors and fuzzy leaves.

An annual is a plant that completes its life cycle in one season and, unlike perennials that can become drought tolerant after they are established, annuals do not have enough time for that process to occur. It is important to choose healthy plants from a reputable garden center so that you know they have been consistently watered and have a strong start. Plants that have been allowed to dry out while in pots or flats have been stressed and do not have the best chance of survival. Choose a disease-resistant variety and plant after all danger of frost has passed. Add some organic matter such as compost or manure to the soil when you are planting. Space your plants properly according to directions to allow air circulation around the plants to help prevent disease. Consistent watering is important for the first month. If Mother Nature doesn’t provide it, you may want to. Deadheading spent blooms, if necessary, and fertilizing according to plant needs will keep them producing blooms throughout the season.

Some choices to consider that are drought-tolerant, like full sun, and may be less desirable to critters include: marigolds, pot marigolds (Calendula), celosia, cleome (there are some dwarf varieties that would be well suited to your site), cosmos, dusty miller, zinnia ‘Profusion,’ ageratum, wax begonia, and globe amaranth.

Filed Under: Ask MG Tagged With: celosia, cleome, drought-tolerant annuals, Moss roses

Tar spot on maple leaves

February 28, 2020   •   Leave a Comment

Do the enclosed leaves come from diseased trees? There have been spots on the autumn leaves from these 2 trees for the last couple years, but not as many as last fall. They are the neighbor’s backyard trees, but the leaves fall into our yard. Are they dangerous to other growth or to the soil in our garden? The neighbor said if we wanted to have them cut down, he would not object.

The maple trees are infected with a fungus known as “tar spot” (Rhytisma acerinum). Many maple species are host to the fungus which is readily visible and, therefore, one of the easiest maple diseases to diagnose. Fortunately, it is one of the least damaging ailments on its host. It can cause early leaf drop but does not cause serious harm to established trees.

The tar-like spot is a fruiting structure of the fungus that survives the winter on fallen leaves. The following spring, just as new leaves are unfolding, the fungal tissue in the leaves on the ground ripens. The surfaces of the spots split and minute, needle-like spores escape. The spores are carried by the wind and, if they land on new leaves of a susceptible host, they may germinate, penetrate the leaf tissue, and start a new disease cycle.

Tar spot will not affect your soil health. Fungi are host specific and this fungus will only affect maple and sycamore trees. The most effective management practice is to rake and destroy the infected leaves in the fall. This will reduce the number of overwintering “spots” (fungal reproductive structures) that can produce spores the following spring. An almost as effective alternative is to mulch the leaves. But the mulch pile should be covered or turned before new leaves begin to emerge in the spring in order to destroy many of the spores before they mature.

What is quite interesting is that the apparent absence of the fungus in urban areas and abundance in rural areas has led to its use as a biological indicator of air pollution. Researchers think the absence in urban areas is caused by the amount of sulfur dioxide (exhausted by combustion engines) in the air.

Filed Under: Ask MG Tagged With: fungus, maple, Rhytisma acerinum, tar spot

Preferred growing conditions for redbuds

February 24, 2020   •   Leave a Comment

I bought a 4-foot tall redbud and it has not grown at all. It leafs out, blooms for spring, then it looks dead by mid-August. Maybe it has verticillium wilt? Does this come back every year? If so, how do I prevent it?

Eastern redbud (Cercis canadensis) is highly valued in the urban landscape for its pink spring flowers and its smaller, manageable size. As an understory tree, it prefers moist, well-drained, deep soils. It tolerates various soil types, except those that are permanently wet, and adapts to full sun or light shade. Regular watering and fertilizing are keys to keeping it vigorous. Unfortunately, it suffers dramatically from lack of water, too much water, or mechanical injury.

Since your redbud does bloom and leaf out in spring, but looks dead by mid-August, your tree may be responding to inconsistent water patterns. There is plenty of moisture available in spring, from snowmelt and rain. By the apex of summer heat, the redbud may be packing all its energy into saving moisture for survival by dropping leaves and going dormant. This is not the typical pattern of a tree suffering from the soil-borne fungus verticillium wilt, which is incurable and progresses over time until the tree is dead.

Before assuming your redbud has this disease, consider the soil conditions where you planted it and your maintenance practices. Is the tree in the middle of lawn, competing with turf up to its trunk for moisture and nutrients? Is it subject to potential mowing damage? Has it ever received a slow-release granular fertilizer beyond its nursery container? Does it get regular deep watering during periods of no rain? With conscientious adjustments to maintenance and amendments, you strengthen your redbud’s ability to withstand such diseases as verticillium wilt, canker, and even insect pests.

With the new growing season upon us, re-examine your plant maintenance routine and strategize a consistent watering program as well as a spring and fall granular fertilizer application. If your tree is sited in lawn, remove the turf away from the trunk out to the tree’s drip line so the root zone has an equal chance for water. The redbud likes moist (not soggy) soil that is well-drained and rich, medium sunlight, and fertilizer to replenish what was used from its original container. Be observant about the tree’s progress through the season, and you may get to enjoy your redbud’s lovely yellow fall display.

Filed Under: Ask MG

Can vegetable gardens be planted near or over septic fields?

July 27, 2019   •   Leave a Comment

Our vegetable garden is over part of our septic field. This is the only part of our yard that gets enough sun. Can there be a problem with possible contamination?

There can be a problem with contamination. Unless your septic tank is completely self-contained and does not permeate into the soil, there are health concerns. Most governmental units have mandated households to convert to self-contained systems to protect Michigan’s groundwater from contamination.

Septic effluent contains chemicals and pathogens potentially harmful to people, animals or plants. Soil types affect how a septic system behaves. Clay soils release cleared effluent in a few inches. However clay does not percolate or drain well and is not a good choice for a septic site in general. Sandy soils permit greater travel of effluent and pathogens, because they drain so quickly. In that case, contaminants can travel greater distances.

Root crops such as carrots or potatoes, which grow in the soil, are likely to pick up pathogens from effluent in the soil over, next to, or downhill from drain field trenches. Leafy crops like lettuce or broccoli that develop above ground may be contaminated by pathogens that splash up from the soil surface during watering or a rainfall. Above ground crops like those that vine (cucumbers, tomatoes, peppers), are less likely to be affected by splash up since they grow vertically out of the way. Homes where water is “hard” and which use a salt-based water softener system are more apt to be passing high levels of brine into the septic drain field. These salts can damage plants that grow nearby.

As septic effluent drains out into the lines, it is filtered slowly through the soil. Beneficial soil microbes digest harmful bacteria and viruses. While septic systems are designed to prevent disease-causing soil contamination, there is no easy way to know if your system is functioning properly. In addition to bacteria, consider all the household chemicals that go down your drains every day. Plants are by nature absorbing and processing “factories,” cleaning up the environment. All of this can end up in those vegetables you planted in the only sunny part of your yard.

Filed Under: Ask MG Tagged With: septic, septic field, vegetable gardens

  • « Previous Page
  • 1
  • 2
  • 3
  • 4
  • 5
  • …
  • 34
  • Next Page »

Copyright 1996-2025 Michigan Gardener. All rights reserved.