Michigan Gardener

SIGN UP to stay in touch!
We will send you occasional e-mails with gardening tips and information!


Digital Editions

Click on the cover to read now!

  • Home
  • Departments
    • Ask MG
    • Books
    • Clippings
    • Garden Snapshots
    • MG in the News
    • Janet’s Journal
    • Plant Focus
    • Profile
    • Raising Roses
    • Thyme for Herbs
    • Tools and Techniques
    • Tree Tips
  • Garden Event Calendar
  • Resources
    • Alternatives to Impatiens
    • Garden Help
    • Soil and Mulch Calculator
    • Public Gardens
  • Web Extras
  • About
    • About Us
    • Editorial Content
    • Privacy Policy
    • Contact Us

PLEASE NOTE: In the autumn of 1995, we hatched the idea for a free, local gardening publication. The following spring, we published the first issue of Michigan Gardener magazine. Advertisers, readers, and distribution sites embraced our vision. Thus began an exciting journey of helping our local gardening community grow and prosper.
After 27 years, nearly 200 issues published, and millions of copies printed, we have decided it is time to end the publication of our Print Magazine and E-Newsletter.

Choosing and growing herbal topiaries

June 29, 2009   •   

Jean and Roxanne Riggs
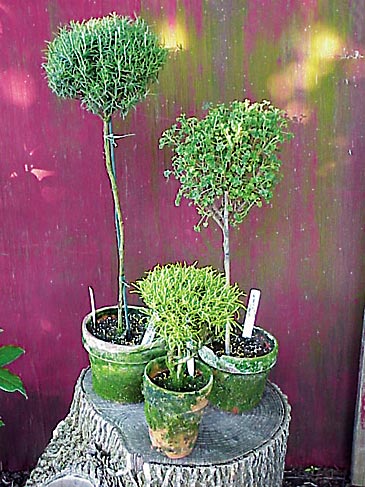
Herbal topiaries – rosemary, scented geranium and santolina.
by Jean and Roxanne Riggs

As more and more people are discovering the joys of gardening in containers, both indoors and in the garden, the use of herbs in the containers has also grown in popularity. Many of the woody-stemmed herbs are especially well-suited to being grown and trimmed into artistic shapes, and the grower is doubly rewarded with a beautiful plant that can be fragrant and useful in the kitchen. Herbal topiaries require time and commitment but are among the most lovely of all potted plants. They let the herb gardener experience different plant habits and needs, along with developing creative ways to display a natural herb.

How to plant and maintain a topiary

Herb plants that are to be trained into topiaries will need the best care that you can give them. Adequate light is important, so plan on giving them at least 5 hours of sunlight a day. They must have sunlight or grow lights during the winter months when they are indoors. Pay attention to the soil in which you are growing them and make sure they have excellent drainage. Clay pots with holes in the bottom are very useful as they help with drainage; you can line the bottom inch of the pot with stones or broken pot pieces to make it even better. One of the high quality soilless mixes available at garden centers is the best choice for a growing medium. Once the plant is established and growing well, you will have to fertilize it regularly since plants grown in containers have no way of getting nutrients unless you add them. A slow-release fertilizer is recommended. Watering is very important; if the soil gets dry to the touch, you must water thoroughly. Relying on the rain will not work and you cannot sit the pot in water or it will rot the roots. Misting encourages molds and mildew on leaves. A good drenching with a watering can or watering wand attached to a hose will really do the job. In cold climates, herbal topiaries are not hardy and must be kept in good growing conditions year round. Topiaries should be moved inside before the first frost in the fall. The ideal temperatures would be 65 degrees or higher in the daytime, and 55 degrees or higher at night.

Herb plant choices

Herb plants that make good candidates to be grown artistically include most of the woody-stemmed varieties:

• Rosemary (Rosmarinus officinalis) for the upright topiaries and prostrate rosemary (R. officinalis ‘Prostratus’) for training into the more intricate shapes like hearts and circles, as well as bonsai.

• Lavender (Lavandula angustifolia, L. lanata, L. dentata and others) although the constant removal of the tips to shape the topiary may eliminate the flowers.

• Thyme (Thymus) has upright varieties that are very good for people with limited space because of their small size.

• Germander (Teucrium) with its tiny fragrant leaves that resemble oak leaves.

• Sage (Salvia officinalis) in its many colored varieties or pineapple sage (Salvia elegans) with its fruity aroma.

• Lemon verbena (Aloysia triphylla) with its strong, sweet lemon fragrance and flavor—just imagine the shocked look on the faces of your guests when you pick a leaf from your prized topiary to flavor your tea!

• Myrtle (Myrtus communis) in its compact or variegated forms.

• Bay (Laurus nobilis) which is a classic shape and the largest of the plants listed here.

• Savory (Satureja montana) has shiny leaves and good taste; reputed to have been named after “satyr” for its aphrodisiac qualities.

• Scented geranium (Pelargonium) with its many varieties, although we recommend that you stay with the smaller-leaved types. Don’t bother with annuals since their short life span makes it foolish to spend your time pruning and trimming.


Creating your topiary

Many of the above plants come in beautiful variegated leaf varieties. However, we stay away from the yellow-leaved types since they sometimes look sick or uncared for in this type of use. Select young plants, from a reliable herb farm or nursery, that are tall and have a straight center stem if you want them to grow upright into the lollypop or poodle shape, or lax and trailing stems if you want them to grow on a wire form. The new plant should be transferred into a 4- or 5-inch clay pot with the soilless mix after purchase.

To start the single ball topiary, which consists of foliage clipped into a tight ball on the top of a sturdy stem, you should begin trimming the lowest leaves and branches. At least 1/3 of the plant’s foliage must remain so it will continue to grow and thrive. Keep doing this until the plant has grown to the height you want it. When the proper height is achieved, pinch the tip off. Place a bamboo stake that is just shorter than the plant into the pot to keep the plant stem straight. Use a few twist ties to loosely attach it to the stake, but don’t strangle the plant as it grows. Now cut off the bottom branches and clip the other branches to start the shape of the ball. During this part of the training process, the plant looks less than lovely. However, it will quickly fill in with new leaves and small branches and look like the art work you had in mind when you started. The same things should be done for the other shapes too, like the double ball or the cone, keeping in mind the ultimate shape and form that you want the plant to achieve. If you make a mistake (and who doesn’t?) don’t worry, the plant will grow back and give you a second chance. It just might take a little longer.

Tools that help

Even the beginner needs some basic tools to use. A really good, sharp pair of garden scissors is a great asset. Be prepared to spend $20 to $45 for these. Stay away from the large pruners for now. A pair of garden tweezers is handy for removing dead leaves and other debris. Bamboo stakes or a preformed topiary wire shape are necessary right from the start since the selection of the plants to be used depends on what the ultimate size and shape of the topiary will be. Plant ties or twist ties, preferably green, that can be cut to the sizes necessary are essential. For some of the heavier stems it might be necessary to use a wire to keep the shape desired. Clay pots are good and are heavy enough to support the taller topiaries. If the wind blows one over, double pot the plant with a second pot at least two to three inches larger than the interior pot. Layer the bottom of the outer pot with pebbles, and fill the sides with the pebbles after the interior pot has been placed into the second pot. Another trick is to run a longer bamboo stake through one of the drainage holes and down into the ground to keep them from blowing about too much.

If you are going to give one of your beauties away as a gift, be sure to include a “care tag” for the lucky recipient. Include the name of the plant and a recipe if it is a culinary herb, and basic care instructions of light, water, temperature, and clipping so that they will enjoy their topiary for a long time. 

Jean and Roxanne Riggs operated Sunshine Farm and Garden in Commerce Township, MI.

Filed Under: Thyme for Herbs

Are your trees making the grade? A proper grade is crucial to tree health

June 26, 2009   •   

by Steve Turner

Let’s discuss a leading cause of premature death and decline of many of our landscape trees. It’s not an insect or a disease although it can make them more prone to both. It is easily prevented and in many cases can be corrected. It can kill some trees relatively quickly and others over decades. What is it? Improper grade around the tree.

I’m not talking about the root ball and if it is above ground or not. What I am concerned about is where the root flare is in relation to the soil grade. Can you see the roots as they enter the soil? Can you even see the taper of the trunk? Some trees look like sticks or telephone poles coming out of the soil with absolutely no visible flare at all. These are sure indicators that the plant is too deep, has girdling roots, or both. Think about trees growing in the forest, and how they appear to be “standing” on the soil as opposed to being buried in it. You can easily see the root flare and often the roots themselves as they enter the soil.

Now look at your trees – do you see any resemblance? Unfortunately many of you will not. That is because for years people were told to plant trees deep to create a deeper root system to “help keep the tree from blowing over” or to “keep the roots out of the lawn.” Both reasons seem logical and have their short-term benefits, but in the long run they will decrease the life of the tree.

Another factor is grade change around trees during development. Fill dirt is often spread to even out the grade of the land, and mature trees can be buried beyond their natural root collars. This can affect both naturally-grown trees and those we have planted, but it will not always affect both of them in the same way. Soil structure also plays a role in the time in which a problem will occur. Heavy clay soils will speed up the process while sandy soils can take years to have an impact.

The long-term effects

When a tree has soil placed on it above its root collar, usually one of three things will occur. First, the tree will send out new roots from its buried trunk. If the soil is sandy, they will normally grow away from the trunk, but if the soil is clay, odds are the roots will turn and circle the tree (this is what we call a girdling root). As the tree grows these roots will eventually end up pressed against the trunk, restricting the flow of water and nutrients up to the tree as well as the reverse flow of sugars down to the roots for storage and root growth.

This girdling root has been cut to relive pressure against the tree trunk and allow better movement of water and nutrients up the tree.This girdling root has been cut to relive pressure against the tree trunk and allow better movement of water and nutrients up the tree.

The second problem occurs when the soil around the tree is so compacted that it will not let the tree expand, and starts to restrict it. This can happen when new trees are planted too deep in compacted clay soils. Or it can happen to older, mature trees that were filled around long ago. After decades of the tree growing and pushing the soil back, it has caused the soil to compact around it so densely, it’s almost like cement pressed against the trunk. I recently worked on a large white oak that had 10 to 12 inches of sand filled around it in the 1920’s when the house was built. When I removed the soil around the trunk, the sand was so compressed it came out in chunks that looked like sandstone. It was amazing to see how compacted it had become after 80 years of pressure.

The third thing that can occur usually affects young trees and trees with thin bark like linden, beech, cherry, birch, and mountain ash. They develop cankers along their trunks that can lead to decay in the future or kill so much of the cambium that the tree declines. Trees release gasses through their bark and if it is covered by soil, it can disrupt this process and cause a build up of toxins under the bark, which can lead to cankers.

From the nursery to the landscape

I have seen trees of all types and ages that are too deep, but a large majority seem to be trees planted in the 1970’s and later. Even trees planted above grade can be affected if the soil is mounded too far up the trunk. I think a lot of this has to do with how many times the tree is handled before it is planted. Once a tree is dug from a field it gets balled in burlap and it is difficult to see the original grade at which it grew. Next, it will be buried in mulch until shipped to the nursery, and once it gets there it is reburied in mulch until someone buys it. Each time it is handled it has more mulch piled up against it until the original grade is lost on the top of the ball over time. When the homeowner or landscaper plants the tree they look at the new grade of the tree instead of pulling back all the mulch and built up soil that has accumulated and untying the ball to check the original grade. So the tree is sometimes 6 to 10 inches too deep right from the start. More soil is often added around it or the tree can also sink in the hole, making the problem even worse. Finally, if the tree has mulch piled against the trunk, it will only add to the problem as the mulch breaks down and adds more soil above the original grade. So no longer can we just measure the root ball and dig a hole, time should be taken to uncover the trunk and search for the first lateral roots before the hole is dug.

I know many of you are thinking “my trees look like they could be planted too deep but are doing just fine, so what’s the big deal?” Trees are very resilient and can take years to show the effects of past damage. Rarely is the original problem associated with the decline because so much time has passed until the symptoms become apparent years and years later. What you do to your tree today will not show up for years to come, but it will have an impact on its longevity. 

The soil grade has gradually been lowered around this tree, so that the tree’s root flares are now visible.Things that can be done

If you think your tree might be planted too deep and has been in the ground too long to replant, there are some things that can be done to restore the grade. An arborist’s tool called the Air-Spade uses a high pressure stream of air to remove soil around the base of the tree and inspect the roots and trunk below grade. Although powerful, it is still very gentle around trees. It will remove even the most compacted soil but will not disturb the roots; even the small feeder roots will remain intact. Once the soil is removed we can get a better idea of what is going on below grade. If the root system is a tangled mess or the tree has grown into the wire basket, or even has started to decay from old cankers, at least you will know for sure what the problem is instead of simply making guesses.

I recently uncovered the roots of a dogwood that had been declining for several years. Several companies had tried different treatments with no success. When I looked at the roots, it was clear why the tree was not responding – they looked like a tangled ball of knots and the tree was about a foot too deep. Unfortunately, there was little hope to correct this tree, but at least the homeowner now knew why and could avoid wasting any more money on it, while focusing their attention on what to replace it with.

Many trees will improve by just lowering the grade and installing a well around them if necessary to keep the soil away from their trunks. Some trees may have a couple of girdling roots crossing their trunks and they can usually be removed without causing too much stress on the tree.

Steve Turner is a Certified Arborist from Arboricultural Services in Oakland County, Michigan.


Filed Under: Tree Tips

Controlling damage from Japanese Beetles

June 22, 2009   •   

Japanese beetles are 3/8 inch long and metallic green in color. (Photo: Steven Nikkila / Perennial Favorites)

by Nancy Lindley

Ah, summer! A time when gardeners can relax and enjoy the fruits of their labor. But wait, what’s that insidious cluster on the rose blossoms? Why do leaves of the linden tree have a tattered appearance? Oh no, it’s a Japanese beetle. Why, those creatures must have stomachs made of tempered steel—they’re devouring the poison ivy! And thus begins the beetle battle. Our goal: defeat the enemy. But to defeat the enemy, we must know the enemy. 

Adult Japanese beetles are easy to identify. They’re about 3/8 inch long, metallic-green in color, and emerge from the ground in late June. They feed in groups, starting at the tops of plants, then work their way downward. Individually, Japanese beetles don’t consume much. But collectively, their damage can be devastating—and heart-breaking. Japanese beetles feed on over 300 varieties of plants ranging from sweet corn to birch. They are especially fond of plants that grow rapidly in direct sunlight. Their larvae live in the soil and wreak havoc when they feed on the roots of irrigated turfgrass.

Where the little buggers came from

Japanese beetles appeared in the Northeast United States in 1916, probably arriving in the soil of imported nursery stock. They have been steadily moving outward at a rate of approximately 50 miles a year. They are now found in all areas east of the Mississippi River. Oregon and California are especially concerned with these pests and have rigorous controls on the acceptance of out-of-state nursery stock. Unfortunately, it’s probably only a matter of time until Japanese beetles infest all portions of the country.

The damage that Japanese beetles cause is especially bad at the outer reaches of their territory. That’s because few natural controls exist in newly colonized areas. These pests spend the first ten months of their lives in the soil as grubs, starting in August or September. The following June, adults emerge and congregate on plants where they begin their feeding and breeding frenzy. Adults tend to be highly active on warm, clear days, then return to the soil in the evening. Adults will also stay hunkered down in the soil if the weather turns cold and wet.

Every three or four days for several weeks, adult females will lay one to four eggs, and up to 40 to 60 during their lifetime. 45 days after their emergence, adult beetles say sayonara and begin to die off while, simultaneously, the next generation is beginning to hatch.

Moisture from a late-summer rainfall or irrigation is all that’s needed for eggs and newly hatched grubs to survive. The grubs grow quickly, feeding on grass roots. However, if conditions become too dry, they are capable within a few weeks of moving deeply into the soil for moisture and other roots on which to feed. In autumn, grub-infested turf will appear as large dead patches—the kind of thing that causes severe hair loss and blown capillaries in golf course managers.

When the soil temperature falls below 60 degrees, grubs burrow into the soil and remain there in an inactive state throughout winter (or perhaps read articles like this and plot counter-strategies). In spring, the grubs move toward the surface as soil temperature increases, and resume feeding on grass roots for a brief period. They pupate in an earthen cell and remain there until they emerge as adults.

Natural enemies

Many different birds eat Japanese beetles; however, they prefer to dine on the grubs. And in their effort to search for grubs, they tend to tear up small pieces of turf. Okay, a small problem. A larger problem is the lawn damage created by moles and skunks who also feed on the grubs.

Predaceous insects such as the praying mantis occasionally feed on adult beetles and grubs, as do a few native wasps and flies. However, the role they play in controlling Japanese beetles is relatively minor. Several parasitic wasps, flies and plant-friendly beetles have been imported in an attempt to control the beetles, but have seen only limited success.

Natural controls

Japanese beetles are not a major pest in, of all places, their native Japan and Korea. This is because several natural controls are present. These include (1) an intestinal parasite called a gregarine, which attacks the grubs, (2) a nematode, or microscopic worm, which eats the grubs, and (3) a bacterial disease called milky spore, which infects and kills the grubs.

These controls were introduced in the Northeast United States several years ago and have kept the beetles in check. As a result, researchers at Michigan State University are assessing the success of these controls and are working to establish them in Michigan’s eco-system on a large-scale basis. Unfortunately for homeowners, these controls are not very effective on a small-scale since adult beetles can easily fly into and out of treated areas. Also, these natural controls are effective only on grubs, not adult beetles.

Chemical controls

It’s difficult to control adult beetles with chemical sprays. Plus, these products also kill beneficial insects such as honeybees. Rose fertilizers with systemic insecticides have no effect since individual beetles don’t actually eat much.

Products that contain neem oil are safer and are believed to repel Japanese beetles. However, they, like other chemical sprays, must be applied every few days.

Turf damage from grubs can be prevented with a late July application of Merit (imadichloprid). However, most homeowners can prevent turf damage simply by keeping their lawns adequately irrigated and fertilized. Keep in mind that treatment of your grass for grubs will not appreciably reduce feeding damage from adult beetles, unless your neighbors are treating their lawns too.

Practical control

To prevent grubs from damaging the turf grass at our rose nursery and large display garden, my husband and I simply irrigate and fertilize the grass.

As for adult Japanese beetles, homeowners can benefit from the same technique we use to minimize damage: remove them by hand. That’s not as tedious and time-consuming as it might sound. We have thousands of rose bushes, yet spend less than an hour a day on beetle removal. My husband, the main beetle-control officer (and shall hereafter be known as “Beetle Bailey”), walks through the nursery on sunny afternoons and shakes beetles from each bush into a bucket of soapy water, or plucks them one by one and tosses them in. The beetles don’t die immediately, but the soap coats their wings so they can’t fly. Eventually they drown, and we dispose of them the next day in our trash.

We tried to control Japanese beetles with Sevin, but found we had to spray every few days. Plus, we weren’t comfortable using an insecticide that harms beneficial insects. Beetle Bailey reports that daily hand removal actually takes less time because there is no suiting up, mixing chemicals, application, equipment clean-up or showering afterward.

We found that Japanese beetles are especially fond of fragrant, light-colored roses. If pressed for time, Beetle Bailey only scouts the area of the nursery where our most fragrant roses, the rugosas, reside. He has even cut blossoms off white and yellow rugosas to avoid attracting beetles. Daily removal is better than waiting to do it every few days, since individual beetles are attracted to large groups feeding on blossoms. If you prevent groups from forming, you minimize damage.

We also use professional-grade traps from Tanglefoot on the outer perimeter of our property. Since these traps work by attracting beetles, they may be impractical for small gardens (the beetles may bypass the trap and head for your garden). However, in larger areas consisting of several acres, multiple traps placed in sunny areas can be used to keep beetles away from desirable plants. With professional-grade traps, beetles are collected in a screw-on canister. This canister must be emptied daily, otherwise the beetles die and create an odor that wards off other beetles and prevents the traps from doing their job.

So, when it comes to controlling Japanese beetles, you actually have several options, each offering varying degrees of effectiveness. You can wait for natural enemies to establish themselves, or you can take a more aggressive approach with chemical control or natural control. We prefer practical control at our nursery because it’s probably the safest, simplest and most effective method of all. And no, I’m sorry to report that Beetle Bailey is not for hire.

Nancy Lindley, now retired, owned and operated Great Lakes Roses in Belleville, MI.

Also on MG: Janet’s Journal: Plant damage awareness will help prepare the garden for next year

Related: Japanese beetles – Tips for your lawn

Filed Under: Ask MG Tagged With: control, damage, japanese beetle, Merit

  • « Previous Page
  • 1
  • …
  • 265
  • 266
  • 267
  • 268
  • 269
  • …
  • 285
  • Next Page »

Copyright 1996-2025 Michigan Gardener. All rights reserved.