Michigan Gardener

SIGN UP to stay in touch!
We will send you occasional e-mails with gardening tips and information!


Digital Editions

Click on the cover to read now!

  • Home
  • Departments
    • Ask MG
    • Books
    • Clippings
    • Garden Snapshots
    • MG in the News
    • Janet’s Journal
    • Plant Focus
    • Profile
    • Raising Roses
    • Thyme for Herbs
    • Tools and Techniques
    • Tree Tips
  • Garden Event Calendar
  • Resources
    • Alternatives to Impatiens
    • Garden Help
    • Soil and Mulch Calculator
    • Public Gardens
  • Web Extras
  • About
    • About Us
    • Editorial Content
    • Privacy Policy
    • Contact Us

PLEASE NOTE: In the autumn of 1995, we hatched the idea for a free, local gardening publication. The following spring, we published the first issue of Michigan Gardener magazine. Advertisers, readers, and distribution sites embraced our vision. Thus began an exciting journey of helping our local gardening community grow and prosper.
After 27 years, nearly 200 issues published, and millions of copies printed, we have decided it is time to end the publication of our Print Magazine and E-Newsletter.

Why are the leaves on my Japanese maple green?

June 26, 2011   •   

I have a Japanese maple that has become a green tree rather than a red tree. The tree is planted on the west side of my home and gets a little sun, about an hour or two in the morning and by noon it is in full sun until sundown. The tree does have a little red on the tips of the leaves but looks nothing like our neighbor’s Japanese maple, or like it looked a couple years ago. Also, it looks like a bush and really grew quite a bit this year. Can it be trimmed a little? It has some branches that make it look a bit wild.

The ability of red-leaved varieties of Japanese maples to remain red throughout the growing season is very variable. It is nothing to be concerned about, and you are not doing anything wrong if your tree is otherwise healthy. The variability of coloring may be attributed to the characteristics of the specific variety and its exposure to light conditions. They have the best red color in a spot that is as sunny as the tree can tolerate. This is the point just before the leaves scorch.

Because named varieties don’t come true from seed, they are grafted to a species rootstock to ensure the same coloring and characteristics as the parent plant. Some varieties, like Acer palmatum ‘Atropurpureum,’ are bright red in spring and fall, but only tinged with reddish bronze during the summer months. Some go from fire-engine red to pinkish to green with red veins and petioles; others from purple-red to deep maroon, on to green and back to crimson in the fall. The color varieties are endless! Most likely your Japanese maple is a different variety from your neighbor’s.

Since your tree looks more like a bush, the growth may be coming from the rootstock. Examine your tree to determine where the green branches originate. If there are absolutely no original red leaves appearing on your tree, then it has responded to the dying back of the red-leaved grafted variety by sending up new growth from the base. The rootstock was not a red-leaf variety, as rootstocks are generally selected for their hardiness and vigorous growth, which you have already observed in the bushy green. With the sun and wind exposure of the plant site, and the more typical Michigan winter temperatures, the graft area may have been too stressed. Your choice is to prune what you have or remove it and start over.

Corrective pruning and training can be done at any time of the year, except when the sap is rising in early spring. Cuts should be made just beyond a pair of buds on the twig. Usually, this will then produce two side shoots. When removing a larger limb, like any other pruning, the cut should be made just above the branch collar, the ridge or line where the branch joins an older branch or stem. Major pruning should be done during the dormant season after the leaves have fallen, in October or November, well before the sap starts rising prior to leaf production in the spring. Fine, twiggy growth must be removed, especially from cultivars in the ‘Dissectum’ group. A tree that is too bushy invites insect and disease problems. Pruning is also important to properly display the plant’s structure. Part of the beauty of these maples is the trunk and limb structure and texture, especially during the winter months when the foliage is absent.

Filed Under: Ask MG

What’s causing the dying branches in my silver maple?

June 24, 2011   •   

I have been noticing a problem with my silver maple for several years now. It is a mature tree with whole branches dying off. Each year another 5 to 10 percent of the tree fails to support new growth. The remaining branches look quite healthy and the tree continues to grow. Recently I’ve begun noticing the same occurrence with other maples in the Clawson area. What’s happening?

Silver maples are fast growers, 10 to 12 feet in 4 to 5 years. Unfortunately, with fast growth comes a weak-wooded tree. This makes it susceptible to wind, ice and snow damage in Michigan. Since your maple is mature and demonstrating slow dieback over a period of 4 to 5 years, it is probably succumbing to maple decline. Your observance of other maples in the Clawson area exhibiting the same symptoms demonstrates the pitfalls of planting a single tree species in an urban environment. Silver maples are often used because they grow fast and give that “mature community” look in a very short time span.

Maple decline is caused predominantly by environmental stress. Trees avoid stress through proper pruning, opening the canopy for air circulation and reducing limb breakage. Silver maples benefit from spring fertilization with a high-nitrogen formulation. Watering well during dry spells, at least 1 inch per week, also decreases stress. Mulch also helps to reduce evaporation but do not let it touch the trunk. Avoid soil compaction under trees by limiting mowing and walking on the surface when it is wet. Two of our worst culprits are riding lawnmowers and weed whips. They can increase compaction and cause trunk and root injury, especially for silver maples, whose roots are exceptionally close to the soil surface.

Filed Under: Ask MG

Plant Focus: Catmint

June 18, 2011   •   

Walters Gardens
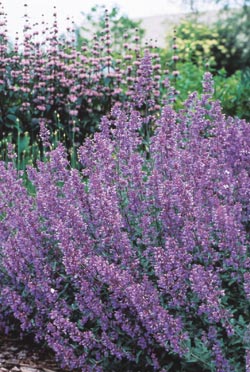
‘Six Hills Giant’
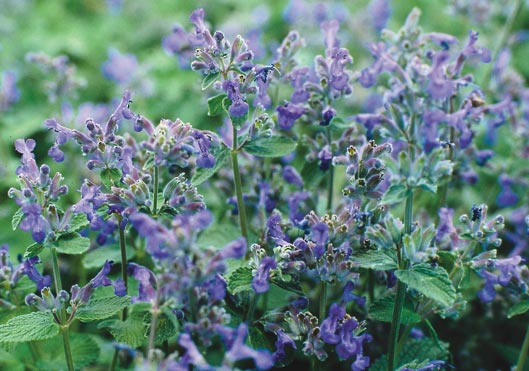
One of the finest blue-flowering perennials available is a type of Nepeta called catmint. Not catnip. Not mint. Catnip is the version that’s popular amongst cats. Mint, as we commonly know it, is in a completely different genus (Mentha) and, although some are attractive, most are used for herbal applications. Mint can also spread uncontrollably through the garden. Catmint, on the other hand, forms manageable clumps, has scented foliage, and is excellent in the perennial or rose garden. There are short and tall varieties available, but almost all of them form clouds of blue spikes above gray-green leaves from mid June to late July or August. No sunny garden in need of blue-flowering plants should be without at least one type of catmint.

Walters Gardens
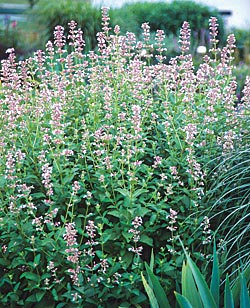
‘Dawn to Dusk’
Native to parts of Asia, catmint has been used for centuries in Europe. The English have used various Nepetas as long-blooming, scented perennials along the front of the border or pathway. A minty fragrance is released when one brushes along the leaves or steps upon a stray stem. Nepeta is very easy to grow and is even tolerant of poor soil. Some plants in fertile, rich soil will require division every 2 to 4 years to keep the growth habit tidy and manageable. Plants will tolerate full or partial sun but the taller varieties may require staking in less than full sun. Bees and butterflies are especially fond of catmint flowers, while deer and rabbits shy away. Catmint is a fine cut flower as well.

The blue flowers and airy growth habit of catmint make it the perfect companion plant for a rose planting. The small blue flowers of Nepeta look exquisite with the large and bold flowers of almost any color rose. Many summer-blooming perennials are also excellent compliments to catmint. The light and delicate flowers of catmint are perfect against larger flowers. Try the pink bee balm ‘Marshal’s Delight,’ white Shasta daisies, daylilies, tall garden phlox, or coneflower to name a few.

The species of catmint that is most readily available is Nepeta x faassenii. Varieties of this species have a horizontal growth habit and can grow quite wide if not divided every few years. ‘Blue Wonder’ has dark blue flowers and is one of the best low growers. It only grows 12 to 15 inches tall and can spread as wide as 3 feet. The flowers begin in mid-June and will persist until the beginning of August. Deadheading is not necessary but shearing the top third of the plant can prolong the bloom time by a few weeks.

Walters Gardens
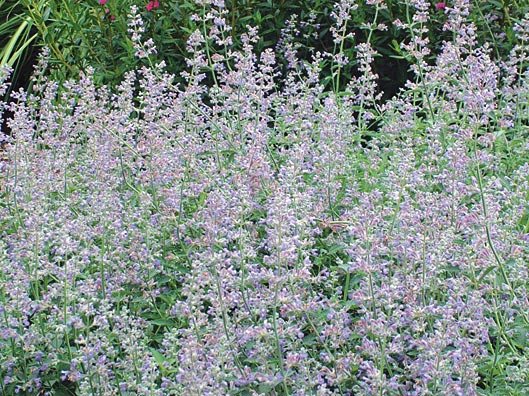
‘Walker’s Low’
One of the best-known catmints is the taller ‘Six Hills Giant.’ It is used extensively in England to produce the classic blue border so often portrayed in gardening books. It has violet flowers above plants up to 30 inches tall. ‘Walker’s Low’ is very similar to ‘Six Hills Giant,’ but has slightly darker violet flowers. Its name implies a more compact growth habit, but in reality, this is one of the largest catmints available. It has extra long, 30-inch stems that relax to form a mound 18 to 24 inches tall. Like ‘Six Hills Giant,’ it will start blooming in June and continue through August. Both of these varieties are perfect choices for the front of a bed where a wide, dramatic border of blue is desired. For a pink catmint, try the newer variety ‘Dawn to Dusk’ which features pink flowers on plants that grow three feet tall.

If your garden requires a more erect grower, try a Siberian catmint or Nepeta sibirica. The variety ‘Souvenir d’Andre Chaudron’ has large lavender-blue flower spikes. This one stands up nicely and can be used further back in the border. It begins blooming in July and will last until the end of August or September. It is exceptionally hardy (zone 3) and should not require dividing as frequently as the shorter varieties.

Catmint has something to offer nearly every garden and gardener. The novice will appreciate its undemanding growth requirements, while the new garden will benefit from its rapid rate of growth. Everyone can enjoy its fragrance and the abundance of blue flowers that it provides for the garden or your freshly picked summer bouquet. Catmint may be just what you need for the dog days of summer.

W. Atlee Burpee & Co.
N. mussini
Nepeta 
(NEP-uh-tuh)

Common name: Catmint

Plant type: Perennial

Plant size: Height and width: 12-36 inches, depending on variety

Habit: Clump-forming, airy mound

Hardiness: Zone 5 or colder

Flower color: Various shades of blue and violet; pink

Flower size: 1/2 to 1-1/2 inches long

Bloom period: Summer

Leaf color: Gray-green

Leaf size: 1-1/4 to 3 inches long

Light: Full to partial sun

Soil: Any well-drained soil 

Uses: Blue-flowering plant, perennial border, rose bed, cut flower

Companion plants: Roses, bee balm, daisies, daylilies, tall garden phlox, coneflowers, and many more summer-blooming perennials

Remarks: Easy to grow, fragrant foliage


George Papadelis is the owner of Telly’s Greenhouse in Troy, MI.

Filed Under: Plant Focus

Latest USDA pesticide reports helps consumers choose organic fruits and vegetables

June 15, 2011   •   

Many consumers these days are fixated on buying organic food. But, many of them don’t have much information on what is motivating their organic purchases other than, “it’s better for me.” With the recent release of the annual USDA report on pesticides, there is no better time than now to learn more about pesticides and organics as they relate to your fruit and vegetable choices.

There’s a “Dirty Dozen,” headlined by apples, celery and strawberries. And there’s also a catchy “Clean 15” of fruits and vegetables lowest in pesticides. The top three on that list: onions, sweet corn and pineapples.

The Environmental Working Group (EWG) suggests that people buy organically grown fruits and vegetables for the varieties on its list of the most likely to carry pesticide residues. But the group also says the health benefits from produce mean that “eating conventionally-grown produce is far better than not eating fruits and vegetables at all.”

This story is well-timed as there is still time to plant several of the dirty dozen items in your own garden. In a couple months you could enjoy your own pesticide-free harvest!

Read the full story here at NPR

Filed Under: Clippings

What causes mold in cocoa shell mulch?

June 11, 2011   •   

I use cocoa shells for mulch. Last season, mold developed on all the areas where I put it down. I used cocoa shells again this year and thus far I have not had the mold appear. What causes this mold? Would it be weather or maybe a “bad” batch of cocoa shells?

According to one of our favorite chocolate empires, Hershey’s, waste shell from the extraction of chocolate from the cocoa bean has been used for over 30 years as mulch. Just smelling it makes your mouth water for something chocolate! Cocoa shells slowly decompose and contain about 2.5 percent nitrogen, 1 percent phosphate and 3 percent potash, according to Auburn University Soil Testing Labs. Because it is feather-light, consumers are often advised to water it to keep the shells in place. This means no air circulation as the shells are compressed by the water. Although the shells are clean, they are still an organic product meant to biodegrade into your soil. Excessive rain in spring and summer as well as watering to keep the shells in place can cause a mildew-like mold to appear as the shells naturally decompose. Try to avoid excessive watering and keep air circulating through the shells by lightly top raking. They are meant to disintegrate, amending the soil as they do so. If you are mulching with cocoa shells in breezy areas of your yard, you might consider an alternative mulch that is slightly heavier and not subject to wind dispersal.

Filed Under: Ask MG

Free smartphone app works as tree identification tool

June 9, 2011   •   

Botantists from the Smithsonian Institution teamed with engineers from Columbia University to create a handy tree identification application for smartphones.

Scientists have developed the first mobile app to identify plants by simply photographing a leaf. The free iPhone and iPad app, called Leafsnap, instantly searches a growing library of leaf images amassed by the Smithsonian Institution.

In seconds, it returns a likely species name, high-resolution photographs and information on the tree’s flowers, fruit, seeds and bark.

Read more about Leafsnap here and here in the Detroit News

Filed Under: Clippings

Why didn’t my blueberry plants produce blossoms or fruit?

June 9, 2011   •   

I have several blueberry plants that didn’t blossom or fruit. I sprinkled aluminum sulfate and ammonium sulfate on them. Now the leaves are falling off and they seem to be going dead. Did I burn them? Will they come back?

There are two basic types of blueberries – highbush and lowbush. Highbush are the cultivated blueberries that grow best in a line extending from Muskegon to the lower end of the Saginaw Bay. Lowbush are the wild blueberries that grow throughout the state and are about 20 inches tall. Blueberries are considered to be a long-term crop as it takes between 8 and 12 years for them to reach maturity. With proper care, they can live for 20 to 40 years. I wonder how old your plants are and if they have ever produced flowers or fruit? Blueberries have fairly specific soil and climatic requirements for good production. Let’s go through these requirements and see if we can solve the mystery of no flowers and no fruit.

First, blueberries must have acidic soil with a pH below 5.5 and do best in soil with a pH between 4.5 and 5. Your soil should be tested before planting and regularly thereafter. If your soil pH rises above 5.1, add elemental sulfur or aluminum sulfate. Several pounds of sulfur or aluminum sulfate are needed per 1,000 square feet to lower the pH one unit. Ideally, your soil should have good drainage with a water table 14 to 22 inches below the surface. Blueberries need a consistent water source throughout the growing season but don’t like “wet feet.” When choosing plants, it is recommended that you choose a 3- or 4-year-old bare-root or container-grown plant, as younger plants have more difficulty getting established enough to maintain their winter viability and will take longer to bear fruit. Young plants are also fertilized differently than the older plants. Again, a soil test is preferable but in the absence of a soil test, these are the recommendations:

  • Planting year – 2 to 4 weeks after planting, sprinkle 1 ounce of 20-0-10-5 (NPK magnesium) within 10 to 12 inches of the plant.
  • Years 2-3 – Spread 2 ounces of 20-0-10-5 in a 2-foot diameter around the plant.
  • Years 4-5 – Spread 3 ounces of 20-0-10-5 in a 3-foot diameter around the plant.
  • Years 6-7 – Spread 4 ounces of 20-0-10-5 in a 4-foot diameter around the plant.
  • Years 8-9 – Spread 5 ounces of 20-0-10-5 in a 4-foot diameter around the plant.
  • 10th year to mature bush – Spread 3 ounces of 20-0-10-5 in a 4-foot diameter around the plant.

On an established planting, apply the fertilizer around the drip line of the plant. On sandy sites, you may want to use two applications of fertilizer: half before bud break and half at petal fall. This will help reduce leaching. If 20-0-10-5 fertilizer is not available, use urea or ammonium sulfate.

Blueberries are self-fruitful and will set fruit without cross-pollination but they do require “busy bees” for pollination and fruit set. Native bees will do the trick in the backyard garden. Regular pruning is necessary for a high yield production. The most fruitful canes are 4 to 6 years old and 1 to 1-1/2 inches in diameter. Bushes should have 15 to 20 percent young canes that are less than 1 inch in diameter, 15 to 20 percent old canes that are 2 inches in diameter and 50 to 70 percent canes that are of intermediate size. Prune the plants when they are dormant (fall to spring). In early spring, you have the advantage of being able to see the canes that were damaged during the winter. There are a number of diseases that can plague our Michigan blueberries and your local extension office can provide you very specific information on each of them.

Now back to your mystery… How old are your plants? Have they ever set flowers or fruited? If not, maybe they need more time. Blueberries are very susceptible to early fall and late spring frosts. What is your soil pH? You can contact your local extension about having a soil test done. Take a good look at the canes. What needs to be pruned? How is your drainage and do your plants get consistent water? Don’t give up! You will likely be rewarded by a little more detective work and patience.

Related Pages:

Michigan State University Blueberry Facts

List of MSU Extensions

Tips on growing raspberries

Learn how to grow strawberries

Filed Under: Ask MG Tagged With: blueberries, blueberry, blueberry plants, fruit, highbush, lowbush

Understanding the decline of honey bees

June 1, 2011   •   

In recent years you may have heard about the decline of the honey bee population (Colony Collapse Disorder) and the impact on agriculture. This issue impacts everyone as it directs affects our food supply. The most recent episode of Splendid Table featured an interesting interview with researcher Marla Spivak in which she explains the theories behind the decline.

Listen to the full story here…

Filed Under: Clippings

How late in the season can perennials be planted, divided or transplanted?

May 31, 2011   •   

How late in the season can I plant newly purchased perennials? How late can perennials be divided and transplanted?

The nice thing about nursery-grown perennials is that they are already “hardened off” when you purchase them. Perennials that have been container-grown and have gone dormant through one winter season in the pot are considered “hardened off” plants; they will be winter hardy. This makes your success rate greater when planting perennials late into the season. You can plant hardened-off plants up until the ground freezes. When planting later in the season, be sure to prepare the soil properly depending on the particular plant’s needs. Also use a root stimulator like Root ’n’ Grow to give the plant a jump start to a healthy root system.

After the foliage of the perennial dies back from frost, cut back the dead leaves to about 3 inches from the ground and cover the entire plant with a light mulch about 3 inches deep. Using pine straw mulch is recommended because it is light enough to allow air circulation at the plant’s crown in order to prevent rotting and at the same time it will insulate the root system for the winter. Winter mulching perennials is an important maintenance step every year, but it is especially important with newly planted perennials.

As general rule, perennial division can be done after the plant is finished flowering for the season. Since division greatly stresses the plant, it should be done early enough to give the plant at least one month in the growing season to reestablish its root system. Dividing on a cool day is also recommended. A first-year perennial should not be divided as it needs at least one growing season to become hardy and healthy enough to handle division.

Find more information here on dividing tulip bulbs.

Filed Under: Ask MG

When is the best time to prune trees and shrubs?

May 28, 2011   •   

by Steve Turner

I am often asked when is the best time and what should be pruned. The ideal time is when the tree is dormant, which is late fall to early spring. Since the tree is not active, the removal of limbs will be less stressful to the plant. It is also easier to see the structure of the tree without its leaves to better find problem areas like rubbing branches, weak crotches, cracked or broken limbs and competing leader branches. The tree will have more time to seal the wounds before the growing season starts and there will be less sap running from the wounds. Also, insect and disease organisms are not active at this time, so it reduces the risk of infection or pest infestation, which is why birches and American elms should only be pruned in the winter. The worst time to prune trees is late spring and early summer when their leaves are expanding and the tree is putting its energy toward growth.

A common myth is that large, mature trees can tolerate more pruning than small trees. In fact, the opposite is true. Only the outside inch or two of a tree is alive; the rest is made up of dead cells whose main function is to support the tree. That’s why a tree can be hollow but still be perfectly healthy. If you compare the percentage of live cells to dead cells between a small tree and mature tree, the difference is huge. A young tree might be made up of 90 to 100 percent live cells, while an old, mature tree might only have 10 percent or less. As you can imagine, the younger tree has a better chance to adjust to change.

A good rule for mature trees is that less is better. Try to avoid removing large limbs over 6 inches in diameter because it will be difficult for the tree to close the wound before decay sets in. Other options are cabling or thinning these large limbs as opposed to removing them. Good maintenance items for mature trees are removing deadwood and hazard limbs and thinning for weight reduction when necessary.

Young trees up to 8 to 12 inches in diameter need to be pruned properly for structure while they are still young to avoid the need to remove large limbs in the future. When pruning trees, keep in mind that the leaves produce the energy for the plant and that removing too much leaf surface from a tree or limb will starve the plant, causing die back or heavy sucker growth from that part of the tree.

“Topping” trees destroys them. They will never grow back to their natural shape and every branch that grows out of that wound area will be an accident waiting to happen. As the new limbs grow bigger and the rot in the wound increases, the branch will eventually break. A topped tree soon becomes a maintenance headache, with constant storm damage due to the weak branch attachment. If a tree is too large for its location, consider having it removed and replanted with a smaller species rather than topping it.

It is important to know what a tree’s natural shape will be when it matures before you prune it. For example, I see many weeping cherries that are pruned into a ball shape because all of the upright limbs were removed as they grew out of the top. If allowed to continue growing, these limbs would have eventually bent back down, creating the weeping effect that gives the tree its unique look. So it pays to do a little homework and find out what the tree’s natural shape is and help it reach its full potential. Not all ornamental trees need to be pruned into the traditional lollipop shape!

When it comes to shrubs, prune flowering shrubs soon after they are done blooming. Non-flowering shrubs and evergreens can be pruned as necessary to achieve a desired shape. Keep in mind that wider at the bottom is better than narrow — if you allow more sun to reach the bottom of the shrub, the plant won’t thin out as much. Avoid heavy, late summer pruning; too much pruning at this time will encourage new growth that may not harden off in time for winter. For those plants that don’t tolerate shearing well, like red or green twig dogwoods, it is best to prune them back to the ground when they become too large or sparse, and let them start over again by growing new limbs from the base.

Steve Turner, Certified Arborist, is from Arboricultural Services in Fenton, MI.

Filed Under: Tree Tips Tagged With: prune, pruning, shrubs, trees

  • « Previous Page
  • 1
  • …
  • 4
  • 5
  • 6
  • 7
  • 8
  • …
  • 43
  • Next Page »

Copyright 1996-2025 Michigan Gardener. All rights reserved.