Michigan Gardener

SIGN UP to stay in touch!
We will send you occasional e-mails with gardening tips and information!


Digital Editions

Click on the cover to read now!

  • Home
  • Departments
    • Ask MG
    • Books
    • Clippings
    • Garden Snapshots
    • MG in the News
    • Janet’s Journal
    • Plant Focus
    • Profile
    • Raising Roses
    • Thyme for Herbs
    • Tools and Techniques
    • Tree Tips
  • Garden Event Calendar
  • Resources
    • Alternatives to Impatiens
    • Garden Help
    • Soil and Mulch Calculator
    • Public Gardens
  • Web Extras
  • About
    • About Us
    • Editorial Content
    • Privacy Policy
    • Contact Us

PLEASE NOTE: In the autumn of 1995, we hatched the idea for a free, local gardening publication. The following spring, we published the first issue of Michigan Gardener magazine. Advertisers, readers, and distribution sites embraced our vision. Thus began an exciting journey of helping our local gardening community grow and prosper.
After 27 years, nearly 200 issues published, and millions of copies printed, we have decided it is time to end the publication of our Print Magazine and E-Newsletter.

Defining tissue culture

July 24, 2009   •   

What is meant by the term “tissue culture”?

In its simplest form, tissue culture (also known as micropropagation) is a technique of plant propagation whereby plants are started from very small pieces under aseptic (sterile) conditions usually on an agar-based medium. Plant parts as small as tiny stem tips, nodes, embryos, seeds or pollen are placed on a special culture medium. The nutrient medium used may vary considerably depending on the growth requirements of the specific plant grown. By varying the medium content, the plant part may be caused to produce undifferentiated callus tissue (which may be further subdivided later on), multiply the number of plantlets produced, grow roots or multiply embryos.

Tissue growing techniques allow gardeners to propagate large numbers of specific clones in a relatively short time in a small amount of space. These techniques can also be useful in producing pathogen-free plants. Tissue culture techniques are widely used by orchid growers and other members of the greenhouse and nursery industry.

Filed Under: Ask MG

Suckers on linden trees

July 24, 2009   •   

We planted 2 linden trees about 5 years ago. They are doing very well, but one of them has suckers that grow every year. By July, they are about 2 feet tall and this is when I have been cutting them off. Is this OK? Is there a better way to handle this? Can the suckers be prevented from growing? Why does one tree have them and not the other?

Occasionally trees may send up sucker growth from mature tissues originating at or below ground level. The best way to prevent recurrence of this is to trim back the suckers as close to the point of origin as possible. Sometimes this may require careful removal of some soil to expose the base of the suckers. Remove the growth by cutting as close to the mature tissue (from which the sucker emerges) as possible, or by twisting and pulling the shoots if they are young and tender. The latter usually provides better control because the latent bud that is causing the sucker is often removed in the process. Once removal is completed, replace and firm the soil.

In some cases, all that can be done is to continue the pruning ritual since no treatment is really available to prevent these suckers from growing. Eventually, some trees will just stop on their own, while others will go on for years…that’s just how nature works.

Filed Under: Ask MG

July 20, 2009   •   

Jonathon Hofley / Michigan Gardener
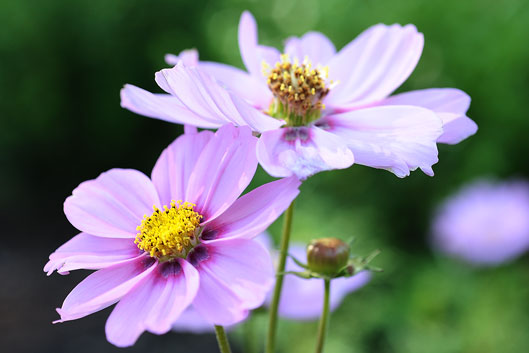
Cosmos bipinnatus ‘Gloria’

https://www.michigangardener.com/158/

Filed Under: Garden Snapshots

Elm leaves are turning yellow and wilting

July 18, 2009   •   

by Steve Turner

I have a large elm tree in my yard and on one branch the leaves are turning yellow and wilting. Does this mean it has Dutch elm disease? If so, is there anything I can do to save it and what can I do to help prevent my other elms from catching it?

From the symptoms you have described, it does sound like your tree has signs of Dutch elm disease. The yellowing and wilting is called flagging and is one of the first signs of infection. The water-conducting cells in that limb are becoming blocked and the tree can’t supply enough water to keep up with the transpiration (water evaporating from the leaves) in that part of the tree. So, the leaves turn yellow, wilt and then turn brown or drop.

A good way to explain Dutch elm disease, which is a fungus, is to compare it to cholesterol in humans. If your arteries become so blocked that blood cannot pass through them, the organ that is being supplied will fail. The same thing applies with a tree — if the water-conducting tissues become blocked by a fungus build-up, then that portion of the tree will die. All this can happen very quickly under the right conditions.

As far as saving your tree goes, that gets a little more complicated. Dutch elm disease is very hard to control, but it has been done. If the tree is flagging in 5 percent or less of the crown then there is some hope. The first step is to sterile prune out the infected limbs back to healthy wood and then do trunk injections with a systemic elm fungicide at a curative rate. There are several brands on the market. In my experience, I have found Arbortech and Alamo to work the best. Then water, water, water! Your mature tree needs a lot of water since its ability to transport water has diminished. This is especially true during the summer heat which causes the tree to transpire at a much higher rate than in cooler weather. It will need a constant supply to keep up with the increased demand. This is why your tree looked fine in the spring but is now showing the signs of infection. Chances are, your tree has been infected for a while but up until now has not faced a strong demand for water.

In regards to your other elm, there are three ways that elms become infected with Dutch elm disease: 1) by elm bark beetles feeding on diseased and then healthy elms, 2) through pruning with contaminated saws and loppers, and 3) through root grafts connecting elms together by their root systems below the ground. The first way is the main cause of the problem, but the second happens more often than people realize. Look at elms near power lines that have been pruned in the last couple of years; many of them are either dead or infected because the fungus was transferred from one to another. The third is common in neighborhoods with smaller yards or where the elms are planted closely. When one elm becomes infected, the others around it can start dropping like flies. In your case, this is probably the biggest threat to your other elm.

I recommend that owners of large, specimen elms have their tree injected every other year or every year if other trees in your neighborhood are infected. The cost of the injections is less expensive than the removal of a large, mature tree, which can cost up to several thousand dollars depending on the size and location of the tree. The bottom line is to keep your elm in good health through proper watering, fertilizing, pruning, and, on large trees, injecting. Also, to increase the chances for a prize elm’s survival, you may want to remove any small elms in the area, as they seem more prone to infection, especially if they are near power lines and subject to pruning. For those of you who would like to plant an elm, the American Elm Society (800-FOR-ELMS) has a disease resistant variety called the Liberty Elm. They are, however, hard to find in larger planting sizes, but free saplings can be obtained by joining the society, a small price to pay for the beauty of the great American elm.

Filed Under: Ask MG

July 17, 2009   •   

Jonathon Hofley / Michigan Gardener
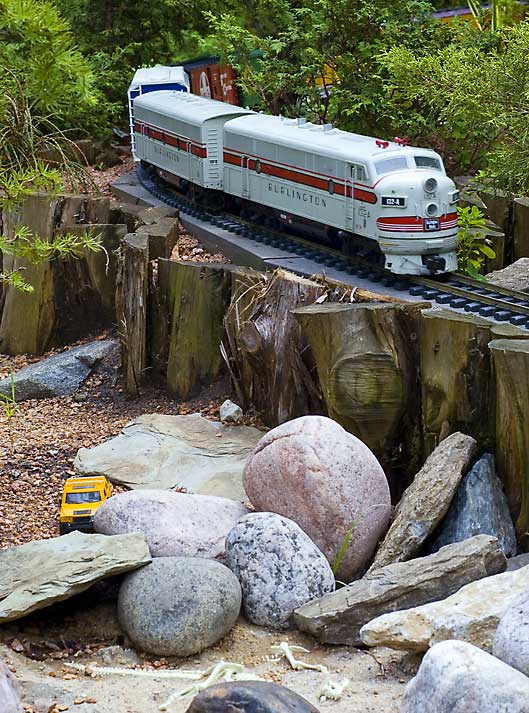
Headed to Chicago this summer? The Chicago Botanic Garden, located 20 miles north of downtown Chicago, is home to some beautiful gardens including the railroad garden pictured above. (Click on the photo for a link to their website.)

https://www.michigangardener.com/161/

Filed Under: Garden Snapshots

Norway Maple doesn’t look healthy

July 16, 2009   •   

by Steve Turner

Over the last couple of years, my Norway maple seems to be getting thinner, getting its fall color early, and some limbs are dying on one side of the tree. What’s wrong?

Unfortunately, the situation does not look good. From what you have described, it sounds as if your tree has girdling roots, which is a major problem of Norway maples and ‘Crimson King’ maples, a cultivar of the Norway maple. Many of these trees develop the problem between 25 and 40 years of age, which is also when the tree starts to mature and become the picture perfect tree we all admire. If you look closely at the base of the tree, you will see that instead of your tree having “root flare” as it goes into the ground, it looks more like a telephone pole going straight into the ground or it has a flat side instead of being round. These are sure signs that the roots below are wrapped around the trunk and are causing a slow, but certain death by strangulation for your otherwise perfect maple.

The reasons for this are a little more complicated. The problems begin in the nursery when the trees are dug for transplanting. The process of digging severs tree roots, which in most trees is no big problem. But with Norway maples, this causes a major change in the way the root system develops. In the tips of the roots is a growth regulator that causes all the roots behind the tip to remain smaller than the main root which extends away from the tree. When this root tip is severed, the tree loses its ability to control the size of the lateral roots, and that is where the trouble begins. The lateral roots become dominant and cross the trunk of the tree causing the restriction that eventually brings the demise of the tree. It’s no coincidence that the size of the trunk at the time of decline is usually the size of the original root ball at the time of planting, which is why it takes so long to discover the problem.

Unfortunately, there is no cure. Fertilization will only speed up the growth of the tree and cause it to die sooner. Cutting the roots is expensive and is not a permanent solution; they will grow back in time and then you are back to square one. Keeping the tree well watered will help prolong its life, but it is not a cure.

Steve Turner, Certified Arborist, is from Arboricultural Services in Ferndale, MI. 

Filed Under: Ask MG

Garden Snapshots: Ninebark ‘Monlo’

July 15, 2009   •   

Jonathon Hofley / Michigan Gardener
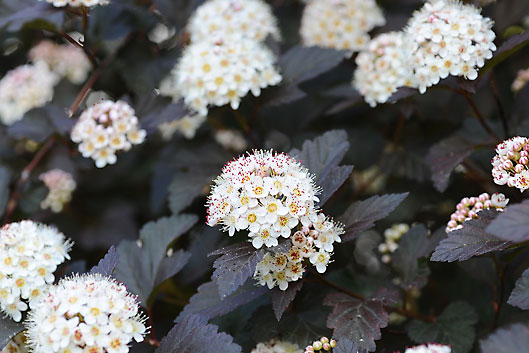
Physocarpus opulifolius “Monlo”

Filed Under: Garden Snapshots

Proper planting instructions for trees and shrubs

July 14, 2009   •   

by Steve Turner

I know you have all read the pamphlets and have probably done it a few times, but it never hurts for a little review. If I had a dollar for all the improperly planted trees I have seen over the years, I would be rich!

First, dig the hole as deep as the root ball and at least twice as wide. Be sure to not dig too deep; a good way to prevent this is to measure the root ball against the shovel handle and check it often when digging. If you do dig too deep, remember to pack the soil firmly under the ball to prevent settling once the plant is in place. This is more important for trees than shrubs. On the other hand, if the hole is not deep enough, keep digging. Don’t make the mistake of planting high and then mounding soil up around the root ball, even in clay soils. One exception is a compacted clay subsoil, which can be found in new subdivisions. If you can’t dig deep enough, then add a lot of topsoil around the top of the root ball to make a gradual decline down to the grade level.

After the tree is in the hole, cut and remove as much of the wire cage (if present) as possible. Any part that you can’t remove should be cut and bent down. Untie the twine around the trunk and pull down the burlap. If the burlap is in good condition, push it to the bottom or cut it out. If it is old and roots are growing through, then leave it and make several vertical slices instead. If you are planting potted shrubs, carefully remove them from their pots and make several vertical slices down the root ball. Grab the bottom of the roots and pull them back up like peeling a banana and set them in the hole with the cut sections pointing out. Next, begin to backfill using the same soil that came out of the hole, making sure to break up any large chunks of soil. There should be no large air spaces left behind as you fill. Stop about 6 inches from the top and add fertilizer to the remaining fill, preferably either slow release or organic fertilizer that is low in nitrogen. Complete backfilling to grade level.

When planting trees or large shrubs, do not mix soil amendments such as sand, peat, or topsoil to the fill. These work better as top dressings. They actually create a false environment within the planting hole and do not encourage outward growth of the roots. Instead, the roots tend to wind around in the hole, which can eventually lead to girdling roots. Also, drainage can be a problem with dissimilar soils. Water will not move from one soil type to another until the first is completely saturated. This is why it is important to check the soil of the root ball before you buy the plant. Ideally, you should not plant trees grown in sand in clay soils and vice versa. It can only cause problems in the future.

Now that the plant is in the ground, water well and keep the soil moist for several weeks, but do not overwater. Before watering, move aside the mulch and feel the soil to verify it isn’t too wet before adding more water. Keep the mulch away from the trunk of the plant and do not add too much mulch — 3 to 4 inches is plenty.

Steve Turner, Certified Arborist, is from Arboricultural Services in Fenton, MI.

Filed Under: Tree Tips

July 8, 2009   •   

Jonathon Hofley / Michigan Gardener
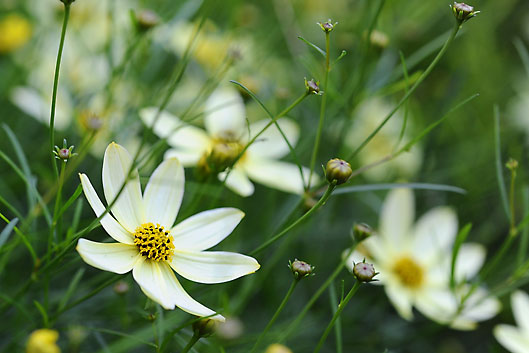
Coreopsis ‘Moonbeam’

https://www.michigangardener.com/155/

Filed Under: Garden Snapshots

Plant Focus: Lady’s Mantle

July 7, 2009   •   

by George Papadelis

In our quest for beautiful shade gardens, we often separate foliage plants from flowering plants. The attractive foliage of plants like hosta and ferns is used to provide season-long interest. This, along with an occasional shade-loving evergreen like boxwood or holly, make up the foundation of the garden. The list of flowering plants for shade is much longer than most people think. It includes, but is not limited to, primrose, monkshood, anemone, goatsbeard, plumbago, bleeding heart, turtlehead, foam flower, true forget-me-not, globeflower, perennial lobelia, waxbells, and many, many more. These should be sprinkled throughout the garden to provide occasional splashes of color from spring to fall. Some perennials, however, may have both beautiful leaves and beautiful flowers. This list includes lenten rose, lungworts, coral bells, bugbane, astilbe, barrenwort, bergenia and many, many more. These plants are very useful, especially where space is limited and a huge variety of plants is not practical.

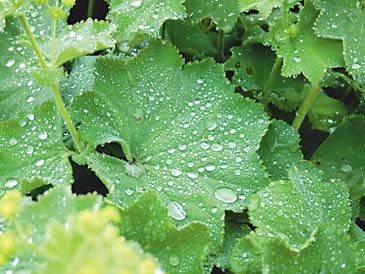
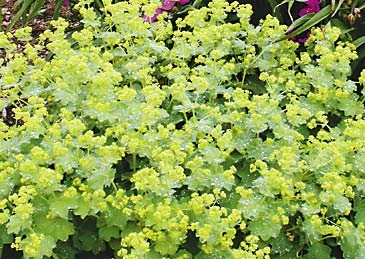
Walters GardensAlchemilla mollis or lady’s mantle is another plant with a dose of both great leaves and great flowers. Its silky, olive green leaves are up to 4 inches across. This leaf color is unique and valuable for the shade but my favorite feature goes beyond their color. Lady’s mantle sparkles whenever water is on the leaf surface. With rain, morning dew, or the last watering, droplets of water bead like diamonds glowing in the shade. One definition of the word “mantle” describes a cloak-like garment. The plant’s common name is derived from its resemblance to the sparkling jewels of a “lady’s mantle.”

George PapadelisAs gardeners strive to combine leaves of different textures, lady’s mantle is especially valuable. The leaves have a rare color and feel that is perfect alongside contrasting plants. In the shade, the bold foliage of almost any blue, green, or bi-colored hosta looks perfect with the light green leaves of lady’s mantle. Ferns offer fine-textured leaves to contrast. In light shade, the sword-like, deep green leaves of Siberian iris look stunning near lady’s mantle. This is a particularly effective combination since the purple flowers of a Siberian iris like ‘Caesar’s Brother’ appear while lady’s mantle has begun bearing its chartreuse flowers in June.

Speaking of flowers, lady’s mantle also produces billowing sprays of small chartreuse flowers from June to July. Chartreuse has been and continues to be a very popular color in and out of the garden. Light colored flowers like these are especially bright in shady gardens. There are several other late spring and early summer bloomers available for creating a riot of early season color. Besides the Siberian iris mentioned above, many astilbes, perennial geraniums, campanulas, and coral bells would make great flowering companions. That said, companions are not mandatory; lady’s mantle has the merits to exist all by itself as a border around shrubs or a perennial garden. It may also be planted more densely and used as a groundcover.

Walters GardensLady’s mantle is versatile and easy to grow, preferring moist soil. This is often created when amending clay soils with organic soil amendments such as sphagnum peat moss, aged pine bark, or compost. It prefers part sun or part shade, but will also grow well in full shade and even full sun if it is not allowed to dry out. This plant can grow almost anywhere! Plants typically form mounds 12 to 18 inches tall which should be spaced about 18 to 24 inches apart. If plants are allowed to dry out or if growth becomes too leggy, the leaves may be cut back a few inches above the soil. New leaves will emerge, and in two to three weeks, a beautiful mass of lush foliage will reappear.

The flowers of lady’s mantle make great cut flowers that may also be dried for floral arrangements. Just like the garden, the chartreuse blossoms are stunning when combined with colors such as blue, violet, or rose.

I have always felt that this plant is terribly underused in American gardens. Its combination of beautiful foliage and flowers are often overlooked. In the gardens of England, where plants bearing mediocre foliage are rarely tolerated, this plant is quite popular. Try one in the sun or the shade. Plant it in combinations or as a border. Just add water and enjoy the sparkling and shimmering of your lady’s mantle.

George Papadelis is the owner of Telly’s Greenhouse in Troy, MI.


At a glance: Lady’s mantle

Botanical name: Alchemilla mollis (al-keh-MILL-uh MOLL-is)

Plant type: Perennial

Plant size: 12-24 inches tall, 18-24 inches wide

Habit: Mounding

Hardiness: Zone 4

Flower color: Chartreuse

Flower size: Clusters of tiny flowers

Bloom period: June-July

Leaf color: Olive green

Leaf size: 4 inches wide

Light: Shade to sun; provide plenty of moisture if in sun

Soil: Well-drained, prefers moist soil

Uses: Specimen perennial; shade plant combinations; edging plant

Companion plants: Hostas, ferns, iris, coral bells, astilbe, many other shade plants

Remarks: Water beads on the leaves for an amazing sparkle effect; leaves have a silky texture; beautiful foliage and flowers; can self-seed in the garden

Filed Under: Plant Focus

  • « Previous Page
  • 1
  • …
  • 35
  • 36
  • 37
  • 38
  • 39
  • …
  • 43
  • Next Page »

Copyright 1996-2025 Michigan Gardener. All rights reserved.