Michigan Gardener

SIGN UP to stay in touch!
We will send you occasional e-mails with gardening tips and information!


Digital Editions

Click on the cover to read now!

  • Home
  • Departments
    • Ask MG
    • Books
    • Clippings
    • Garden Snapshots
    • MG in the News
    • Janet’s Journal
    • Plant Focus
    • Profile
    • Raising Roses
    • Thyme for Herbs
    • Tools and Techniques
    • Tree Tips
  • Garden Event Calendar
  • Resources
    • Alternatives to Impatiens
    • Garden Help
    • Soil and Mulch Calculator
    • Public Gardens
  • Web Extras
  • About
    • About Us
    • Editorial Content
    • Privacy Policy
    • Contact Us

PLEASE NOTE: In the autumn of 1995, we hatched the idea for a free, local gardening publication. The following spring, we published the first issue of Michigan Gardener magazine. Advertisers, readers, and distribution sites embraced our vision. Thus began an exciting journey of helping our local gardening community grow and prosper.
After 27 years, nearly 200 issues published, and millions of copies printed, we have decided it is time to end the publication of our Print Magazine and E-Newsletter.

Lowering the soil pH

March 19, 2010   •   

According to a soil test, I need to lower the pH of my soil. What are the best and safest ways to do that in an area where I want to grow vegetables?

So you’ve decided on a spot for your garden and have an idea of what you want to grow. That’s a great beginning. Wisest of all, you’ve tested your soil, specifically its pH, so you know which plants will grow best in that bed. Most plants prefer a soil pH somewhere between 6.5 and 7.2. The term “pH” comes from the French term pouvoir d’hydrogene which means “hydrogen power.” It is the amount of hydrogen ion concentration in the soil sample that is measured on a scale from 0 to 14; zero being the most acidic, 7 neutral, and 14 the most alkaline. The pH scale is logarithmic, meaning that each number on the pH scale actually represents a tenfold change. For example, a pH of 7 is ten times more alkaline than a pH of 6.

You can lower your soil’s pH (making it more acidic) by adding chemicals such as soil sulfur, iron sulfate or aluminum sulfate, adding an acid-type fertilizer, or by working organic mulches into the soil such as peat moss, oak leaf mold, composted animal manures, sawdust, ground bark, decayed pine needles, or homemade compost among others.

Organic mulches are likely to be your safest pH-adjusting additives. They not only cover and protect the soil, they also release substances that feed earthworms and other helpful soil organisms. These organisms release nutrients into the soil so that plant roots can absorb them.

Filed Under: Ask MG

Pruning azaleas & yews

March 18, 2010   •   

Would you please advise me how to prune azalea bushes and yews. They are very old – I am guessing approximately 45 years, since they were here when we moved in 31 years ago. My husband has always trimmed them using electric shears and has only trimmed the top of the shrubbery, hence, all of the foliage is at the tips with a lot of wood at the center. Can I salvage these shrubs by pruning them back drastically? Will I lose them if I do so?

Shearing your evergreen shrubs will give them a neat, formal appearance, but when done year after year it can create undesirable and unhealthy results. Two different pruning methods are listed below for yews and azaleas. When used for evergreens, these pruning methods are best done before bud break in the early spring.

Renewal Pruning: Best used when shrubs are older and have become overgrown with large amounts of unproductive wood.

Method: Cut off the oldest branches near ground level leaving only productive young stems. If there are only a few young stems, remove the oldest branches over a three-year period. Prune back 1/3 of the oldest branches each year to allow even light penetration for new growth. When new shoots develop they can be thinned back to various lengths, which will develop strong branches.

Cons: More pruning cuts have to be made over a longer period of time.

Pros: Shrubs look aesthetically better during the process. Weakened shrubs have a higher survival rate when using the renewal rather than the rejuvenation method of pruning.

Rejuvenation Pruning: Best used when shrubs are unhealthy and severely overgrown.

Method: Cut all branches 6 to 12 inches from ground level. This is a drastic method and better results are achieved if followed up with proper watering and fertilizing practices.

Cons: If you are pruning a flowering shrub you could lose bloom for 1 or more years. If the shrub has been in decline for several years it may not recuperate.

Pros: Strength and vigor of new shoots are directly proportional to the amount that the stem is pruned back.

General pruning tips:

  • Use clean, sharp pruning tools appropriate for the task.
  • Remove dead, broken or diseased branches any time of the year.
  • Yews are a better candidate for rejuvenation pruning.
  • Azaleas are a better candidate for renewal pruning.
  • Always check the mature size of the shrub before planting; a properly-sized plant will require less maintenance pruning.
  • When shearing your evergreens always continue to make thinning cuts every season to allow for light penetration and inner growth.

Filed Under: Ask MG

Corsican mint for path

March 17, 2010   •   

We recently installed a rock pathway and want to fill the spaces between the stones with “step-able” plants that are low-growing and hardy. We planted some creeping thyme in the sunnier areas. I have seen Corsican mint used for this purpose in shady areas. Do you think it would do alright in southeastern Michigan?

Corsican mint (Mentha requienii) would definitely work and look nice for a very low growing (1/2 to 4 inch tall) ground cover between paving stones. The plant needs partial shade, and rich, moist soil that is well drained. It will not take drought because it is very shallow rooted. When stepped on (it will take foot traffic), it gives off a peppermint fragrance. It has small, light purple flowers in late spring and early summer. It is rated for zones 6 to 9, but many growers say it comes back in zone 5 (southeast lower Michigan). Remember it is a mint and will spread, but it is much better behaved than its relatives. It basically stays in its own area and can be controlled by removing the outside edges that have spread too far.

Filed Under: Ask MG

Plant Focus: Trillium

March 12, 2010   •   

by George Papadelis

For hundreds of years, this plant and its name have been used to symbolize purity, simplicity, elegance, and beauty. The name trillium has graced the marquees of restaurants, country clubs, resorts, software companies, consulting firms, and numerous other businesses. Every spring, many Americans journey into the woods to admire the showiest of our spring woodland flowers.

In Ohio, where all 88 counties have masses of wild trillium, it was selected as the state’s official wildflower. Its flowers have twice graced a U.S. postage stamp. Even our Canadian friends across the bridge have declared white trillium (Trillium grandiflorum) the official provincial flower of Ontario. Other parts of the world share our passionate admiration for this plant. In Europe, where trilliums are not found in nature, gardeners dedicate vast amounts of time and money acquiring them, especially rare species. In Japan, a cult-like interest has developed towards trillium.

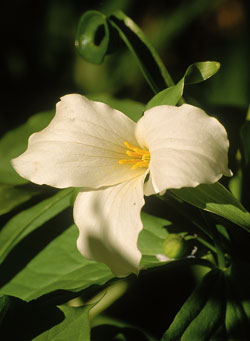
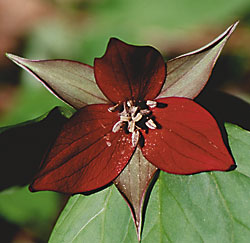
Trillium-erectumJonathon Hofley / Michigan Gardener
Trillium erectum

Trillium species and growing conditions

The most readily available species is Trillium grandiflorum or white wake-robin. This has large, pure white flowers up to 5 inches across. These develop in great abundance throughout the northeastern U.S. Its flowers usually fade to a dull pink and sometimes red. Trillium erectum is a much more diverse species with flowers ranging from red to purple to yellow-green and beige. It also grows wild in the Northeast and Michigan. Trillium luteum is the most common yellow species. It originates from areas around eastern Tennessee. One of its most notable features is the beautiful dark green leaves decorated with pale green markings. The flowers are relatively small. Trillium recurvatum bears maroon-purple to clear yellow flowers with strongly curved petals. Several other species and a few named varieties are readily available. Most trillium grow about 12 to 18 inches tall once established in the garden.

Trilliums are North American and Asian natives that typically thrive in moist, woodland settings where rich, acidic soil is prevalent. Gardeners with some shade can create this type of soil by incorporating organic soil amendments such as aged pine bark, sphagnum peat moss, leaf mold, composted manure, or compost. During dry spells, plants may require some supplemental watering.

Trilliums typically bloom in late April or early May when dozens of perennials and bulbs are available as companions. Several spring-flowering bulbs will tolerate shade, and a few flower at the same time as trilliums. Try trilliums with daffodils, tulips, Siberian squill, grape hyacinths, summer snowflakes, glory-of-the-snow, and Anemone blanda. Pansies and violas planted the previous fall or in early spring will offer the largest color range to coordinate with your trillium flowers. Early May-blooming perennials for shade include Anemone sylvestris, foamflower (Tiarella), fern-leaf bleeding heart, leopard’s bane, and the beautiful blue-flowering perennial forget-me-not (Brunnera macrophylla). Several other woodland plants such as woodland phlox (Phlox stolonifera) and yellow dogtooth violets (Erythronium canadensis) should also be at peak bloom.

How trilliums grow

As gardeners, many of us have developed questions about growing this somewhat mystical plant. It doesn’t help that the typical nursery only sells tiny, flowerless plants that show little promise of ever coming to fruition. Perhaps the most important aspect of appreciating this plant can be expressed in one word: patience. The small plants available through nurseries are much more durable than they appear. Most species will eventually develop into clumps of flowers that are quite persistent even in less than perfect conditions. This clumping process often takes 2 to 4 years. At least it’s faster than growing them from seed. If the seed germinates, it may take as long as 10 years to bloom.

Another perplexing aspect of growing trilliums is the short period of time plants are visible in the garden. The “root” of a trillium is really a sort of underground stem called a rhizome. This rhizome stores food all winter until temperatures rise in spring. In early May, the rhizome sends up branches that typically support three leaves and a single three-petal flower. The short time during which leaves are present is the plant’s only chance to gather energy from the sun. Therefore, picking trillium flowers and leaves will diminish the plant’s ability to produce food. It won’t kill a healthy plant, but frequent picking will eventually reduce flowering. The number of flowering branches depends on the age of the plant, the size of the rhizome, and the overall energy stored in the rhizome.

Next comes the strange part. Just a few weeks after blooming, the branch and leaves wither away with no visible signs of life. The rejuvenated rhizome will await winter dormancy, which is mandatory for next year’s bloom production. Many woodland plants and spring-blooming bulbs (i.e. tulips, daffodils, crocus, etc.) enter an early-summer dormancy. These plants, like trilliums, are described as spring ephemerals. If you are thinking of shopping for a potted trillium in summer or fall, visually evaluating a plant’s vigor is almost impossible. However, a gentle probing of the soil to locate a firm, sleeping rhizome should do the trick.

Finding and purchasing trilliums

Some trillium species are considered threatened or endangered. These trillium cannot be collected from the wild under any circumstances. All other trillium in Michigan are protected as follows: The only way these can be collected is by owning the land from which they are harvested, acquiring a permit to collect them from the Department of Natural Resources, or by acquiring a bill of sale from the property owner. All trillium located in National Forests are also not collectible.

trillium-grandiflorumJonathon Hofley / Michigan Gardener
Trillium grandiflorum
Since it is legal to collect unthreatened and unendangered trillium that are located on your own land, “nurseries” can own land from which they may legally collect wild trillium. Fortunately, responsible commercial collection of trillium has had little effect on most species. Most trillium have developed stable masses in their natural habitats, and more and more nurseries are offering wildflowers that are propagated on site. As gardeners and stewards of our environment, we should seek out these sources and avoid plants that are illegally collected.

The biggest two concerns for the sustenance of trillium populations are animal grazing and urban development. Repeated grazing from deer can eventually weaken plants and wipe out large areas. In regions where deer populations have increased, trilliums have often disappeared. A deer repellent would be a wise investment if deer browse in your trillium bed. In cases where a plant’s habitat is limited, populations are also suffering from commercial development. Clear cut lumbering and urban sprawl have an enormous impact on all wildflowers. In cases where development is unavoidable, the proper agencies should be contacted to save important plants. A great source of trillium is one that has a permit to rescue plants that would otherwise fall victim to bulldozers.

Trillium are available from many garden centers as spring-flowering plants in small containers. These can be treated just like any other perennial. More and more retailers are selling them packed in plastic bags with some peat moss. Make sure the rhizomes are firm and try to plant them before the leaves emerge. Bury rhizomes horizontally about 2 to 4 inches deep in the moist, rich soil that most woodland wildflowers love.

Remember to be patient—good things come to those who wait. In time, your little plant should form colonies that you and your garden’s admirers will enjoy for years to come.

George Papadelis is the owner of Telly’s Greenhouse in Troy, MI. Fred Case and Tony Reznicek also contributed to this article. A portion of this article was excerpted from the book “Trilliums” by Fred Case and Roberta Case, published by Timber Press.

At a glance: Trillium (TRILL-ee-um)

Plant type: Perennial

Plant size: Most are 12-18 inches tall and 12 inches wide

Habit: Clump-forming

Hardiness: Most are zone 4 or 5

Flower color: White, red, pink, yellow

Flower size: Up to 3 inches wide

Bloom period: Late April to early May

Leaf color: Green, sometimes mottled with pale green, dark green, or maroon

Leaf size: Up to 8 inches long and up to 6 inches wide

Light: Dappled shade to shade

Soil: Moist but well-drained, rich in organic matter

Uses: Woodland garden, shady border

Companion plants: Spring-flowering bulbs (daffodils, tulips, grape hyacinths, etc.); spring-flowering perennials (foamflower, fern-leaf bleeding heart, perennial forget-me-not, woodland phlox, etc.)

Remarks: Patience is a must—trilliums take time to become established; the plants go dormant in summer (stems and leaves naturally wither away)

Filed Under: Plant Focus

Organic solutions for the lawn and garden

March 10, 2010   •   Leave a Comment

by Steve Turner

There seems to be a growing trend toward using organic products versus manmade, synthetic products in the garden industry. Today, many consumers are more educated and aware of the benefits of more natural solutions to common garden problems, rather than to rely on the quick fix of a synthetic product. Chemical companies are responding by offering more eco-friendly products than ever before. When you walk into a garden center you will find a host of newer products to help control insects and diseases right next to the old standbys. Some synthetic pesticides are being phased out due to increased government regulations and others are not available to homeowners anymore.

So how do you know what to buy for your problem and does it really work? And is an organic product really safer? First of all, there seems to be a misconception that all organic products are safe. While in most cases this is true, keep in mind that the definition of “organic” denotes a compound that contains a carbon molecule. Arsenic and lead meet this definition and yet are very toxic to humans. You still need to read the product labels, use the products as directed, and follow the safety procedures—organic or not.

Toxicity is measured in how many parts per million of a substance it takes to be toxic to humans. Table salt can be toxic to humans if enough is digested at once. A product that has a low toxicity means that it will take a lot more exposure to that product to have negative effects than one with a higher toxicity level. Most organic products will do what they are labeled for if applied properly. Some might need to be applied more frequently than synthetics because they break down quicker. Others will out-perform synthetics because of their ability to be absorbed by the plant and to have a longer residual effect.

Common organic products and their uses

Garlic oil – Garlic works by repelling insects, not killing them. It is mixed with water and sprayed on plants, and is absorbed into the leaf tissue where it can remain effective for up to 30 days. It works well at repelling mosquitoes, bees, flies, ants, spider mites, and other flying insects. Do not use on plants that need bees to pollinate them, i.e. vegetable gardens.

Neem oil – Derived from the neem tree, neem oil has many medicinal purposes and is well-known for its natural resistance to insects. It works by repelling insects, prohibiting eggs from hatching, and interfering with insects’ molting process. It works against a wide variety of chewing and sucking insects. It also has anti-fungal and anti-bacterial properties that can fight disease. Effective on blackspot for roses and white flies.

Chile extract/Mustard oil – Kills on contact and repels nematodes, fungi, insects and slugs. Works well on grubs and harmful nematodes.

Pyrethrins – This extract is from the chrysanthemum plant and is used in many products. It works by killing insects on contact. It has a low toxicity to humans and animals, and controls a large variety of insects. A common ingredient in flea collars.

Diatomaceous earth – Ground up seashells. Harmless to humans, works because its abrasive form breaks down an insect’s outer defense and then causes desiccation due to its highly absorbing qualities that dry up an insect’s bodily fluids. Ants, cockroaches, plant bugs, aphids, caterpillars and many more.

Beneficial nematodes – Work by attacking grubs and other insect larvae in the ground. They are a parasitic organism that can survive for many years in the soil without a food source. They work very well against grubs and black vine weevils.

Fish oil – Works by suffocation, just like horticultural oils. The advantage is that it is not petroleum-based and it contains many beneficial nutrients and vitamins that break down to fertilize the plant.

Petroleum-eating microbes – Great for accidental gas or oil spills on property. These microbes actually eat petroleum products and convert them to harmless carbon molecules.

Citric acid/Mint oil – Anti-fungal and anti-bacterial. Can be used against a wide variety of pathogens including Phytophthora.

Grapefruit seed extracts – Anti-fungal and anti-bacterial. Can be used against a wide variety of pathogens. Works as a barrier preventing diseases from getting started on plant foliage.

Hydrogen peroxide – Kills fungus on contact, literally melts the spores into jelly, then breaks down in the soil and releases oxygen. Works well on powdery mildew. A disadvantage is that it is very corrosive to metal.

Pepper sprays – Can kill some soft-bodied insects like aphids and is used to repel others. Also used to deter rodents and deer from gardens. Can be an extreme irritant to skin and eyes.

Milky Spore – A fungus that attacks grubs. Works well and has a long residual in the soil. Works so well that the company almost went bankrupt due to the lack of need for repeat sales in the 1950’s.

Mycorrhizae – A soilborne fungus that colonizes the roots of plants and prevents many soil pathogens from attacking the plant they are growing on. Works well against fusarium blight on lawns and many others. Great for preventing disease in seedling production.

Steve Turner, Certified Arborist, is from Arboricultural Services in Fenton, MI.

Filed Under: Tree Tips

Plant Focus: Glory-of-the snow (Chionodoxa)

March 9, 2010   •   

by George Papadelis

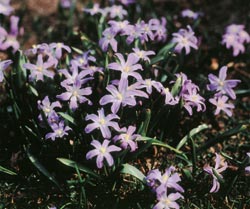
Chionodoxa-luciliaewww.bulb.com
Chionodoxa luciliae
As spring approaches, gardeners seek the familiar signs of yet another growing season. Even before trees produce their leaves and the spring equinox arrives, the garden can be alive with color from early blooming bulbs. In February, some warming can bring up an occasional flower or two, but by March, color is almost guaranteed through the planting of crocus, snowdrops (
Galanthus), or glory-of-the-show (Chionodoxa).

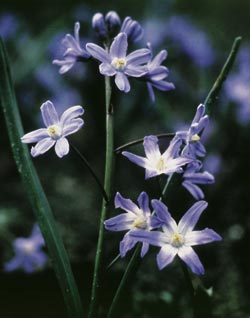
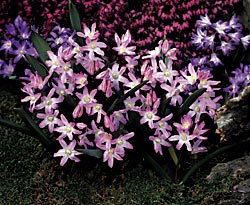
By late March (sometimes early April), glory-of-the-snow produces 6 to 10 one-inch wide, single flowers that last 3 to 4 weeks. Besides their vibrant color, these starry flowers are unique in that each blossom has a distinct white center. The species Chionodoxa forbesii (formerly C. luciliae) has glowing blue flowers, while the variety ‘Pink Giant’ has rosy-pink blooms. Both grow 6 to 10 inches tall. Since the flowers are small, a planting of 20 to 50 bulbs would provide the best show. This is also economically practical since the bulbs are usually inexpensive.

Chionodoxa-giganteawww.bulb.com
Chionodoxa gigantea
Glory-of-the-snow is very easy to grow and amongst the hardiest of all bulbs. Only well-drained soil and some sun are required for good performance. Bulbs should be planted with bulb fertilizer in the fall about 3 inches deep and 3 to 4 inches apart. Glory-of-the-snow self-sows and divides itself very freely to form self-sustaining clumps that may last effortlessly for years. However, best results occur if the younger bulbs or “offsets” are dug up in May and replanted with fresh soil, fertilizer, and adequate space. 

The only pest problem may be a hungry squirrel looking for a freshly planted snack. If this is a threat in your garden, some chicken wire buried above the bulbs usually does the trick.

Plant glory-of-the-snow in clumps around trees, in the rock garden, or even in your lawn. It works wonderfully alone or in combination with other spring-blooming bulbs. Later-blooming bulbs such as tulips can also be placed in the same planting hole since they require deeper planting depths of 6 to 10 inches. Glory-of-the-snow thrives in woodland situations if tree leaves are shredded, mulched, or raked off to assist them in spring emergence.

Chionodoxa-Pink-Giantwww.waysidegardens.com
Chionodoxa ‘Pink Giant’
This tiny spring treasure is a must for any garden because of its versatility, performance, and durability. Try it almost anywhere! Just a few minutes of digging in the fall will allow glory-of-the-snow to grace you with its presence for many years to come.

George Papadelis is the owner of Telly’s Greenhouse in Troy, MI.


At a glance: Glory-of-the-snow 

Botanical Name: Chionodoxa (ky-on-oh-DOK-suh)

Plant Type: Bulb

Plant Size: 5-10 inches tall

Flower Color: Rich blue with white centers (most common); also pink, white

Flower Size: 1 inch wide

Bloom Period: Late March – Early April

Leaves: Narrow, upright sprays

Light: Sun-light shade

Soil: Well-drained

Hardiness: Zone 3

Uses: Border, woodland areas, rock garden, nauralizer, lawn

Remarks: Plant in the fall, 3-4 inches deep

Filed Under: Plant Focus

Learn more about bees

March 4, 2010   •   

What’s the story with bees? Are they in decline? How important are they to our world and our food supply?

Join CityBees/Detroit at their first conference, All About Bees, at the Detroit Waldorf School on Saturday, March 6. Whether you are just curious about bees, want to get past your fears and phobias, are a novice or even an experienced beekeeper, this conference is for you. All About Bees will feature presenters from across the Great Lakes region, US and Canada.

For more information, visit the website of City Bees Detroit.

Filed Under: Clippings

Watering with natural mineral water

March 2, 2010   •   

Cost aside, is there any benefit to occasionally adding natural mineral water when watering houseplants or outdoor container plants? I recall that gardeners in Europe do so because it mimics rainwater. I have also heard pros and cons on using distilled water, such as from a dehumidifier, for potted plants.

The best type of water for houseplants is rainwater or melted snow. Distilled water can be used but you may be deterred by the cost and work carrying the jugs into the house. Tap water (well or city) is generally suited for most plants. The water should stand overnight in a container to allow it to lose some of the chlorine. Also, it is best if the water is at room temperature. Both hard and soft water can be harmful to your plants as they can contribute to a build-up of excessive salts in the soil. Hard water contains salts of calcium, magnesium and iron. Plants use these salts in very small quantities but, in large amounts, they become toxic. Softened water is even less favorable because the softening process exchanges calcium salts that have no use. In short, save your money and collect that rain or snow – it’s free.

Filed Under: Ask MG

Suckers on crabapple trees

March 1, 2010   •   

I have noticed that some crabapple trees have suckers and some don’t. I’m guessing that certain types are more likely to have them than others. I’m talking about the shoots of growth that come from the base of the trunk and sometimes come from the roots out away from the trunk. I have been told that there is nothing that can be done to prevent these suckers and the only thing that you can do is cut them off. I have also heard that cutting them only promotes more growth and they should be torn off. I have a great-looking crabapple, but it grows many suckers and some of their bases have become so thick over the years that they are difficult to cut and impossible to tear off. The reason I’m asking is because this tree needs to be removed from its current location. I hate to just cut it down, but it seems like there are always suckers that need to be removed. If I have it moved to another location, is there anything that can be done to prevent or reduce the number of suckers?

You might not realize that flowering crabapple trees are nearly all self-sterile. One way they are propagated is through grafting soft “whip” to a winter-hardy rootstock. Those rootstocks are what cause the suckers. Older rootstock selections were bred primarily to withstand Michigan winters. Hardiness was of prime importance to the fruit grower.

However, over the last 40 years, there have been substantial improvements in rootstocks that not only produce good root systems and are easy to transplant, but are relatively sucker-free. These are the Malling rootstocks, developed in England, and are used extensively by nursery growers today. Your crabapple may pre-date the use of the Malling series.

Another factor is how heavy your crabapple has been pruned over the years to maintain its pleasing appearance. A rootstock more prone to producing suckers will respond to hard pruning with a veritable army of soldier-like sprouts. The plant’s response is to send up as many opportunities as it can to regain leaves which produce its food. This response could be accentuated if the hard prune was done in early spring instead of late winter when the plant would be at its dormant best. Actually, stimulating root suckers, or “stooling,” is one of the ways new multiple rootstock plants are created.

It appears the heritage of your rootstock is the primary source of the problem, and unfortunately, you cannot change that. Since the tree must be moved from its current location, it might be better to remove it completely and replace it with one of the newer cultivars developed on one of the improved Malling rootstocks. If you are especially fond of this tree, you could also have a certified arborist, knowledgeable about grafting, take a softwood cutting and graft it to an improved rootstock that will not produce a sucker response to every pruning. (There are also products currently available on the market containing growth hormones which can be used to help control sprout and sucker growth on woody ornamentals.)

However, if you choose to replace the tree with a variety similar in height, blossom color and fruit, seek out a reputable nursery and specifically ask about the rootstock they use. With the tremendous number of cultivars available, there will certainly be a crabapple that mimics the look of your old one, but with none of its aggravating attributes.

Filed Under: Ask MG

Removing or controlling creeping bent grass

February 28, 2010   •   

Please provide advice on the riddance or control of creeping bent grass.

Creeping bent grass (Agrostis palustris), possibly your bête noire unless you tend a golf course putting green, is an invasive perennial grass. Thin, flat, and rough edged, this creeping native plant spreads through coveted bluegrass lawns by stolons (creeping stems) and by seeds. Small circular green patches in your lawn are the first signs of this invasive problem. As the stolons weave larger, more numerous, and denser verdant mats in your lawn, fewer bent grass roots grow in the soil. Thirsty for moisture during long hot summers, the green patches die and turn brown. Seeds from bent grass’ lily-of-the-valley-like seed heads scatter through the lawn every time it’s mowed. High humidity from frequent watering traps the seeds between bluegrass blades, keeping the seeds alive until they root and form new patches.

Ridding your lawn of bent grass takes time and patience. Small patches of creeping bent grass can be pulled or dug, taking care to grab as many of the roots and stolons as possible. This process should be repeated weekly or biweekly, otherwise remaining roots may sprout and cause further problems. Don’t put bent grass in your compost pile until it has first dried in the sun.

Spot treating with glyphosate (Roundup), a non-selective herbicide, can also control actively growing bent grass. Areas treated with glyphosate may be re-seeded seven days after you’ve applied the chemical. Remember, though, glyphosate will kill or damage all green plants it touches, including desirable lawn grasses and garden plants. (Herbicides that differentiate between types of grasses are not currently available to homeowners.)

Filed Under: Ask MG

  • « Previous Page
  • 1
  • …
  • 27
  • 28
  • 29
  • 30
  • 31
  • …
  • 43
  • Next Page »

Copyright 1996-2025 Michigan Gardener. All rights reserved.