Michigan Gardener

SIGN UP to stay in touch!
We will send you occasional e-mails with gardening tips and information!


Digital Editions

Click on the cover to read now!

  • Home
  • Departments
    • Ask MG
    • Books
    • Clippings
    • Garden Snapshots
    • MG in the News
    • Janet’s Journal
    • Plant Focus
    • Profile
    • Raising Roses
    • Thyme for Herbs
    • Tools and Techniques
    • Tree Tips
  • Garden Event Calendar
  • Resources
    • Alternatives to Impatiens
    • Garden Help
    • Soil and Mulch Calculator
    • Public Gardens
  • Web Extras
  • About
    • About Us
    • Editorial Content
    • Privacy Policy
    • Contact Us

PLEASE NOTE: In the autumn of 1995, we hatched the idea for a free, local gardening publication. The following spring, we published the first issue of Michigan Gardener magazine. Advertisers, readers, and distribution sites embraced our vision. Thus began an exciting journey of helping our local gardening community grow and prosper.
After 27 years, nearly 200 issues published, and millions of copies printed, we have decided it is time to end the publication of our Print Magazine and E-Newsletter.

Grow and eat your own spinach for good health

January 13, 2011   •   

This is the time of year to start thinking about what to grow in your vegetable garden this summer. If you’re considering spinach, this informative piece from the National Garden Bureau is a must-read.

Forget Popeye! Spinach contains many more nutrients than just iron. Actually, the amount of iron in spinach comes way down the list after vitamins A and C, thiamin, potassium and folic acid (one of the B complex vitamins). Dark green leafy vegetables, like spinach, contain lutein and zeaxanthin, both carotenoids. Studies show carotenoids help your eyes stay healthy as you age by preventing macular degeneration and the formation of cataracts. Vitamins A and C, both antioxidants, keep your cardiovascular system healthy, thereby reducing the risk of strokes and heart attacks. Folic acid is essential for the production of red blood cells and for normal growth, and may reduce the risk of certain cancers. It’s particularly important for pregnant women.

Read more…

Filed Under: Clippings

Fill bleak days with beautiful blooming bulbs

January 12, 2011   •   

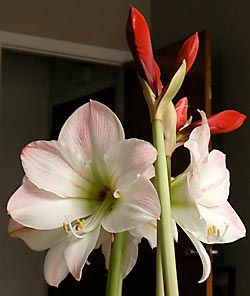
Flickr / Steve Drolet
An apple blossom amaryllis in bloom.
There is no better way to brighten your home during winter than growing some bulbs indoors. Here’s a good story from nj.com to get you started:

After the Christmas tree comes down and the wreaths are tossed, a long spell of bleak days looms ahead with nary a hint of green in sight. Fill the void with winter’s brightest bulbs and you won’t have to pine for vibrant, living color.

The key species for winter bloom are two showy flowers: amaryllis and paperwhites narcissus. Both are easy-to-grow windowsill plants offering quick, if not instant, gratification. Delicate paperwhites can bloom in as little as four weeks and gaudy amaryllis in six.

Unlike familiar spring-flowering bulbs, including tulips, daffodils and hyacinths, these two species don’t require a long period of cold temperatures to trigger bloom. Native to regions of the Southern Hemisphere, they are programmed to flower on an upside-down schedule in our winter months.

Read the rest of the story about indoor bulbs at NJ.com

Filed Under: Clippings

Flint gardeners growing greens this winter

January 11, 2011   •   

Interesting story from mlive.com about two enterprising Flint gardeners that are doing their part for job creation and urban renewal with their commercial startup:

Urban gardening projects have been sprouting all over the city, but one new project may be the city’s most visible, even before a single seed has been planted.

A massive hoop house — a kind of greenhouse that uses a plastic covering to hold in heat from the sun — now stands covered in Christmas lights on a plot of land off Court Street just west of Miller Road.

Read the rest of the story here…

Filed Under: Clippings

Considering organic seeds in 2011?

January 11, 2011   •   

Organic is still a hot topic these days but organic seeds are not always easy to find in stores. Seeds of Change, the oldest and largest organic seed company in the U.S. has just released their 2011 catalog. Included are many new introductions including Blush tomato, Torreto Romaine lettuce and Tirreno Italian melon. Find out more on their website.

Filed Under: Clippings

Planting and taking care of sweet peas

December 31, 2010   •   

At a garage sale last summer I bought some seeds called “Hungarian peas.” It is some kind of a vine, but I am not sure when I can plant it or how to take of it. Please help.

Your question is a little like getting a 1000-piece jigsaw puzzle to construct without a picture. Because the plant produced a fruit from which to collect seeds, and the seller thoughtfully labeled them “peas” and told you it was a “vine,” they are likely in the legume family (Leguminosae). This is a huge family of plants, but to illustrate our proposed method of handling this situation, let’s assume that they are a variety of sweet pea (Lathyrus odoratus, L. latifolius or L. grandiflora).

Sweet peas can be annuals (L. odoratus) or perennials (L. latifolius, L. grandiflora). Sweet pea vines can grow pleasantly over any support structure (fence, hedgerow, trellis, arbor) providing mildly fragrant blooms in early summer, and produce a pea-like seed pod in late summer or early fall. An annual will die back completely in winter, but a perennial will re-sprout the next spring. You could have either since seeds can be collected from both types for propagating. You will need to watch the plant for a full year to see if the main plant returns. I suggest planting these mystery seeds in an area with 4 to 6 hours of sun per day, moderately fertile soil, and provide some kind of support structure. Locate the seed planting in an area that will not invade other plant material until you have witnessed its growing habits. Most perennial sweet peas are tolerant of dry soils, while annuals prefer a more humus-rich soil. Although the preferred time to plant perennial sweet peas is autumn, you might want to plant yours now to get it established and see what happens. It’s always fun to take a chance; you could be quite pleasantly surprised.

Filed Under: Ask MG

Seeking tips for growing cauliflower

December 30, 2010   •   

I am growing cauliflower for the first time this season. Someone recommended that I tie the leaves together to help the heads develop. Is this correct, and if so, why and what is the proper way to do this?

Cauliflower is a cool season vegetable. It is a crop that is exacting in both its soil and climatic requirements, and should have uninterrupted growth. Any delay in growth will encourage the plants to prematurely form a small head that is of no value. In order to avoid this, the soil should be high in organic matter so that it will hold a lot of moisture. Cauliflower demands a fertile, sweet soil so be sure the pH is about 6.5.

Sow the seed 6 weeks before the plants are to be set in the garden. Cauliflower plants should be about 6 weeks old when set out, and you can figure 3 to 4 plants per person per year. These plants are grown the same way as cabbage. Set the plants 18 inches apart in the row and have the rows 30 inches apart. In the spring, set out the plants about 10 days after it is safe to set the earliest cabbage. Water the plants when transplanted to prevent wilting. Severe shock to plants at transplanting time often causes poor head development. Watering the plants with a starter solution, such as compost tea, is helpful. For best development cauliflower must have a large amount of available nitrogen. This is best supplied by making at least three side-dressings with a nitrogen-rich fertilizer. Make the application on top of the ground, 3 inches out from the plant. A circle around each plant is a good method if only a few plants are grown in the home garden. Cultivate only to control weeds and then be sure that the cultivation is very shallow.

In order to be good, cauliflower must be kept snowy white. Do this by tying the leaves together over the heads in order to blanch them. This tying should be done when the heads are slightly smaller than a doorknob. Tie the leaves that grow around the head so that they fully cover it, and prevent sunlight from reaching the head. Be sure to do this before any sunlight gets to the heads. They should be examined from time to time to see when they are ready to cut. If they are let go too long, the heads get loose and lose much of their tenderness. It will usually be about one week from the time they are tied until they are ready to use. There are cauliflower varieties that are said to be self-blanching, but tying is still recommended.

Filed Under: Ask MG

Where did my wild roses come from?

December 29, 2010   •   

I have wild roses growing in the area where I planted quince bushes 5 years ago. I never have planted wild roses and neither have my adjacent neighbors. How would these wild roses be growing there? Stray seeds? Would the quince plants have been grafted onto wild rose roots?

I suspect the wild roses (Rosa multiflora) came to your yard by way of birds dropping seeds from the rose fruit or “hips.” Your next-door neighbors don’t need to have wild roses for the birds to find the tasty 1/4-inch fruit, which appears in August through winter. They then travel to the densely protective, shrubby nature of your quince to enjoy their meal. The fruit’s small size makes it great “take-out” bird food. Because both Rosa multiflora and quince are in the rose family (Rosaceae), they flourish in similar growing conditions and share a number of plant attributes. The named cultivars of flowering quince (Chaenomeles speciosa) are propagated by softwood cuttings, dipped in root stimulus compound, and planted in peat-perlite mix. Seed collection from named varieties is also a means of propagation for quince, but grafting is not.

Filed Under: Ask MG

When should I uncover my roses in the spring?

December 28, 2010   •   

When do I uncover my roses in the spring? I have rose cones on some and mounds of soil around the base of others. Also, does it depend on the type of rose it is?

The type of roses you have determines if winter protection is required. Many species roses, shrub roses, old roses, miniatures, and climbers, as well as some of newer hybrid teas and floribundas need little protection. Since you indicate they are all protected in one fashion or another, I will assume they are varieties non-hardy to zone 5. That being said, you do not want to uncover protected roses until any chance of hard frost is past – in Michigan we can have frost until Mother’s Day. Rose cones can be removed on sunny, warm days to prevent moisture accumulation inside. Check from time to time for new growth at the base and uncover the plant slightly as new growth appears, but be prepared to cover (at least lightly) in the event frost is predicted. Prune away winter-killed canes to healthy wood when the winter protection is removed for the season.

Some general rose culture notes to keep in mind: In southeastern Michigan, grafted roses should be planted with their bud union 4 to 6 inches below the ground surface. Roses grown on their own root stocks are typically hardier than grafted ones. Many roses have been developed that are quite winter hardy and do not need protection much past their first year. Good cultural care is also important for winter hardiness. Adequate water and fertilizer throughout the growing season combine to produce healthy plants that better withstand Michigan winters. Finally, roses should not be pruned after September 1 in order to allow the plants to properly harden off.

Filed Under: Ask MG

When should I prune my clematis?

December 27, 2010   •   

We moved into a new house last spring, and there is an old clematis vine scrambling up and along a fence. It bloomed fairly well last year, but it looks to me like it needs some pruning – it has some pretty scraggly-looking sections in it. I don’t know what variety it is. How and when should I go about pruning it?

Clematis can be a confusing group of plants to prune, since they vary in flowering times, and therefore are not all pruned the same way. They are generally divided into three categories: clematis that flower in spring require little pruning (pruning group 1); those that flower in early summer require light pruning (pruning group 2); and those that flower from midsummer onward require hard pruning (pruning group 3). Without knowing which category your plant falls into, you may want to just do some renovation pruning this year, by removing most of the old, scraggly-looking growth, and retaining a few good long shoots. These may need fanning out and retraining, but your clematis should flower at some point during the summer, helping you to identify which group it belongs to.

Group 1 or spring-flowering clematis bloom in April and May from buds produced during the last growing season. Prune these plants immediately after blooming, but no later than the end of July in order to give the plant enough time to produce new buds for next year. Start by removing shoots that have bloomed; the only other pruning you will have to do is to remove any weak or damaged stems, or to control the size of the plant.

Group 2 clematis are the large-flowered hybrids which bloom in mid-June on stems from the previous season and often will bloom again in late summer on new growth. Remove dead or weak stems in late winter or early spring, leaving the best of last year’s buds. Once they finish blooming, deadhead all flowering stems or cut the plant back to 12 to 18 inches to force new growth for a second round of flowers.

Group 3 is made up of the late-flowering clematis, whose flowers are produced on the current season’s growth (these are the easiest to prune). In early spring, cut the plant back to 24 to 36 inches. Once the young shoots have grown to about 12 inches, prune half of them back to encourage more new shoots that will bear their flowers later than the first.

Filed Under: Ask MG

What should I do with iris foliage?

December 26, 2010   •   

I have heard different opinions on how to treat iris foliage. Some say to cut it down after flowering, and others say to leave it. Which is correct?

Unlike most spring bulbs, bearded iris don’t require a period of cold to produce blossoms. They are also extremely drought tolerant – good for areas with little or no summer rains. Bearded irises are not actually bulbs, but rhizomes – a kind of thick brown root. The rhizomes need plenty of sun to bloom well and regularly. They do best in well-drained soil. To plant a rhizome, dig a large hole, fill the center with a mound of soil and set it on top. If planting in the fall when dormant, cut back existing roots to about three inches. Iris planted in the spring should have their roots fanned out around the sides of the mound. The rhizome itself should sit at about ground level. Growers differ as to whether it is best to cover the rhizome completely with a light layer of soil or to leave the tops a bit exposed.

Irises multiply out from the center, which gradually becomes dry and dead. Every three to four years, they need to be dug up, divided into new plants and replanted to provide the most flowers. Cut off dead blossoms and dead bloom stalks when the iris has stopped flowering, but don’t cut back the leaves until they begin to turn brown in the fall. The leaves are needed to produce next year’s blooms.

A common problem is the iris borer, one of the most destructive insect iris pests. Females lay their eggs on old iris leaves and other plant material in the fall. These eggs spend the winter on leaves and hatch in April or May. Cutting iris leaves back to a four-inch fan and removing other garden refuse during the fall can save iris plants from serious damage next season. Feed your irises a teaspoon of bone meal every fall and when you replant. You can feed again a month before they bloom if you like, but they are quite tolerant of just one feeding.

Filed Under: Ask MG

  • « Previous Page
  • 1
  • …
  • 12
  • 13
  • 14
  • 15
  • 16
  • …
  • 43
  • Next Page »

Copyright 1996-2025 Michigan Gardener. All rights reserved.